Technical Heater Matrix Repair/Replacement.

Currently reading:
Technical Heater Matrix Repair/Replacement.

Joined
Mar 27, 2004
Messages
13,622
Points
2,047
Location
West Cumbria
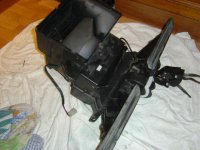
Ok what are the symptoms of a Heater Matrix Failure.

1. Loss of coolant (can be very slow almost un-noticable)
2. Even though the hot air is directed to the windows they still steam up (they will even cause clear windows when the car is first entered to steam up)
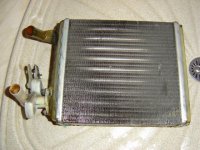
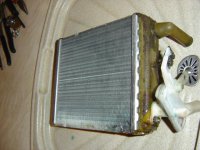
3. Leaking of Coolant round the airbox where the origin cannot be found as it will come from under the airbox.
4. Wet carpets (disgusting I know but coolant is very sweet so if you taste it you will be able to tell the differance between coolant and a normal window/roof leak)

The reason for wet carpets is the coolant is blown from the airbox tunnel to the floor vents which makes it's way under the carpet.

Tools required are minimal...
Phillips & flat blade Screwdriver
10 & 13mm socket
8mm spanner for the battery contacts
Pair of grips for the Wiper nut.

That's it.

First of all TAKE YOUR TIME as this can be fiddly and if you use force you will ruin the controls (I've already made that mistake).

The first job is to remove the dash Three phillips screws underneith and one at each side 5 in all, then remove the heater control rubber knobs or whatever you call them they just pull off & remove the outer dash cover (dont forget at this point before pulling to remove the wiring to the blower switch and the heater control bulb)

Next remove the two phillips screws for the clock and uncilp the wiring.

Next Just below there is a plastic vent with a rubber seal remove this, it should just pull away.

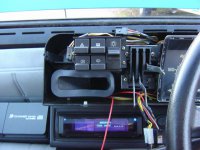
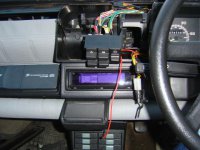
Next remove the 4 phillips screws that hold the switch cluster and move to the side there is no need to disconnect any wiring.

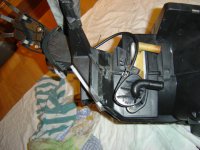
Now you will see the 4 Large phillips screws that hold the heater controls in place, remove these.

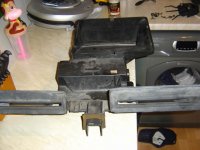
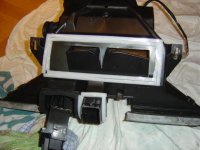
See the pic below (although the heater controls are not shown (as my unit had been removed at this time) your dash will look something like this).
 

Attachments

  • Heater13.JPG
    Heater13.JPG
    73 KB · Views: 553
Last edited:
Now all the outer work needs to be carried out.

Pop the bonnet but don't raise it at this time.

Remove the wiper arm and the plastic nut holding the spindle.

Now raise the bonnet.

Next Remove the battery by taking off the 13mm nut on the plastic retaining clamp then the -ve & +ve terminals thay should be 8mm nuts.

Next remove the rubber strip going accross the bulkhead.

Next remove the Phillips screw holding the insulation to the airbox on the nearside at the back. To remove the bulkhead insulation you will have to remove the drain pipes attached to the two window vents, the insulation can now be eased off, again take your time as the insulation can be easilly ripped if force is used. Also remove the plastic backing cover just above the airbox behind the intake box.

Now time to remove the whole wiper unit, this is held in place by two 10mm bolts and large washers and the nylon nut on the spindle which you have already removed....Remove the 10mm bolts and disconnect the wiring then tease out the spindle by pushing down and at an angle.

It's now time to start on the Airbox itself.
 
At the drivers side of the airbox are two heating pipes one above the other remove them by undoing the jubilee clips with a 7mm socket or flat blade screwdriver.

Next unplug the Fan/blower 3 pin wiring plug which will be next to or near where the wiper unit was removed, the wiring should have a green plastic shroud.

Next remove the two 10mm nuts on the bulkhead either side of the Airbox....you are almost ready to remove the Airbox but first for better clearance remove the engine Airfilter box again with 10mm socket.

Removing the Airbox is now simple but care must be taken. Standing at the front of the car pull gently towards you and upwards at the same time.....If you have someone with you they can ensure looking from inside the car that the control levers are not sticking as you do not want to force them out the odd little rock may help and it will come out as a complete self contained unit as shown below.
 

Attachments

  • Heater4.JPG
    Heater4.JPG
    60.6 KB · Views: 330
Last edited:
The Airbox cover is in two parts upper and lower and held in place by spring clips, they can mostly be removed by hand but the odd stubborn one can be removed by a flat blade screwdriver.

Next remove the matrix cable the cable is held in place by one phillips screw and the cable wire by either a small screw or 2mm hex allan nut.

Finally remove the cable for the front intake vent the cable just slips off but you also need to undo the phillips screw holding the cable in place before the Airbox cover can be split.

Gently seperate the cover and this is what you will now see.......

I also found that the upper part of the cover was split (bottom pic) :( so had to source that as well.
 

Attachments

  • Heater23.JPG
    Heater23.JPG
    65.1 KB · Views: 339
  • Heater16.JPG
    Heater16.JPG
    59 KB · Views: 268
  • Heater25.JPG
    Heater25.JPG
    70.5 KB · Views: 240
I bought a new matrix for replacement but as I had the other problems I bought a parts car complete and returned the new matrix (after having pressure tested the second hand one) The parts car was cheaper than just the new matrix :eek:

Having removed the second hand unit I noticed that all the foam seals were in a bad way so replaced those seals with draught excluder.

The fan from a later car also had a different fan plug so used my original fan which I know works perfectly.

My knacked matrix with slightly different control mechanism is shown below(bottom pics)

All was cleaned and the unit is now ready to be replaced......To be continued.
 

Attachments

  • heater19.JPG
    heater19.JPG
    93.8 KB · Views: 227
  • Heater18.JPG
    Heater18.JPG
    74.2 KB · Views: 234
  • Heater3.JPG
    Heater3.JPG
    59.1 KB · Views: 203
  • heater1.JPG
    heater1.JPG
    67.1 KB · Views: 234
Just one more addition when replacing the unit and the heater controls I noticed you don't have to remove the clock or the switch cluster :eek: I didn't think that all four screws were available but they are as shown below. It will however give a bit more room if you do.

I replaced the unit this morning and the heating is better than it's ever been even at full fan it remains hot where before it cooled slightly (y) (y)
 

Attachments

  • heater26.JPG
    heater26.JPG
    67.4 KB · Views: 157
Having done me proud I took him for a wash n brush up as a treat and is booked in for a full vallet next week to get the carpets all sorted.

Don't he Look GOOD
 

Attachments

  • Panda1a.JPG
    Panda1a.JPG
    61.9 KB · Views: 128
  • Panda1b.JPG
    Panda1b.JPG
    71.2 KB · Views: 125
Last edited:
Went to Dumfries this evening to pick up a new bonnet and went past the highest post office in Britain whilst it was snowing and the car's bleeding roasting, had to turn the fan and the outside vent off as well as using the heat setting it was that warm. Whilst in the middle of no-where I stopped for someone with their hazzards on and it was baltic when I rolled the window down so happy bunny with the new heating (y)
 
THis is the second Heater Matrix Repair I have done on a Panda.

Again, it is the WHITE PLASTIC CONTROL VALVE that has failed, it is only held down by two nuts, one on either side.
The better option would be to have 4 nuts holding the valve down onto the heater Matrix.
THe Perfect option would be to have a METAL Control valve. -that wouldn't warp with age or heat
THe White plastic valve arcs out in the middle away from the matrix and this is where the leak occurs.

The repair is to clean the mating face on the heater matrix and REPLACE with a new control valve. It seems buying only a new matrix is not the answer as the valve is the thing at fault.
Incidentally, when the heater stops working, your coolant level is way too low!
 
Back
Top