Technical Ducato 230 2.0 JTD Engine dies all the time

Currently reading:
Technical Ducato 230 2.0 JTD Engine dies all the time

Thanks for your quick and supportive replies. I did not get that kind of help in other forums!

The crank sensor indeed is on the flywheel, sitting on the bellhousing at about 2 o clock. The "2003 Ducato 2.0 JTD swb suddenly gone into limp mode" thread is very interesting, some helpful files posted there.

I ordered crank and also cam sensor, as its housings plastic looks briddle and faded.
 
Last edited:
Today I recieved both crank and cam sensor. Put them in, but after 10 minutes of driving the engine died again, so the sensors were not the problem.
But interestingly I finally got a more workable code in the ECU:

P0191 Diesel pressure control

But I dont think the sensor is faulty, as 970 bar seem to be a plausible value. How is the pressure regulated in the JTD?
 

Attachments

  • P0191.PNG
    P0191.PNG
    33.3 KB · Views: 64
Disappointing. The crank sensor could have been your problem.

Pressure regulation of the HP system is via an electromagnetic regulator, attached to the end of the HP pump opposite to the drive. shaft
For more information see the attached extract taken from the 2.0jtd section of eLearn.
 

Attachments

  • 2.0jtd Fuel Pressure Regulator.pdf
    230.9 KB · Views: 125
Thanks for the extract. I dont really know what to do now. Replace the whole HP unit, including the regulator its ~200€.
Or start by replacing the fuel pressure sensor? How would you go on?
 
I would start with the wiring and connection to the fuel pressure sensor......
And if they look good replace the fuel pressure sensor. Only use a good brand NOT unbranded Chinese or autodoc own brand!
 
There is a butterfly valve/flap in the air inlet system . Check it is not closed cutting off all air when problem occurs, or jam it open and see if problem. Disappears.

Good luck
 
Back to basics. A diesel engine needs air and fuel. @jackwhoo has suggested a possible reason for a lack of air. The ECU responds to power demands and air supply by controlling the fuel. If the ECU thinks that there is a problem, it responds by reducing or cutting the fuel supply.
If jamming the EGR butterfly valve does not stop the problem, then the attached extract from eLearn may be worth looking at. I am puzzled by the final line, which is a nonesense as it stands. Perhaps substitute temperature for "pressure"?

Another remote possibility, which I would leave until all other avenues are explored. is a problem with the ECU. In my experience electronic components can suffer from faults (micro cracks?) which cause problems when the component becomes warm. I have suffered from this on at least three items of domestic equipment. TV, Bosch washing machine. and the PSU for a 12V mirror light. I am sure that there were others in a former life, but these are lost in the mists of time.
The difference in recorded distances mentioned in post #1 may be due to either the ECU, or the instrument panel being replaced, possibly in a previous fault investigation?

As an aid to checking the wiring, I am also attaching pdf copies of the 2.0jtd engine wiring diagram.
 

Attachments

  • 2.0jtd Fault Display.pdf
    180.9 KB · Views: 103
  • 2.0jtd E5050-1.pdf
    94.8 KB · Views: 117
  • 2.0jtd E5050-2.pdf
    66.9 KB · Views: 92
  • Fiat Wiring Colour Codes.pdf
    70.1 KB · Views: 134
Sorry for my late reply, I was busy with my other projects...
I fiddeled around with the FRP sensor wiring and also the fuel pressure regualtor wiring, and ultrasonic cleaned the regulator without any results. My next step would have been to buy a new FRP and FPR, but...
Today I did a return flow test, and injector #4 brought around for times as much as the other 3

So I will first try a new Injector #4
 
Removing the old Injector did not go well. In fact, it was a worst case szenario

First battle I had to fight was the bolt, holding the clamp, as I had to drill it out
Then it was time to pull out the injector itself. I tried levering, twisting, heating, pulling/hammering, soaking it in every chemical I could get hold of and all of them simultaneously aswell.
After a few hours it sheared right off and now im left with this:
905DBA0B-728A-45D1-84D6-67ADD0B3D6EF.jpeg


On the weekend Im going to drop the engine in order to get off the head and machine the stuck Injector out of it.
 
You could attempt to weld a nut to the remains of the injector then use a slide hammer screwed into the nut.
The heat from welding may help loosen the injector.
 
I also thought about this, but I already put huge forces on the injector and it still would not budge. My last action, when I sheared the injector body off, was a 1 meter steel bar I had welded to the injector. It felt like it would wiggle loose, but what I actually felt was the whole thing torsioning in itselfabove the cylinder head surface.


I do not think that I could produce a weld in that tight space capable of holding a force applied by a huge slide hammer that most likely would need to produce quite a few tons of impact in order to to anything.

But I will still try, as dropping the motor looks not to be very pleasing
 
Welding a big M22 Nut to the remains of the injector held up surprisingly well. I have been slide hammering on it the whole last week, in total probably 3 hours.
But sadly the material of the injector itself once again gave up. It is now broken of clean with the surface of the cylinderhead.

My next action will be to fabricate a drilling jig fixed to two of the headbolts to drill out the injector at the right position, angle and depth. Lets hope this goes well.
 
Drilling the injector went very well so far. I'm now roughly 30mm underneath the cylinderhead surface, dead in the bore center and at the right angle seemingly.
But now I got stuck on a hardened pin, most likely the valve plunger reaching inside the nozzle.
Tomorrow I will fabricate a "holesaw" like drill, to remove material around the pin. Then I should be able to pull it out.
Sadly I could not find a dimensioned drawing of that injector, so I can't be exactly sure what im even doing...
Sorry for your woes. It looks awful! I have found Bosh Diesel centres very helpful and knowledgeable in the past. Maybe someone there or a similar place could shed some light on the detail.
 
Not dimensioned, but is the attached extract from eLearn any help?
 

Attachments

  • 2.0jtd injector.pdf
    278.2 KB · Views: 83
Finally managed to fully remove the injector. The seat was a little damaged after, but I fixed that by milling the hole a little deeper, and turning a new copper ring, accomodating the injector position by making it thicker.

I put a used (supposedly good condition) injector in its place, and the engine runs noticeably smoother than before.

But the engine still dies with a P0191 error after certain driven distance. But not as often as before.

I will make another return flow test, to verify the „new“ injector is good.

If so, I really dont know where to continue with this frustrating problem.

Attached you can see the tools I used, the remains of the injector itself and the condition of the seat before regrinding it.
 

Attachments

  • 48E0524D-1FEC-4E90-8B17-9C1567C7127B.jpeg
    48E0524D-1FEC-4E90-8B17-9C1567C7127B.jpeg
    1.9 MB · Views: 65
  • 11A178EE-ECB2-4158-BFF6-C64A540F4C1E.jpeg
    11A178EE-ECB2-4158-BFF6-C64A540F4C1E.jpeg
    2 MB · Views: 61
  • E566D179-6526-480B-A9FF-E96AE143DE20.jpeg
    E566D179-6526-480B-A9FF-E96AE143DE20.jpeg
    2.5 MB · Views: 66
Quick update:

Verified that the new injector is good by another return flow test. This went positive, all four are pretty equal now.
The engine ran fine for 300 kilometers, the next 50 kilometers it died 3 times, one of which it went into limp mode a few minutes before.

On saturday I have a (allegedly very competent) software tuning guy coming. He will check if the software is original and possibly flash it, and we also will try to do a DTC delete for the P0191 code.
I know doing this results in only solving the effect and not the issue itself, but I have no more options left.
 
A new fuel rail pressure sensor would be a very good idea.
It was your plan before finding an injector returning more fuel than the other 3 injectors.
 
Hello, I have news.
The new FRP sensor sadly did not do anything. After that setback I concentrated on properly diagnosing the hole situation better. Bought full version of MultiECUScan, a better more reliable VagCom interface, mounted analog gauges to the CR-system aswell as the low pressure pump aswell as digitally monitoring voltage of the low pressure fuel pump.

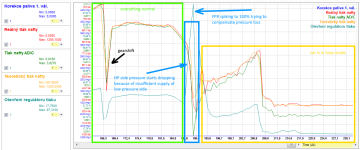
What I found is: The electric low pressure pump at idle fluctuates between 1.5 and 3 bar. ´The electric motor sounds like its load is heavily variing. Already unusual imo.
After studying the data I collected, I now know what happens, when the car goes into limp/engine cutout:

Low pressure side of the fuel system falls down to under 1 bar. At this low pressure the fuel pressure regulator tries to compensate by fully closing the return, which infact manages to sufficiently feed the HP pump and keep the pressure in the HP system upright. But the ECU doesnt like the FPR having a 100% threshold and thus - cuts the engine or limits the output - this is dependent on how violently the low pressure side pressure drops down.

When I notice the pressure sinking and I go very easy on the load/accelerator, I can manage to keep the low pressure side above 1 bar, and so the car will never stall or go into limp mode

With this data, I'm 100% sure the low pressure side is the problem. The electric pump itself always was sufficiently powered with 12 volt but I was not able to monitor its power draw so maybe there is increased resistance in the electrical side. But it could also be a mechanical problem. I will most likely check/replace the sending unit as a whole.

Can someone give me more information regarding the low pressure fuel system? Where is the pump relay? Should the return line be under some pressure?
 

Attachments

  • 0003.png
    0003.png
    105.6 KB · Views: 52
The hour is late, and my eyes are closing, so I have just converted the whole 2.0jtd system from eLearn. Cannot supply more!

The fuel pump relay will be the same as that for the 2.8jtd, so attaching my diagram for engine bay fusebox B001
 

Attachments

  • 2.0jtd Fuel System.pdf
    1.5 MB · Views: 72
  • Fusebox B001 Engine Bay.pdf
    191.2 KB · Views: 79
Back
Top