Technical Brake auto adjusters. Middle of job reply ASAP pls

Currently reading:
Technical Brake auto adjusters. Middle of job reply ASAP pls

newbie fiat

New member
Joined
Aug 4, 2016
Messages
96
Points
27
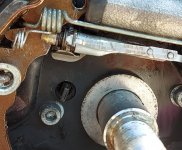
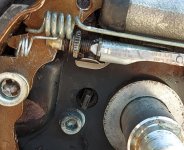
Hi, I replaced the drums and shoes on my 2005 panda yesterday but couldn't get the handbrake working. I'm aware of the adjuster cable in the cabin and adjusted that till it wouldn't go tighter. The auto adjusters seem to be at fault but after a clean up they look brand new and not worn at all. I just think I'm not setting the up right. I'm aware the handbrake cable has to be loose while sorting the adjusters

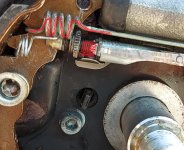
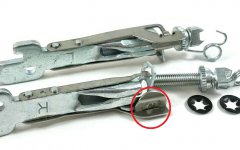
I'll attach a video if I can figure out how but the entire brass bar gets pulled out and moves the spline away from the metal plate its supposed to click against.
 
post a close up photo if you can't do the video


the adjuster should fit into a little notch in the shoes its easy for one side to fall out


The click from my 3rd party adjusters were quite quiet. Needed the rear doors open to hear them.
 

Attachments

  • temp.png
    temp.png
    114.1 KB · Views: 40
Last edited:
official procedure


The recovery of the clearance due to wear is automatic, the adjustment of the handbrake should only be carried out after having replaced the rear brake shoes, the rear brake cylinder and the complete cable.
Proceed with the adjustment when the vehicle is on the lift.
Refer to op.. 7040L20 tunnel trim - r r
1. Make a note of the position of the nut, then loosen the adjustment nut for the handbrake cable by at least two or three turns to ensure that the cable is completely loosened.

Start engine.
With the engine idling, press the brake pedal forcefully at least 10 or 15 times.
Retighten the handbrake cable adjustment nut to the original position.
Make sure that, with the handbrake lever in the rest position, the rear wheels can rotate freely.
Check that the braking action of the handbrake starts before the first notch.
At the end of the adjustment, check that the lever does not travel through more than five notches of the toothed sector.
Switch off the engine.
Refer to op.. 7040L20 tunnel trim - r r
Remove the vehicle from the ramp.
 
If the handbrake cable is too tight, (and that seems likley from your description) it restricts the movement of the adjusters, and they don't adjust.
+1 for handbrake cable as most likely culprit. As per above post, the cable adjuster inside the car doesn't want to be fully tightened, just back to its original position.

When I took my brake shoe automatic adjusters off, I wound the ratchet wheel right back. When everything is assembled correctly, it should be possible to use the handbrake a few times to wind in the automatic adjusters.
 

Attachments

  • brakes-01.jpg
    brakes-01.jpg
    169.6 KB · Views: 72
apologies for the delay in replying

positive news. brakes complete and working very well. i took the wheel bearings off while i was there completely degreased and rebuilt so they were looking and feeling new. dropped the rear beam and took a wire wheel on my angle grinder to it and removed all the rust and sprayed with an anti corrosion spray paint. only light surface rust which is surprising really giving its a 16 year old part that is known to fail. all brakes flushed through with new fluid.

the pads are the original pads from new but there was almost no wear at all... :confused: (i have all the service history for the car and the rear brakes had never been done. none of the bolts had any markings to show someone had been in previously) they were literally the same thickness as the replacements. the drum had almost no lip either (was extremely rusty on the outside though) what appears to have happened is a very light leak early on in the cars life on the cylinder which had coated the pads enough to reduce wear. it was my first car so not having anything to compare it against i assumed the breaking power it had was correct.

the auto adjusters still appear to not do anything, i manually set them and its great now but i know 12 months down the line ill have to adjust them again. unless someone can explain to me how they are supposed to work. by their design i don't understand how the splined bolt is supposed to turn. it just moves out with the shaft and back in without turning. i have some videos which i will try again to upload as they failed yesterday.
 
cant upload videos so hopefully these photos explain. the cog does not turn at all it starts as shown in photo 1 and ends up in the position shown in photo 2 then back again. with this cog moving with the shaft i dont understand how it rotates round. the metal plate that stops it getting loose has no effect on it turning (apart from obviously stopping it turning back)
 

Attachments

  • 1.jpg
    1.jpg
    429.6 KB · Views: 103
  • 2.jpg
    2.jpg
    414.5 KB · Views: 65
the second photo I posted


the bit circled gets moved across the toothed wheel pushing it out only via the cam action of the piece thats not quite vertical just above it.


The not quite vertical is by design, the small angle to vertical is equal to just over one tooth of the wheel


I wouldn't call it Good news. Its not working as intended. Its the brakes. They should be 100%.
 
This post contains affiliate links which may earn a commission at no additional cost to you.
I think this is almost certainly your problem:
2.jpg
Firstly, the spring for the adjuster is not correctly installed (that's my car on the right).

More importantly, the ratchet wheel should not be moving together with the adjustment screw.

The ratchet wheel should stay in place against the adjuster body and rotate around the screw as the screw withdraws from the adjuster body. The screw itself does not rotate.

The ratchet wheel pawl (highlighted in koalar's second post) then stops the ratchet wheel from turning, so preventing the screw from sliding back into the adjuster body.

Is it possible to turn the ratchet wheel on the screw on yours? Looks like it could possibly be cross-threaded or damaged? The ratchet wheel itself is soft metal. Or maybe the screw is bent. It doesn't look quite right.

If the adjusters are damaged or not operating properly, they'll need replacing.
 
Last edited:
rmjbn1 is correct. The spring is bent out of Shape.


photo two look like you are trying to operate the bakes without the drums on.

they only work when the shoes have something to press against


the spring should do one complete lap before coming across at an angle

one of the teeth looks damaged

to the right there should be a gap which appears to be missing. doesn't look from the camera angle that the temperature lock would work ?
 

Attachments

  • temp.jpg
    temp.jpg
    786.4 KB · Views: 43
Last edited:
if this spring is pulling properly

this gap can not open up. Again you can't test without the drums on

something is seriously wrong

Stuck piston ???
 

Attachments

  • temp.jpg
    temp.jpg
    814.7 KB · Views: 86
Last edited:
Someone has bent the bimetallic strip that stops the self adjusted working when brakes are hot .

The bend is stopping the self adjuster working at all even when cold.
 
This post contains affiliate links which may earn a commission at no additional cost to you.
Someone has bent the bimetallic strip that stops the self adjusted working when brakes are hot .

The bend is stopping the self adjuster working at all even when cold.

it doesn't looked latched in the two photos but there's only a small fraction of a mm to go but a photo from another angle would confirm


the whole thing looks messed up. Damage to the spring. Which also look like its not locked properly damage to the teeth. The angle of the little bracket doesn't look right. Brakes aren't something you should be taking a chance with.

I think the original poster really needs someone to give them a hand. Maybe someone is local.
 
Last edited:
For what it would cost, a new brake drum with a large access hole would be a useful tool for checking the adjusters. Cut holes towards one side with a hole saw and hack-saw the metal between. It will never be usable on the car but very handy for brake servicing.

https://www.ebay.co.uk/itm/333855868441?fits=Model:Panda&hash=item4dbb5c4619:g:guEAAOSw9LBf~mpf

why

Once you done a few the whole job takes no more than 15 minutes including cleaning

the adjusters and springs can all be installed on the bench and then carried to car. Only one of the bottom shoes need levering on with a screw drive


I remember the days before I internet and smart phones. Now you just take a few photos for reference if you not done the job before.

There's an audible click if its working correctly
 
This post contains affiliate links which may earn a commission at no additional cost to you.
Back
Top