Hi everybody. Second big problem, second post (sorry, can't link to the first one, as I don't have 5 posts yet).
Car's a -99 mk1 punto 60sx auto.
As per the previous overheating problems, I reinstalled the thermostat (w. new seal) and the radiator, flushed the cooling system, etc.
Car ran with no particular problems for several weeks, apart from that it ran about halfway between the middle and the 3/4 marks on the engine temp, i.e. slightly above middle temp, but not dangerously so.
Then, one day, stuck in a traffic jam on the motorway (to drop off family at the airport to take their flight home - sod's law says that's when things will go wrong, right?), she starts overheating like crazy, a wisp of white smoke coming out of the engine compartment every now and then (faint enough that it took us a while to figure out if it was our engine or the exhaust of the car in front).
Pulled over to the hard shoulder, waited for it to cool down. Noticed that the coolant pressure cap had sprayed a little coolant inside (later found out that this is indicative of too much pressure, not a faulty cap). After cooling down, we took it very tenderly to the first exit - noticed more white smoke out the engine compartment and out the exhaust pipe - parked at a petrol station, family took taxi to airport, while I waited for the tow truck.
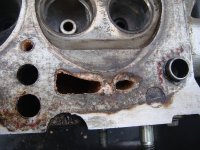
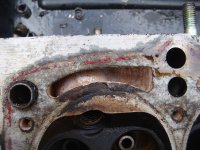
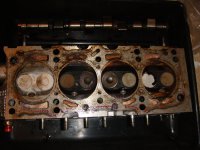
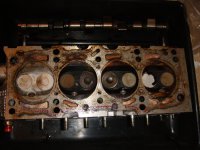
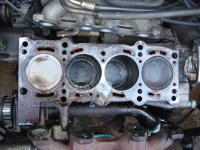
The truck comes, repairman Ricky says it's a blown head gasket, probably due to a faulty fan switch. Says he can tell not only by my description of the breakdown (white smoke, etc.), but also because when he fills up the coolant reservoir with water and leaves the cap off, running the engine causes it to spit out.
I tell him I had a similar issue a while back, when replacing the radiator, I forgot to screw in the upper bleed screw (not the one on the rad), and starting the engine that time had also lead to coolant/water gushing out. Ricky informed me that was a sign of a failing/failed head gasket already back then.
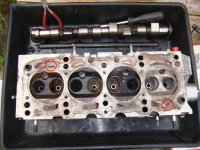
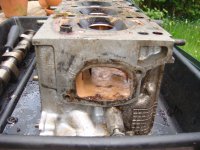
So I've got my sockets, my torque wrench, a new head gasket set (incl. 10 new bolts), a new timing belt and tensioner, new water pump (just in case), and a new fan switch, and am ready to go to work. What I need from this forum's esteemed members is answers to the following questions:
1) Does everything sound correct with Ricky's opinion/what I've noted above?
2) To get under the timing belt cover, is the easiest method to support the bottom of the oil sump, and thereby the engine, with a piece of wood on the spacesaver jack, and remove the mounting bolts/plate? This seems easier to me than buying a proper hydraulic jack and removing the righthand wheel and wheelarch...
3) In terms of money-saving, how important is it to get an angle-wrench for angle-tightening the head bolts to stages 2 and 3? Can't 90 degrees be pretty much sussed out without the need for the extra equipment?
4) My torque wrench has a minimum of 30 Nm, which is a lot higher than the requirements for some of the bolts. Does anybody know whether any of the DIY stores rent out lower-setting torque wrenches in an affordable manner?
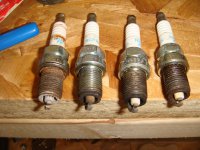
5) Do I really need to remove everything around the throttle housing, like the Hayne's manual states, to get the cylinder head off? How about the spark plugs?
6) As regards the timing belt, so long as I follow the instructions very carefully and to the dot, is it really all THAT important to get the belt tensioned at a specialist Fiat garage?
Sorry for the questions being somewhat vague at the moment, but I'm kinda in the dark on this one, being the first head gasket/timing belt change I've ever done. The forum has proven a wealth of info so far, but more pointed tips to my specific case are what's needed now.
Cheers,
/oboojoe
Car's a -99 mk1 punto 60sx auto.
As per the previous overheating problems, I reinstalled the thermostat (w. new seal) and the radiator, flushed the cooling system, etc.
Car ran with no particular problems for several weeks, apart from that it ran about halfway between the middle and the 3/4 marks on the engine temp, i.e. slightly above middle temp, but not dangerously so.
Then, one day, stuck in a traffic jam on the motorway (to drop off family at the airport to take their flight home - sod's law says that's when things will go wrong, right?), she starts overheating like crazy, a wisp of white smoke coming out of the engine compartment every now and then (faint enough that it took us a while to figure out if it was our engine or the exhaust of the car in front).
Pulled over to the hard shoulder, waited for it to cool down. Noticed that the coolant pressure cap had sprayed a little coolant inside (later found out that this is indicative of too much pressure, not a faulty cap). After cooling down, we took it very tenderly to the first exit - noticed more white smoke out the engine compartment and out the exhaust pipe - parked at a petrol station, family took taxi to airport, while I waited for the tow truck.
The truck comes, repairman Ricky says it's a blown head gasket, probably due to a faulty fan switch. Says he can tell not only by my description of the breakdown (white smoke, etc.), but also because when he fills up the coolant reservoir with water and leaves the cap off, running the engine causes it to spit out.
I tell him I had a similar issue a while back, when replacing the radiator, I forgot to screw in the upper bleed screw (not the one on the rad), and starting the engine that time had also lead to coolant/water gushing out. Ricky informed me that was a sign of a failing/failed head gasket already back then.
So I've got my sockets, my torque wrench, a new head gasket set (incl. 10 new bolts), a new timing belt and tensioner, new water pump (just in case), and a new fan switch, and am ready to go to work. What I need from this forum's esteemed members is answers to the following questions:
1) Does everything sound correct with Ricky's opinion/what I've noted above?
2) To get under the timing belt cover, is the easiest method to support the bottom of the oil sump, and thereby the engine, with a piece of wood on the spacesaver jack, and remove the mounting bolts/plate? This seems easier to me than buying a proper hydraulic jack and removing the righthand wheel and wheelarch...
3) In terms of money-saving, how important is it to get an angle-wrench for angle-tightening the head bolts to stages 2 and 3? Can't 90 degrees be pretty much sussed out without the need for the extra equipment?
4) My torque wrench has a minimum of 30 Nm, which is a lot higher than the requirements for some of the bolts. Does anybody know whether any of the DIY stores rent out lower-setting torque wrenches in an affordable manner?
5) Do I really need to remove everything around the throttle housing, like the Hayne's manual states, to get the cylinder head off? How about the spark plugs?
6) As regards the timing belt, so long as I follow the instructions very carefully and to the dot, is it really all THAT important to get the belt tensioned at a specialist Fiat garage?
Sorry for the questions being somewhat vague at the moment, but I'm kinda in the dark on this one, being the first head gasket/timing belt change I've ever done. The forum has proven a wealth of info so far, but more pointed tips to my specific case are what's needed now.
Cheers,
/oboojoe

")