That is a stunning range of suggestions Widemouthfrog! In the end, it appears that a bit of excess haste, youthful impatience, and brute force has got one of them out. The second is a work in progress as I type, however, if I need to provide back up, I will know that a trip out to a steel merchants awaits me. I like the methodology though, and will over the course of the next phase of motherhood start to gather bits of steel tube with the enthusiasm with which I have ammassed biscuit cutters… it is simply a question of when not if this phase begins! As for the vernier calipers, they are on my shopping list, along with the penetrating oil, galvanising spray and stonechip paint…


You are using an out of date browser. It may not display this or other websites correctly.
You should upgrade or use an alternative browser.
You should upgrade or use an alternative browser.
General A few questions about multipla subframe jobs.
- Thread starter Sunroofjo
- Start date
Currently reading:
General A few questions about multipla subframe jobs.
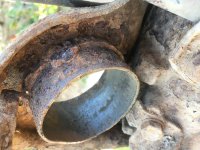
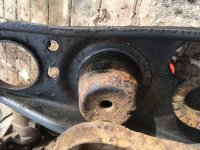
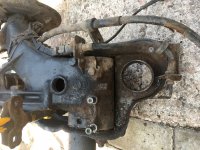
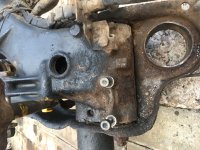
Ahh. We have a potential problem with this part of the bush removal. Initial thoughts were that the one bush was out - however, there are questions as to whether this is the case, or if the damn thing is actually welded onto the subframe. I've taken a photo and wonder if anyone could cast a knowing eye over this and say one way or the other before I start to google steel merchants in the locality…
Attachments
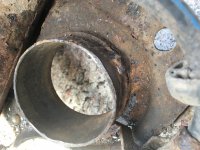
That looks to be the subframe itself rather then part of the Bush
Although the back side of that area looks worryingly Rusty
Although the back side of that area looks worryingly Rusty
Thanks Chris, I'll post up a few more photo's as there is a pause in the current proceeding whilst we assess what is subframe, and what is bush…! the replacements are yet to arrive so there's work planned on removing rust and treating with galvanising spray (as per my shopping list!).
Essentially we think that there is some of the bushes left in the front two - but they have been welded in place, and this is looking to be a bigger problem to deal with. I have taken on board all of the suggestions from widemouthfrog earlier, but am unsure as to whether if they have been welded this brings a new level of excitement to the job….
Essentially we think that there is some of the bushes left in the front two - but they have been welded in place, and this is looking to be a bigger problem to deal with. I have taken on board all of the suggestions from widemouthfrog earlier, but am unsure as to whether if they have been welded this brings a new level of excitement to the job….
Attachments
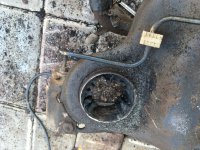
Ahh. We have a potential problem with this part of the bush removal. Initial thoughts were that the one bush was out - however, there are questions as to whether this is the case, or if the damn thing is actually welded onto the subframe. I've taken a photo and wonder if anyone could cast a knowing eye over this and say one way or the other before I start to google steel merchants in the locality…
That is the bush outer casing, I think. The subframe starts at the step on the outside of the tube, near the top. You’ll know for sure by looking at the other side of the hole. The subframe doesn’t step “up” before going into the hole. It’s just a flat surface, with a hole in it.
The long bit of tube you’ve got is what some people saw through. They then hammer it inwards towards the hole centre, buckling as it does so, until you can peel it away from the subframe itself. If you do this you must be very careful not to saw into the subframe.
Quick ‘n’ dirty guide: Look at what you removed from the holes. If it’s rubbery on the outer diameter, you left something of the bush in the subframe. All four bushes have an outer casing made of steel. What makes you think they’ve been welded in?
Last edited:
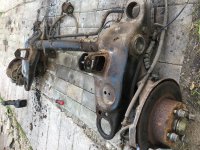
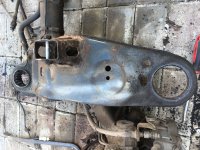
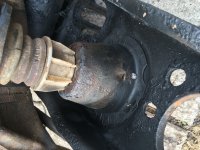
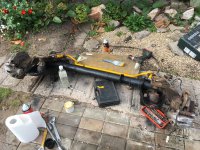
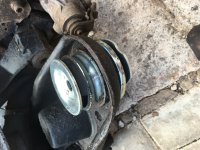
On the plus side: That subframe looks nice and sound. Can you flip it over and take a photo of the cone-shaped pressings that locate the springs?
Looking at your later pics it it clear that is actually part of the bush outer metal I think it's just rust you can see around that in the pictureThat looks to be the subframe itself rather then part of the Bush
Although the back side of that area looks worryingly Rusty
Get it a few gut knocks with a hammer and screwdriver to chip them off and soak them on oil to air removal
Looking at your later pics it it clear that is actually part of the bush outer metal I think it's just rust you can see around that in the picture
Get it a few gut knocks with a hammer and screwdriver to chip them off and soak them on oil to air removal
Thanks! One question - what is an oil to air removal? (sorry if thats common knowledge… I freely admit, this is a new area of parenting and my knowledge is not yet up to speed…)
Thanks! One question - what is an oil to air removal? (sorry if thats common knowledge… I freely admit, this is a new area of parenting and my knowledge is not yet up to speed…)
Typo oil to aid removal it should have said dammed auto correct
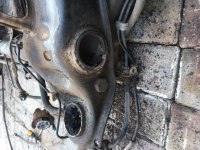
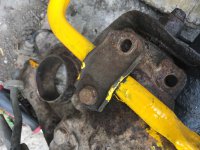
I'm not sure if I'm keeping up with this job, or if you are all keeping up, but something new has happened - and once again, I need a bit of advice. I know that widemouthfrog has been talking about the pivot bolt and I think that in the last 10 minutes that has been located and duly sprayed with penetrating oil, but meanwhile… some bolts have been busy snapping. All sympathy gratefully recevied.
Any advice would also be very welcome…https://www.fiatforum.com/images/smilies/cry.gif
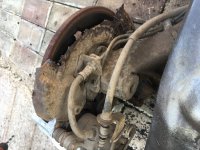
ps. I know that the brake pipe is now quite a vivid colour… I think we all need to be painting our brake pipes yellow right now, it will provide some light during the dark times.
Attachments
On the plus side: That subframe looks nice and sound. Can you flip it over and take a photo of the cone-shaped pressings that locate the springs?
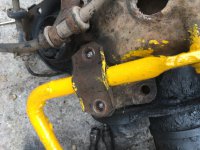
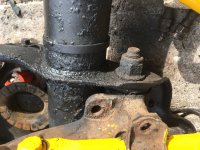
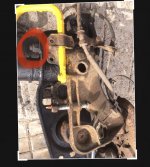
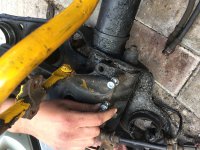
I think I can do that… and I think I can also indicate on one of the photo's where I am imagining that the pivot bolt is located (but happy to be corrected if I am once again barking up the wrong tree!)
I have found something cone-like, but given the level of dismantling that has been going on, I have no idea if there are spings in the near location. Anything could be happpening at this stage in the game…
Attachments
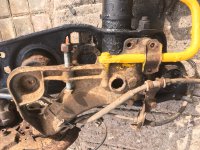
What you've painted yellow isn't a brake pipe. It's the anti-roll bar (ARB). It's just a solid length of bar that is loaded in torsion when the car corners and so resists the tendency for the car to tilt sideways, whilst at the same time not restricting the suspension from moving vertically (well, not much anyway) to absorb bumps in the road.
This is a perfect demonstration of the need to (repeatedly) soak any fixings that you want to remove in penetrating oil well before you try to remove them. You now have a bit of a headache.The last of the four bolts will have to be removed, whether it shears or not. That will allow you to lift the (now yellow) roll bar away from the subframe. For future reference, the brake pipes are the much thinner ones that can be seen in your most recent photos. They are relatively fragile and should be treated with care.
Once the roll bar and its clamp brackets are removed, you have to figure out a way of getting what's left of the four bolts out of their holes. To avoid a lengthy description here, the best I can advise is to google 'screw extractor' and watch a couple of YouTube videos. Tip: centre punch the middle of the bolt stub to help get the hole for the screw extractor as near to the centre of the bolt as possible. You no not under any circumstances want to be drilling into the tapped hole itself as that will be very difficult to reinstate.
What you've circled in red is the pivot bolt. Give it a really good soaking in penetrating oil, particularly the exposed threads and where the nut sits on the subframe itself. Putting some on the head of the bolt (on the outside face of the subframe) won't do any harm either. Then leave it for a couple of hours, come back and put some more on. Leaving it overnight might be advisable. While you're doing that, soak any other bolts or nuts that you might want to remove in it too. Put some anywhere where two components meet: the oil is very thin and will draw itself into tiny gaps by capillary action, helping to release surfaces. Sheared bolts, especially ones that break off flush with the parent metal, are a real pain and you want to do everything you can to reduce the chances of it happening.
The cones (photos 4 & 5) look OK. The fact the bump stop (the white plastic thing) is still in one is a good sign. Give them a good wire brushing to get loose rust off, then a light tap with a hammer and see if they cave in. They are made of much thinner steel than the main subframe pressings so they take less time to rust through.
Last edited:
What you've painted yellow isn't a brake pipe. It's the anti-roll bar (ARB).
My mistake… I was told this, but for some reason my brain translated in into a brake pipe. I won't be making that kind of school girl error again!!
This is a perfect demonstration of the need to (repeatedly) soak any fixings that you want to remove in penetrating oil well before you try to remove them.
Kids eh. Leave 'em for ten minutes home alone… and this happens.
You now have a bit of a headache.
Yes. I know. It hurts. :bang:
The last of the four bolts will have to be removed, whether it shears or not. That will allow you to lift the (now yellow) roll bar away from the subframe.
Sounds simple…
For future reference, the brake pipes are the much thinner ones that can be seen in your most recent photos. They are relatively fragile and should be treated with care.
Just hang around and I will keep you informed when the brake pipe massacre occurs.
Once the roll bar and its clamp brackets are removed, you have to figure out a way of getting what's left of the four bolts out of their holes.
I'll do that whilst I cook tea. Multitasking is not my forte, but there's no better time to try and improve on this.
To avoid a lengthy description here, the best I can advise is to google 'screw extractor' and watch a couple of YouTube videos. Tip: centre punch the middle of the bolt stub to help get the hole for the screw extractor as near to the centre of the bolt as possible. You no not under any circumstances want to be drilling into the tapped hole itself as that will be very difficult to reinstate.
Ahh. I have actually seen this kind of trick being played out in an earlier edition of my life involving various scooter parts that we rounded off. It is an exciting prospect that I am very much looking forward to.
Thank you widemouthfrog. Today is turning out to be the kind of a day where I don't know where I'd be without you kind folk here on the forum.
Thanks all
Be persistent. You are at the worst stage. Make a trip to Screwfix or Toolstation. They sell pretty much all you need, if you haven't already got it:
Centre punch.
Decent drills. Don't buy a big set of cheap ones. They will snap in the bolt stubs, then you'll have even more of a headache because the drill steel is much harder than the bolt steel. Just buy one or two good quality drill bits in the size(s) you need. If they sell one, a centre drill might be a good investment as they are very stubby and strong (EDIT: just had a look on Screwfix and it doesn't look like they sell them.). You want something like this:
https://www.ebay.co.uk/itm/CENTER-D...991157?hash=item51ac0ea235:g:QJUAAOSwqABbKjDZ
They're meant for use in lathes but can be used in cordless drills etc to get a hole started in a bolt. Because they don't flex when you press on them, they are much easier to control than a normal drill of 3-4mm diameter. You can then go in with a normal drill of a size recommended by the extractor kit.
Focus on stripping the subframe right down into its component parts. Once that's done, let the cleaning and painting begin. Oily rag for the handbrake cables will bring them up nicely; wire brush and wire wool for the metal bits. If you want to paint them afterwards, try to avoid using anything oily to clean them up, even though it's tempting. The cheapo Screwfix wire brushes are very good for this sort of work - only a couple of quid each, the last time I bought some. Item 2213V. Buy two or three. A gruesome looking brush, but great for rust removal. They do a small set 3698V for the tricky corners, but they're nowhere near as tough.
This post contains eBay links which may earn a commission at no additional cost to you.
Ahh! Thank you again Widemouthfrog. A new shopping list! ...and yes, regarding my original shopping list, we are now the very proud owners of a set of vernier calipers… digital ones (as that was all they had), a can of penetrating oil (not that you would think it) and various cans of spray paint. But I must say, I did think it wasn't a proper list, and that there would be more things required for a job of this magnitude. Next on the list then is:
1. Decent drill bits of the approprate size (first job for the vernier calipers? ..or is that overkill?).
2. A centre drill (I'm actually quite excited about this as I can recall lots of times when this would have been handy if I had known of it's existence - have you any idea how hard the material that they make snooker balls out of? ...You soon find out when you, or someone you know, wants one for a gear knob.)
3. The extractor kit. Best make that a good one too, as I've had previous here with something not up to the job.
4. And finally the wire brushes and wire wool. I am off to source the necessary kit and might even throw in a bottle of gin for good measure as I'm sure as heck going to need that before the day is over… Thanks Widemouthfrog. I know where I am with a shopping list.
Get the extractor kit before the drill bits. Irwin brand are good. I think Screwfix may sell them. I’ve seen them in B&Q before and they’re the same company as Screwfix. Open the pack while you’re there and see what drill sizes it recommends and buy to suit. Am I right in thinking the sheared bolts are M8? You can use the verniers on the stubs of the bolts to find out.
Last edited:
Hi! I'm back with an update and hoping for a bit of reassurance on the next phase.
So, earlier on this week, it was full steam ahead (not necessarily in the right direction) and then a return to school put a bit of a pause on the work in progress, however, Dan (absolute hero!!) has helped out today with some expert tools and knowledge - so we have jumped in the right direction. (phew!!) But there is more to do and I thought I'd show where the job is at now, and get some thoughts from you. Many thanks to everyone so far. We are very grateful!
The latest batch of photo's show that the sheered off bolts have now been removed and shiny new ones are in place. The old ones were absolutetly melded in so degraded were they that the only way out was to drill them. But armed with decent drill bits and a lot of care, this took place, and new threads were formed. Anway, that's sorted now. (Thanks Dan!)
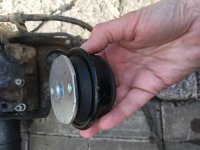
We have taken more photo's of the remaining bush elements that are next up. They are definitely welded in, and whilst this isn't bothering Dan unduly, he would like absolute reassurance that this is the bit to be extracted before setting-to. As you can see, I have photographed the new bush that is going to replace it, and it looks to be quite a different thing. So, it would be great to get the thumbs up that this is all alright. I think that covers the update and the next-up bit of the job. Thanks again, Jo
So, earlier on this week, it was full steam ahead (not necessarily in the right direction) and then a return to school put a bit of a pause on the work in progress, however, Dan (absolute hero!!) has helped out today with some expert tools and knowledge - so we have jumped in the right direction. (phew!!) But there is more to do and I thought I'd show where the job is at now, and get some thoughts from you. Many thanks to everyone so far. We are very grateful!
The latest batch of photo's show that the sheered off bolts have now been removed and shiny new ones are in place. The old ones were absolutetly melded in so degraded were they that the only way out was to drill them. But armed with decent drill bits and a lot of care, this took place, and new threads were formed. Anway, that's sorted now. (Thanks Dan!)
We have taken more photo's of the remaining bush elements that are next up. They are definitely welded in, and whilst this isn't bothering Dan unduly, he would like absolute reassurance that this is the bit to be extracted before setting-to. As you can see, I have photographed the new bush that is going to replace it, and it looks to be quite a different thing. So, it would be great to get the thumbs up that this is all alright. I think that covers the update and the next-up bit of the job. Thanks again, Jo
Attachments
-
 IMG_9021.JPG1.9 MB · Views: 68
 -
 IMG_9019.JPG2.8 MB · Views: 59
 -
 IMG_9017.JPG2.4 MB · Views: 59
 -
 IMG_9015.JPG3 MB · Views: 60
 -
 IMG_9012.JPG2.5 MB · Views: 65
 -
 IMG_9022.JPG3.3 MB · Views: 64
 -
 IMG_9024.JPG3.2 MB · Views: 76
 -
 IMG_9025.JPG2.9 MB · Views: 64
 -
 IMG_9026.JPG3.5 MB · Views: 61
 -
 IMG_9028.JPG2.4 MB · Views: 67
The Job is Now Officially A NIGHTMARE!!!
But, we haven't given up (yet!)
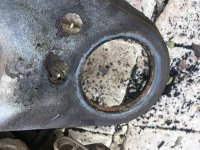
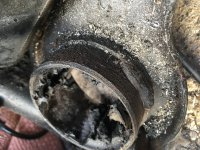
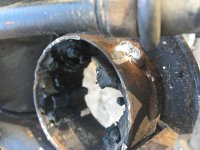
The latest phase - removing the metal bush casings from the front of the subframe is offically a pig of a job, on account of the fact that someone welded them in…
There's been some banging, shouting and cursing and this is the current state of play. (see photos showing each of the casings). We are debating whether we need to add a dremel to the next shopping list, and if anyone can say if this would be powerful enough to do the job. I have looked into this as best I can and wonder if a Dremel 4000 or 4300 would be a thing worth having at this precice moment? Can anyone help? Many thanks, Jo
But, we haven't given up (yet!)
The latest phase - removing the metal bush casings from the front of the subframe is offically a pig of a job, on account of the fact that someone welded them in…
There's been some banging, shouting and cursing and this is the current state of play. (see photos showing each of the casings). We are debating whether we need to add a dremel to the next shopping list, and if anyone can say if this would be powerful enough to do the job. I have looked into this as best I can and wonder if a Dremel 4000 or 4300 would be a thing worth having at this precice moment? Can anyone help? Many thanks, Jo

Before you go any further, use your verniers to measure the outside diameter of the new bushes ( not the outer flange, just the metal body). Also the diameter of the OUTSIDE of the pieces of metal tube that are welded into the subframe.
This bits of welded tube are not standard. Someone has been there before you. They probably improvised because a) they didn’t fancy forking out for a whole new subframe and b) didn’t know where to get suitable bushes, as Fiat didn’t sell them on their own.
This bits of welded tube are not standard. Someone has been there before you. They probably improvised because a) they didn’t fancy forking out for a whole new subframe and b) didn’t know where to get suitable bushes, as Fiat didn’t sell them on their own.
Similar threads
- Replies
- 9
- Views
- 733