General A few questions about multipla subframe jobs.

Currently reading:
General A few questions about multipla subframe jobs.

Sunroofjo

Eat. Sleep. Multiplas.
Joined
Nov 25, 2015
Messages
54
Points
16
Location
Devon
Hi all… Its been a while since I posted here, and since then, we have had another multipla join us. It's an ugly bug and it was given to our son by someone who realised how much he loved it and was happy to donate it to a keen youngster! Anyway, this week we put it in for it's MOT and not unsurprisingly it failed… but in a way, that's ok (although not ideal!) as our son is young (nearly 15), but keen to learn, and given the state of things in our schools right now with the virus, it might be only a matter of time before this becomes his main source of education.
Anyway, for now, I am the one doing the learning as I try and work out what I need to get! I have ordered most of the things needed for the fails, but am stuck on the bit of the fail sheet that read 'Offside Rear Sub-frame pin or bush likely to become detached (5.3.4 (a) (ii))'
I have been told (by Fab, my son) that I need to buy the parts off ebay, but when I put the numberplate in to check compatability, it says the parts are not compatible, however, on close inspection it might be because Fiat didn't make them as stand-alone items, and as such they are listed as requiring modification. So maybe they are what I need. He also tells me that I may as well get all 4 bushes as it's not worth replacing only the 2 when the job required the whole axle to come off. Ekk. I have looked on the forum here and see that some of you have done this job previously and helpfully added photo's too. (Thanks!) it looks like a huge job though, and I am wondering if we have the tools for it (got a heavy duty jack and axle stands and the usual other tools…) but is there anything that you would suggest I should have to hand without which it will be impossible? I have seen some makes of car's have bush removal tools which remove the need to take the axle off... (am I barking up the wrong tree with this idea?) I guess in summary, my questions are this: Is this way too difficult for a youngster to undertake? Do we need to beg/borrow/buy certain tools which we might not have? And is ebay the place to buy the sub-frame bushes (£93) and is it as easy to replace them all, as to replace only as per the MOT fail element? Sorry this was quite long… I am as ever, a bit out of my depth!! Any help would be much apprecaited. Thanks. jo
 
All you've written is correct. Don't be put off. It's not a difficult job in that it doesn't need lots of specialised tools. Four bolts hold the subframe to the car - that's it. It's just a job that needs a bit of patience and adaptability. Unless the subframe failed on MAJOR corrosion (doesn't sound like it did from what you've written) it's salvageable. They're a solid bit of kit, in the main.

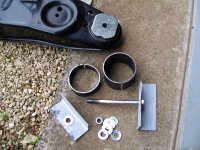
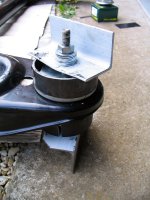
I've replied to your PM with some more information. Get a pair of vernier calipers and a decent quality file. Possibly a blow lamp to help get the old ones out. Make a DIY fitting kit to press the new ones in. Pay attention to their orientation when you press the new ones in.

It would be an excellent job as a learning exercise for your young 'un, if they are willing. They can help drop it off and get in back on. It's not massively heavy - just bulky. I'm a skinny beanpole weed and I managed to do it on my own. Plan ahead, use a scissor jack or two.
 

Attachments

  • IMG_5908.JPG
    IMG_5908.JPG
    447.4 KB · Views: 49
  • IMG_5906.JPG
    IMG_5906.JPG
    284.8 KB · Views: 50
Last edited:
Thank you WidemouthFrog! I feel much more reassured now, and will proceed to the next stage (ordering the parts!) and will invest in a set of vernier callipers now that I have seen what they are… :) The MOT didn't identify any major corrosion, althought the tester at the station suggested that the axle was barely being held on. So, its time to take a deep breath, and see what learning opportunities await!
 
Those bush sets look a bit over-priced to me. They haven’t listed either a maker’s name or part numbers, which usually means they’re trying to hide something. I’ve just had a look on the AUTODOC website (an excellent place to do a bit of research), using other Fiat models from the same era as the Multipla. The Brava seems like a good one. Setting that as the model, the subframe bushes that come up look very similar to the ones in the eBay listing.

The important bit to make a note of the maker’s names and part numbers, along with any dimensions. Then google those makers to see if they have an online parts catalogue. If they do, search for the part numbers. The manufacturers pages may give even more dimensions and details.

Before you strip the old bushes from the subframe, make some simple sketches take dimensions and add them to the sketch. Compare these to the info from the websites and see if you can find a match. If you find something suitable, go back on to eBay and search by the part numbers. You may get lucky and manage to pick some up for less than the Autodoc prices. I reckon £15 per bush is a good target to set.
 
Hello again, sorry for the delay - been feeling a bit peaky… but back to the task of overseeing this. The bushes are already ordered and on their way, as I put it off for as long as I could before deciding that there was no benefit to putting it off any longer, so I think we are now set to work with whatever comes our way, and looking back at older threads, I thought that maybe they were now hard to find and I had no idea about the compatibility with other models of Fiat's. But thank you, again, it's good advice and I will bear it in mind for the next big job! But back to here an now and the job is in progress. There is a bit of cursing going on in the background and a brake pipe has met it's demise… I saw your warning too late about that particular potential issue. It's all happening now though and I guess there may be more troubles ahead. I will be back!!
 
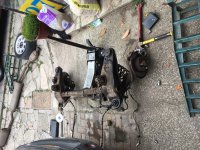
…not sure if this is how to post a photo here.. but this is the progress so far! The axle is out!! The bush on the rhs actually fell out - so yes, it definitely wasn't safe as it was. Onwards, and hopefully upwards!

(that was a fail on the post photo.. will see if I can work it out… )
 
Last edited:
…hmm. Adding a photo to this thread is surprisingly a bit tricky!
I can't see how directing you all to a link on my desktop is going to work… :confused:
if anyone wants to see a greasy, oily rear axle from a fiat multipla post-extraction, let me know how to post it, otherwise you will just have to imagine it. And then we won't know if it really happened… :D
 
Looks fairly intact party from the bushing that's out

Definitely give it a clean up and a coat of paint while you have it off the car

Galvanising spray for a base layer followed by a good top coat of something like stonechip paint
 
Good work! (y)

Next up - more WD40 on the nuts and threads for the two swing arm pivot bolts. Keep applying it every hour or so and leave it to soak in for a while.

WD40 isn't the best thing to use, but most people have it to hand. Screwfix sell a good penetrating oil for not much money. The best brew I've found though is a 50/50 mix of acetone (nail varnish remover is good) and automatic transmission fluid (ATF). Brushed onto to seized bolts / nuts and left for a couple of hours, it will unlock most things.
 
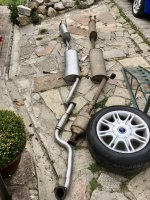
Thanks Chris. That's the next job lined up, meanwhile another job has arrived. Fab took the exhaust pipe off whilst he was taking the axle off, and extracted one that we had stored in the attic (a few years ago our mechanic replaced the exhaust system in the weeks before our original ugly bug was then declared unrepairable… so we got him to take it off before it went to the scrap yard…) anyway, several years down the line and we now have another ugly bug and it seemed like a good idea to extract the new exhaust pipe from the attic. However, there looks to be a bit missing? Is there or isn't there? I'm not sure. But I wonder if someone here can take a quick look and tell me if there is, or isn't a part missing?:confused:
 

Attachments

  • IMG_8914.JPG
    IMG_8914.JPG
    4.4 MB · Views: 49
Good work! (y)

Next up - more WD40 on the nuts and threads for the two swing arm pivot bolts. Keep applying it every hour or so and leave it to soak in for a while.

WD40 isn't the best thing to use, but most people have it to hand. Screwfix sell a good penetrating oil for not much money. The best brew I've found though is a 50/50 mix of acetone (nail varnish remover is good) and automatic transmission fluid (ATF). Brushed onto to seized bolts / nuts and left for a couple of hours, it will unlock most things.

Thanks for the tips - and I will definitely be getting some of that penetrating oil as I think it would come in handy for all manner of jobs as we appear to be accumilating various vehicles (all fiat's!) and all pretty rusty in parts when you dig deep, or need to remove a bolt. So I will invest in that. But I have spoken to Fab about the swing arm pivot bolts and he didn't think he was taking them off. So, unless you think he should/ought/needs to, we might not do that. But happy to be persuaded if it's the best route that we hadn't planned!
 
If it were me, I'd strip the swing arms off. If they've never been touched, they're almost certain to be in a sorry state, and getting at them with the subframe off the car is a lot easier than on. It'll also mean that you can make a much better job of cleaning up both the subframe and the arms. Play in the swing arm bearings is an MOT failure. The tell tale is the tops of the wheels leaning in (i.e. negative camber). Repair kits are quite cheap (around £15-20 per side the last time I looked) and come with replacement pivot bolts.

Your subframe looks as though it's in pretty good shape. The bits that rust through are the 'cages' into which the top of the shock absorbers mount and the cones that the tops of the springs locate upon. In both cases, they're made of much lighter gauge steel than the rest of the subframe.
 
Last edited:
I'm thinking that the 'swing arms' you speak of might still be attached to the car, rather that the axle. (That's how much I know…)
Although I am very interested in this - because that negative camber was the reason that our 1st ugly bug was scrapped. So maybe this new found knowledge can be put to good use this time round! Already talking to Fab, (he's busy outside with all the bits of exhaust pipe) he is thinking that it's worth replacing various bits whilst he has easy access… so, I think this learning that I had in mind is advancing at a pace!
 
In the first photo you posted, look at the hole in the subframe where the bush fell out. Go right, towards the big round cross tube that runs across the subframe. Before you get to that big tube, you can see a big nut on the end of a bolt thread. That’s the pivot bolt. It’s the biggest bolt on the whole subframe and there’s one on each side of the car.

If you undo that but, you’ll (with a bit of luck) be able to tap the pivot bolt out. At that point, the swingarm casting, complete with brake disc and calliper, will come away from the subframe. Before you do that though, detach the brake hose from the caliper (more penetrating oil....), the end of the handbrake cable, and the bolt that goes through the top eye of the shock absorber ( you guessed it - more penetrating oil!)
 
Okay… there's LOTS going on with the job right now (Fab is off school with a cold, and it's rude to send him in with a box of tissues all things considered…)
So right now, the focus is on removing the rear subframe bushes. Please can anyone advise on this, …he is talking about burning them out. I would quite like a rapid response to this as I don't have a fire extinguisher handy, and I am quite fond of my teenage son…
 
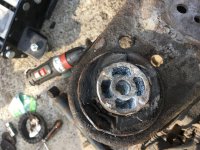
it's looking a bit messy on the bush extraction …but any advice on this bit of the manouvere would be very gratefully received!
 

Attachments

  • IMG_8924.JPG
    IMG_8924.JPG
    3.2 MB · Views: 44
Don't know how hard the rubber is but drill some 6_7mm hole all the way war around and try and knock it out?
Other then that burning them out is quite common way if you haves good heat source
 
Last edited:
Thanks for the suggestion Chris, I prefer that to the setting it alight idea!
 
You can burn them out, but it makes a hell of a stink and you're still left with the outer steel casing to remove. Some folks will hacksaw a slit in the outer casing, so that it can be collapsed inwards to get it out of the subframe. Personally, I don't like that approach. It has to be done very carefully.

Alternative courses of action:

Drill a chain of holes through the rubber, all the way around the central aluminium core. Does much the same thing as burning them out, but without the smell. As above, you're still left with the outer casing to get out.

or

Gather together the bits that you'll need to press the bushes back in, such as those I showed in the photos a few posts back. If you get a third bit of steel tube of a different diameter, you can use all of the same bits to press the bushes out, including the outer shell.

or

Flip the subframe over so that it's top-face-down, on a hard surface. Your block pave/concrete drive would do. Support the main pressing with something really solid like a piece of steel tube. You'll see in my photo that I slit the tube along its length. This allows you to spread it slightly so that it can adapt to different diameters. Personally, this is what I'd use. Measure the outer diameter (got your verniers yet?!) of the bush housing - in your most recent photo, that's the largest full circle that you can see. It's got a slight ding in it at 7 'o' clock. Then google for your nearest steel stockholder (if you haven't got anything suitable lying around) and ask them what tube they've got lying around with an inner diameter close to the diameter of the bush. The size of piece you're after (i.e. no more than 2" long) will be scrap for them. They may take pity on you a give it to you for nothing. Get the other bits of tube (different diameters, to fit around both sides of the bushes that you can see when you flip the subframe over) at the same time. And a beefy bolt and nut - at least M12, preferably M14 or M16 - and a load of washers to suit.

Then you can press the bearings out of the subframe, which is the way to do it that will cause minimum damage to the subframe.
 
Last edited:
Back
Top