General 500R Restoration

Currently reading:
General 500R Restoration

If you remove one side of the floor now but leave the inner sill then you should be OK. But the front door pillar will move towards the centre of the car I used a piece of timber wedged in to brace it. The advantage of leaving the floor for now is that you have an alignment to follow for the sill even though you're not going to weld to it properly.
Then remove and replace that floor and you have the inner and outer sills as a guide.
Then you will definitely feel confident and probably want to replace the inner sill. The new floor and outer sill will show you exactly where it fits.
Also this stops you having too many challenges at once.
 
if i got you right, that's the way i'd prefer doing it: putting the outter sill in, and only then remove the floor.. but the welds from the inner sill to the floor will then be inside the sills, so, not reachable.. that's my problem, right there.. :) look at that last image..

as you say, if i'd only cut these welds from the sill to the floor, the door pillar would already move - which is understandable, as it has nothing else to keep it in that spot..

you see why did i stop and came here for tips? :D i'm overthinking this, and there's a very good reason for that.. i'm afraid of bending that sill.. because if that happens.. hm.. you know.. i screw up the whole thing..
 
it was all going well till.. :bang::bang::bang: ..i ran out of CO2..
i even thought it was just a skill issue - so i revised my swear-word vocabulary - but turned out to be just CO2.. for now.. :D

so, minor update, but satisfied with how it is going now:
changed the tripod from the front left to be able to cut off the bottom (that was the plan at least), and cut a bit of it, to make the space to fit the bar for support i still want to make a little extention from that bar to the front left inner fender, so that's all tied together, but for now it's all fine.
the rear left fender had a bit of a hole from rust, i was half way though the fix when i noticed there was no gas coming from the welder.. so, i grinded all smooth, and stopped for today.
still could take the rest of the left floor out, but i'd prefer to keep it on just until i have that inner plate and the rear left fender really smooth/done, as they're necessary to be properly fixed before thinking of the outter sill going in.

happy with the progress of today, not very amused with the empty bottle.
i guess there will be no progress tomorrow, i'll probably just clean the garage a bit, because.. it's getting really messy with all the crap that is coming out of the car.. :D

and now the pics:
15220171_10207849318611848_6419917778533245077_n.jpg

15230763_10207849318491845_5020205064419978185_n.jpg
 
Interesting way of doing it. Personally I would have left the floor in place & removed the inner & outer sill. Then clean up any welds on the floor so that the new panels line up with the floor but don't weld them. The a post won't go anywhere as it is attached to the front bulkhead and held in place by the centre tunnel, floor and sill on the other side. You can always weld a brace in from front to back. This allows you to remove all quickly, cleanly with the minimal amount of hassle. Once the sills are in cut out the floor. But that's just my opinion[emoji3]
 
I think that's what Ricardo's doing Sean. Just that he seems to have removed part of the inner wheelarch so in my experience he's wise to have that brace. The problem is that this car is maybe not that bad compared with our experiences, so it's a shame, especially since he's new to welding etc, to rip it apart.....
and he has high standards and there is that big question of "where do you draw the line?"
I agree though, the floor is the key template in all this, although it has been replaced previously.?
 
Last edited:
hi guys..
the last time we were checking what to cut and what not, i thought you were saying something around 'keep the car as original as it can be', so, the inner sill is not going anywhere. it stays in place, with 2 minor fixes - one to clean a bit of rust at its bottom front, and the other to put back in place that inner support that was missing from a previous restoration. all those cuts i did on it (thinking i would replace it) will be used for spot welds when i have the outter sill in place.
that brace from the sill to the tunnel is there from Peter's previous suggestion, which as he mentions on this last post, is a better to have as the wheel arch isn't there to hold it in place..
as for why am i cutting the floor off at this point, it's really just because the floor which is there is welded to the inner sill in the wrong place (check the previous images on that), so, these welds won't be accessible if i put the outter sill before removing the floor. - otherwise, Sean, i surely would have done as you say - fix the sill(s) and then do bottom.
 
Maybe you have cut the floor out by now, but if you haven't then leave it until the outer sill is tacked back as the floor edge and height of the flange help guide the position of the sill panel.
On the other side I would do as Sean suggests and replace the floor before anything else. The floor is removable at any stage as far as I can see.

It all comes down to a debate between keeping the original strength and alignment where possible but also wanting to feel the you have a completely rust-free car. I can accept a bit of compromise on the last one and in fact I prefer to know I have only removed what is absolutely necessary, but I think you and Sean are more perfectionist than me.:)
 
no, i still haven't removed it..
i have the feeling i'm super slow at this stage.. putting the car apart was all so quick.. today i spent a few hours just removing that front bit that i had left from the floor, and clean around that zone. i have some questions about that, but let me tell you first what's it gonna be with the rest of the floor:
my next step will be to clean the inner sill as much as possible, and give it a few weld spots on the border of it from the inside of the car, so i can remove the welds made on the previous restoration. this basically allows me to keep the floor in place and stop whinning/worrying about how to remove the sill once the outter sill is in place. which means, i'll be able to follow the steps given by you both, on keeping the new outter sill aligned with the floor. (i understand the importance of doing it this way, but i'm getting really upset at the way the previous restoration was done, and i think you'll get a bit of that feeling when i show you the pics of today)
so, the pics:
15319141_10207857469495615_7179994067673285297_n.jpg

please - please - help me understanding how is the floor from the tunnel supposed to end in the front, because i can only guess that there was some panel coming from under it, but i've no idea how's that supposed to look like. i see that twisted metal and it really makes me upset. (no, it wasn't me, in case you're wondering - comes from a previous resto, in which, clearly, to make it faster, they didn't care at all about it and just slammed the new floor on top of all the rusty panels. what didn't fit was put out in the worst way possible)

15327407_10207857461615418_70372840267626880_n.jpg

then there's this one.. i can understand that the panel from above, would have an L shape to, probably, provide support to the floor. there's a goot bit of it missing, but should be easy to make. what i don't understand is what's that panel doing under it. is it supposed to be there, or is that part of the old (original) floor, going under everything?


15355763_10207857465775522_7736858194366904483_n.jpg

on this one i'm trying to show the hole on the wheel arch.. if it's not clear enough, please let me know so i draw a line around it.. why does this one worry me? it's behind the metal plate where the wheel is attached to. what would you guys do on it? (if you know how afraid i was of removing the sill, now imagine how much this one freaks me out)

15356657_10207857468895600_1079445777103118225_n.jpg

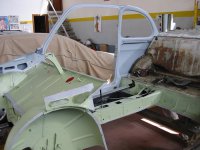
and this one is basically another view on the whole thing. - i wonder what on earth hit the metal next to the left square.. it looks like when you hit a metal sheet with an axe..

sorry for the long post. i'm just upset. hope this all makes sense to you..
 
It doesn't completely make sense to me; there seem to be too many layers of steel in that footwell area. I'm pretty sure that there should be one piece of reasonably thick steel with that sharp right-angle which makes a triangular box-section once the floor panel is welded in. You need to look under the car and see what's going on.
That gash is annoying and the corrosion on the inner wheel-housing is ugly. But you can make progress whilst putting that to the back of your mind for now, What I do is to make light and minimal welds onto areas that will need work in the future.
If you keep going like this until you have only the good metal left then I worry that you will have too many things going on and get stressed.
You don't want this:
 

Attachments

  • restauro_scheletro2_1_7.jpg
    restauro_scheletro2_1_7.jpg
    84.9 KB · Views: 37
Last edited:
ahah! no, no, no, i will not do it to that point.. as i said, i was done with cutting the floor, 'just' had to clean the front, as i can't weld now (without co2)..

but yeah, i'm with you, it doesn't make sense the number of layers.. tried to check under, and it seems like there's two triangles - one is the one you mentioned (which isn't there now as i removed the front part of the floor), and one that is formed with the sheet from below, and ends 1~2cms above the line formed by the two rectangles.. (if you look closely to the last pic, you might be able to see the spot welds in line.. )

i'm puzzled about that section, but i won't be doing anything else in there, until i have the outter wheel arch done (at least half - like sean did on franko - as mine doesn't quite fit), and the sills fixed & welded in place.

any ideas or pics of that section will be helpful though, as even when i'm not doing anything on it for now, i'll be always overthinking about it. - i'll take some more pics of how it looks like under too when i've that messy tar (or what ever it is) removed around there..
 
I was just thinking; I have never seen under an "R" but I think that the front underbody might have the extra strengthening chassis parts from the 126. This might explain if there is more original metalwork going on under that front floor area.:rolleyes:
 
I was just thinking; I have never seen under an "R" but I think that the front underbody might have the extra strengthening chassis parts from the 126. This might explain if there is more original metalwork going on under that front floor area.:rolleyes:

:D these kids come here with questions about their new cars and i've no idea what to tell them.. :D - it's a joke

you're making a very good point.. how do i get to know if that applies though? :eek:
 
:D these kids come here with questions about their new cars and i've no idea what to tell them.. :D - it's a joke

you're making a very good point.. how do i get to know if that applies though? :eek:

:D:D:D

Well, I found this overturned 126 on the internet.
If you have those three outriggers and had the more chunky cross-member, it will change the way that area is constructed from what most of us in the UK will be used to.
126p_Polski_Fiat_on_its_side by Peter Thompson, on Flickr
 
Last edited:
:D:D:D

Well, I found this overturned 126 on the internet.
If you have those three outriggers and had the more chunky cross-member, it will change the way that area is constructed from what most of us in the UK will be used to.

:D that's actually a really good pic! :D

no, mine doesn't have those three outriggers going on, buuuut, remember when i said that there's a single bar holding both floors in place? it's pretty much what they have on the back side of these 3 outriggers.. but with about 1cm tall, not as tall as this one.
anyway, without those 3, it really looks like mine.
 
:.. but with about 1cm tall, not as tall as this one.
anyway, without those 3, it really looks like mine.

Phew!!! In that case we are OK and my previous advice not to worry about removing any rusting cross-bar still stands,. Yours will be like this (my car) :

_JAN2666 by Peter Thompson, on Flickr
 
Phew!!! In that case we are OK and my previous advice not to worry about removing any rusting cross-bar still stands,. Yours will be like this (my car) :

_JAN2666 by Peter Thompson, on Flickr

yes, yes, i remember you saying that.. :)

do you know, by any chance, what's the thickness of the metal plate that makes the L where the floor will sit on? (won't be touching that area anytime soon, but i better find the right metal sheets to be able to fix that once i get to it.)

btw: tomorrow i'm going for co2 refills!
 
am staring at your pic, and i'm noticing:

the floors - rear side goes under, front side goes above. outter side goes under, inner side goes above. (if you understand what i mean with this) am i right?

kuddos on fixing that front left jack support.. :p
(my front is definitely different, but i think i can 'connect the dots' on the differences and move on with it.. ;) )

You got it right.
It does need a bit of manoevring to fit but I have fitted three sets of floors now and found it OK.
I made that mounting piece because that car was restored on a very cheap budget and at the time I didn't even realise the piece was available in any case.
The steel at the front piece you were asking about isn't very thick, possibly 1.4mm at the most. On this car it is definitely the layers, box sections and pressings that give it strength; most of the steel is surprisingly thin.
 
The steel at the front piece you were asking about isn't very thick, possibly 1.4mm at the most. On this car it is definitely the layers, box sections and pressings that give it strength; most of the steel is surprisingly thin.

yep, just asking because that plate that comes from under the tunnel seems thicker than any other i've seen in the car. not as thick as the tunnel itself.
 
:D:D:D

Well, I found this overturned 126 on the internet.
If you have those three outriggers and had the more chunky cross-member, it will change the way that area is constructed from what most of us in the UK will be used to.
126p_Polski_Fiat_on_its_side by Peter Thompson, on Flickr

You scared me at first as I scrolled through this thread, I thought you'd rolled Murf for a minute!!!!!!:eek:
 
Back
Top