fiat before 1.jpg

500 (Classic) 1963 'D' resto with 126

Introduction

Hi all, I have learned a huge amount from threads on this site, so now my own resto is underway I thought I should start my own thread. I don't guarantee I can add an insight, but hopefully I can offer some inspiration!

I've never restored a car before, but have done a few old vespas and recently completed a nut and bolt restoration on an old moto guzzi, so am pretty confident I can have fun with this car and hopefully do a good job.

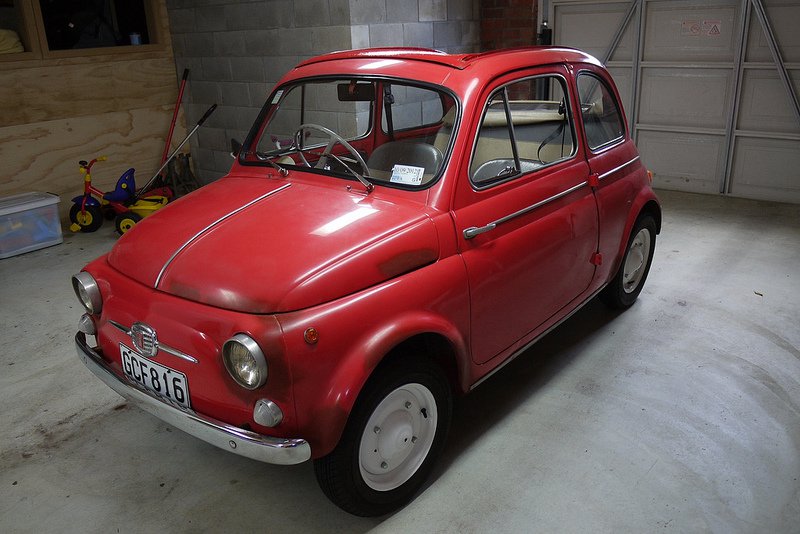
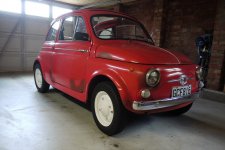
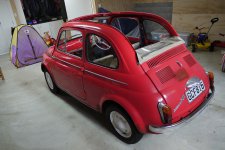
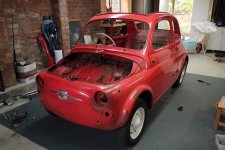
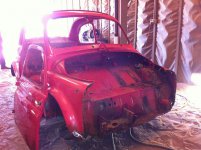
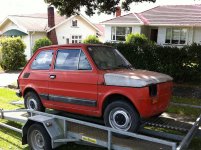
I bought the car in about October last year through an online auction. It was in a different city so I didn't view it first. A friend had a quick look and I took a bit of a leap of faith. I's a 1963 D model, which has had the rear roof unbolted to make it a "Transformable" of sorts. The existing roof just used the standard roof frame and some extra cross bars. You had to fold it back by hand but it worked well enough. The car ran well and I had a blast driving around for 3 months of summer.

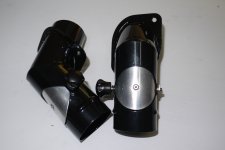
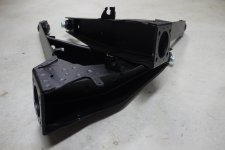
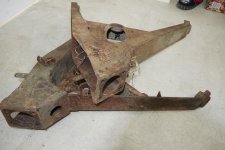
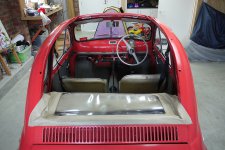
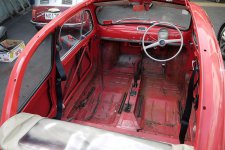
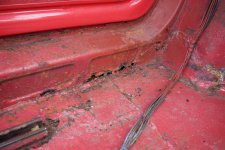
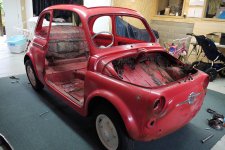
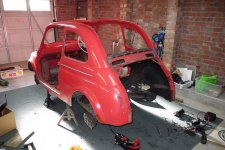
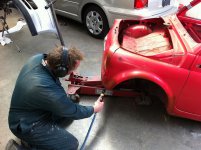
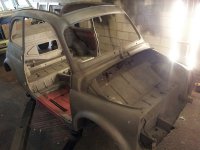
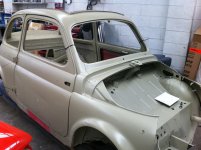
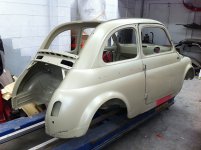
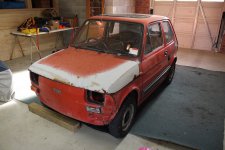
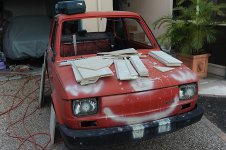
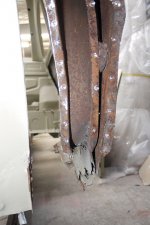
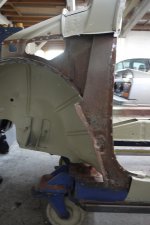
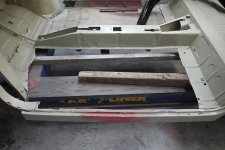
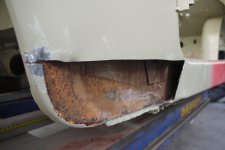
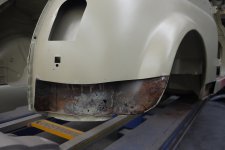
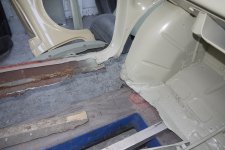
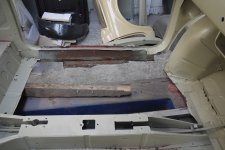
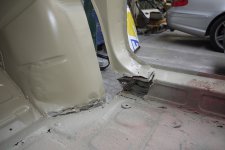
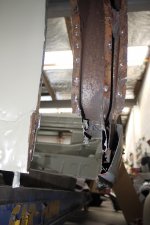
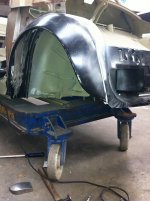
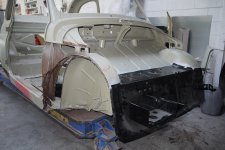
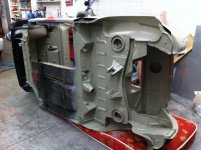
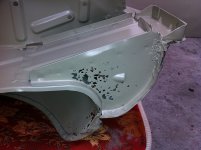
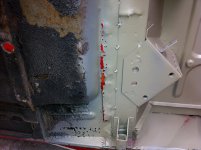
It was pretty obvious the car had rust but I ignored this while I had fun. Earlier this year the car failed its warrant of fitness test so it was time to go and see my mate Dan, who's a panel beater, and figure how bad the rust really was. The pics here show some of what was in the sills and floor. The car had a "makeover" in about 1990, and was probably quite god then, but 22 more years on the road and the rust had slowly done its job. Front panel, battery ray, drivers door, floor, inner and outer sills all needed replacing...

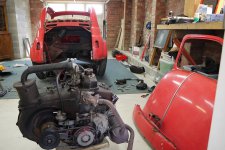
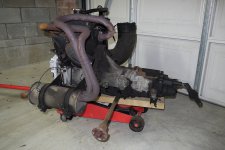
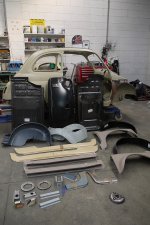
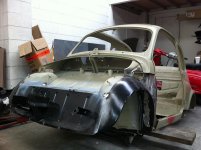
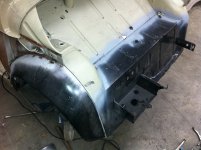
Faced with either a full resto or a trip to the dump I decided to save the car. And so the learning curve stated! I'll post up soon with some pics on whee the panel work has got to so far, some details of the fiat 126 donor I found and some of the work I've done on the rest of the car while the panel gets done.

Cheers Roger
Hi Chris, lots more pics to come I promise. Hope I can live up to your high standard of posts! The car is a good resto prospect for sure, and I plan to keep original as much as possible. The only changes will be things that could be put back to standard if required at some time in the future.

I bought the car because I have a young family and can't really share my passion for old Guzzis, Vespas and lambrettas with them, so the Bambina is like a scoot/bike for four.

I want it to be a practical car for decent family trips, so will be fitting a 126 engine and gearbox, likely with a 695 tune. It'll also get 126 brakes for a bit more stopping power. Other than that everything will be standard 500D. I did look at using the 126 rack and pinion steering, but decided against it on grounds of originality.

More soon.

Cheers Roger
 
Here is another set of photos that covers the dismantling of the car, through blasting and epoxy coating prior to panel beating.

I was surprised at how long it took to strip the car right down, about a day and a half all up. Mind you, I was in no rush and was keen to enjoy lookoing at how the car had been built almost 50 years ago.

I knew the car had been given a "Tart up" 20 years back, so was worried I'd find lots of things wrong, but apart from the rust everything was very original, including 95% of the nuts and bolts. When I started doing up old vespas as a student years ago I used to ditch all the old bolts and replace with new. These days I believe in saving every one that is sensible and safe to retain. On a vespa or a guzzi I would know where a bolt goes just by looking at it, but being new to fiats I took the time to photograph all the bolts etc. I then clean them up in kerosene, give them a brush with the wire wheel on my grinder and send them away for new zinc plating. Costs $20 for a bucket of bolts - lots cheaper than new and better still you get to keep bolts with the lovely "fiat" marked on them. I dropped a "before and after" photo in of a gearbox linkage bolt to give anyone who's not familar with this an idea of how great old bolts can look after this process.

The blasting process revealed more rust, but only in places I expected, so not too bad. Nothing in the whole top of the car, or around the windows at all. Bonnet and boot lid were pretty much mint. I was surprised to find the passenger door was perfect, but the drivers door had old repairs and a lot of new rust. I was over the moon to find a New Old Stock drivers door (how many of those still exist?!) through a local collector and was even more pleased when he told me he'd sold the passenger door that went with it to a previous owner of my car, so mystery explained!

I'm working on some pics of panel work so far, and of some of the parts I've refurbished to date. Meanwhile next post I'll try and cover my 126p donor car.

Cheers Roger
 

Attachments

  • fiat teardown 1.jpg
    fiat teardown 1.jpg
    293.8 KB · Views: 434
  • fiat teardown 2.jpg
    fiat teardown 2.jpg
    308 KB · Views: 353
  • fiat teardown 3.jpg
    fiat teardown 3.jpg
    292.8 KB · Views: 358
  • fiat teardown 4.jpg
    fiat teardown 4.jpg
    303.5 KB · Views: 794
  • fiat teardown 5.jpg
    fiat teardown 5.jpg
    308.2 KB · Views: 295
  • fiat blast 3.jpg
    fiat blast 3.jpg
    234.9 KB · Views: 332
  • fiat blast 2.jpg
    fiat blast 2.jpg
    229.9 KB · Views: 320
  • fiat blast 1.jpg
    fiat blast 1.jpg
    320.4 KB · Views: 321
  • fiat gearbox bolt new zinc.jpg
    fiat gearbox bolt new zinc.jpg
    132.3 KB · Views: 516
  • fiat gearbox bolt.jpg
    fiat gearbox bolt.jpg
    139.7 KB · Views: 258
  • fiat epoxy 1.jpg
    fiat epoxy 1.jpg
    260.3 KB · Views: 787
  • fiat epoxy 2.jpg
    fiat epoxy 2.jpg
    263.3 KB · Views: 889
OK, here are some pics of my 126p donor car. We never got Nikis in New Zealand, just around 80-90 "P" models, so I was glad to find one. The car looks shabby, but apart from the damage to bonnet and front quarter it was actually really good. No rust at all. I felt sorry to wreck it, but ended up giving away doors, windows etc to a couple of 126 fans and will be cutting out a rear quarter for another guy. One good thing about it being a "P" is that they still have a pull starter, which is a litle detail I really like about the 500's.

I have to note that while I think the 126's are cool in their own way, I am amazed at how much of their extra 150cc's must have been simply to cope with the extra weight. Those rubber side trims weigh about 2 kilograms each and the car had a huge amount of heavy soundproofing in it.

It's only ot 40,000kms on the speedo, and someone has given it a bit of a tune at some point. It has a FZD carb and a previous owner has gone to a good deal of effort to farbricate a nice set of "direct to head" exhaust headers of exactly equal length. I can't say I got to experience driving this engine much, the car had been in a shed for 6-8 years and when I picked it up had four flat tyres, a semi-seized brake on one wheel and was covered in a layer or thick sawdust. I pumped up the tyres, rigged up an old oil container as a temporary supply of fresh gas and drove it up and down the street with just the handbrake to stop. Hard to make a proper assessment under those conditions!

Cheers Roger
 

Attachments

  • 126 5.jpg
    126 5.jpg
    286.1 KB · Views: 297
  • 126 4.jpg
    126 4.jpg
    255.4 KB · Views: 300
  • 126 3.jpg
    126 3.jpg
    243.2 KB · Views: 308
  • 126 2.jpg
    126 2.jpg
    262.7 KB · Views: 242
  • 126 1.jpg
    126 1.jpg
    374.9 KB · Views: 269
Wow - for a guy who lives where these cars were never officially imported, you've landed on your feet. That little motor may turn out to be gold and it would be interesting to lift the head and do a few measurements.

I have one request. If you do rebuild the carby and engine, can you please post as much detail as possible - particularly the carby jetting and if possible the camshaft profile. I know this is a big ask, but the information would be invaluable particularly if this motor has been properly tuned. FZD data is getting thin on the ground.

Good luck and keep us posted.

Chris

PS: That serpentine exhaust manifold, although tuned, must get fairly warm ...
 
Hi Chris, rest assured I'll be posting lots of info!

Yup, feeling very lucky indeed. Especially after today. I stripped the engine down this morning as while the head is unmodified beyond some work on the inlet to match the carb, it does have a worked cam. It is engraved with marks from a local firm who had a very good reputation back in the day for fiat cam tuning. Local experts tell me it's quite a find.

The firm still exists, so I'll be calling them on Monday and hope they'll match the numbers to full specs and save me having to calculate it all. Happy to share the info. Will get back to you on carb jetting when I strip the carb.

Cheers Roger
 
The was my Niki 650 (aka Fiat 126p) - purchased and delivered to my door for $250.

The body was full of rust, but I managed to salvage some mechanical parts. The quality of build and panel fit was not very good. I believe that the Italian built 126's were assembled much better.

I was doing some landscaping at the time, hence to junk lying around and on the car. The face was courtesy of one of the guys helping with the fencing. He ended up taking the shell away to use as a motorcross jump on a private course about 30km away. I helped him half bury it when we got it there - poor little car probably didn't deserve such an ignominious end.

Chris
 

Attachments

  • The Pig 2.jpg
    The Pig 2.jpg
    573.6 KB · Views: 177
An update on my cam and carb specs.

With some sleuthing I was able to access the full record of my cam grind. The firm who did the work sold that part of their business years ago but I was able to get in touch with the gentleman who took on the business and its records and he quickly found the original handwritten notes.

The cam is very close ( but not exactaly ) to the 110 degree 35/70 cams that are sold today as "fast road cams". The engineer had recorded mine as "high performance road".

The most remarkable thing is that the grind was done in late 1982 - almost 30 years to the day from now. That is the same year the car was first registered for the road. The notes also record that the car has an fzd carb. So someone loved the car enough when it was brand new to pull it apart, grind the cam and fit an expensive carb - and I assume my tuned exhaust.

I guess that is really only of interest to me as a note to the engine's history, but for those interested in fzd carb tuning it does indicate that the carb jetting has lasted for about 40,000 KM's ( the mileage of the car) and so could be considered a reliable and tested set-up for the state of tune.

I pulled the carb apart and recorded the following specs:

120 main jet
38 Idle jet
40 pump jet
6747.6 emulsion tube
190 air corrector

Cheers Roger
 
Roger,

This is very interesting.

My camshaft is a 43/77 77/43 (107 deg) 'performance cam'.
I've fitted bigger inlet valves (35mm) to go with the 300 degree inlet valve opening.
Even though there is considerable overlap (86 deg) the engine idles well at 1000rpm.

Also, if you don't mind, what are the valve sizes and bore of your engine ?

On advice from Middle Barton Garage, my carby is tuned as follows :

Main 132
Air 190
Pump 50
Idle 48
Emulsion 6747-8

The engine is a 695cc (79.5 x 70mm) and it runs well and pulls strongly without being tempermental. It generates around 35bhp (~5600rpm) at the flywheel.

I think that there are many ways of enhancing performance from these little engines and it doesn't surprise me that no two are the same.

Chris
 
Chris, I don't have exact cam details on me, but inlet timing is around 296 degrees from memory.

Head is almost original. Valves are standard sizes and it doesn't appear to have been skimmed at all. The only work seems to be some mild and sensible opening of the inlet port.

Barrels and pistons are also standard. On that basis I'd say that your jetting seems a logical overall increase given increased CC's you have and your valve sizes.

I take it you've had your engine dyno'd to identify the 35 horses at flywheel? When my car is complete I'll be having it dyno tuned so will certainly be able to post very reliable carb settings then - mind you, that looks at least 6 months away at the current rate of progress!

Cheers Roger
 
Roger,

I made a mistake with my jetting - what I quoted was the original jetting fitted when I bought the carby.

I've dug through my records and the current jetting is -

Main 128
Air 190
Pump 45
Idle 38
Emulsion 6747.6

Apart from the bigger main and pump jets, it's the same as yours.

I got parts from Eurocarb (www.dellorto.com) - they seem to have a good supply of most components.

Yeah, I had it on the dyno a few months ago. At the time it was still not completely run in so the test was limited a bit. The guys said to bring it back when its done a couple of thousand kilometers.

Chris
 
Last edited:
Hi all, here's a photo update on where I'm at with panel work on m "D". My panel beater friend is working on it only in his spare time, so progress is pretty slow. So far the new inner front guards and battery panel have gone on fine and now we're starting on one side of the floor and sills - we're cutting out one side at a time so the car stays in one piece - sort of!

Meanwhile I've got the engine and gearbox fully apart and am now waiting on a huge stash of new parts from various suppliers. The head is being ported and gas flowed and having bigger valves fitted. keeping busy working on various sub-assemblies - rebuilding horn, starter, alternator, steering box etc etc. Wiill post photos of that stuff soon.

Cheers Roger
 

Attachments

  • fiat panel 5.jpg
    fiat panel 5.jpg
    205.4 KB · Views: 248
  • fiat panel 4.jpg
    fiat panel 4.jpg
    188.3 KB · Views: 247
  • fiat panel 3.jpg
    fiat panel 3.jpg
    245.7 KB · Views: 288
  • fiat panel 2.jpg
    fiat panel 2.jpg
    172.2 KB · Views: 253
  • fiat panel 1.jpg
    fiat panel 1.jpg
    248.1 KB · Views: 251
  • fiat panel 10.jpg
    fiat panel 10.jpg
    254.4 KB · Views: 239
  • fiat panel 9.jpg
    fiat panel 9.jpg
    242.5 KB · Views: 222
  • fiat panel 8.jpg
    fiat panel 8.jpg
    233.1 KB · Views: 275
  • fiat panel 7.jpg
    fiat panel 7.jpg
    200.9 KB · Views: 256
  • fiat panel 6.jpg
    fiat panel 6.jpg
    205.7 KB · Views: 292
  • fiat panel 15.jpg
    fiat panel 15.jpg
    263.3 KB · Views: 293
  • fiat panel 14.jpg
    fiat panel 14.jpg
    251.6 KB · Views: 277
  • fiat panel 13.jpg
    fiat panel 13.jpg
    269.5 KB · Views: 306
  • fiat panel 12.jpg
    fiat panel 12.jpg
    278.3 KB · Views: 286
  • fiat panel 11.jpg
    fiat panel 11.jpg
    232.2 KB · Views: 266
  • fiat panel 16.jpg
    fiat panel 16.jpg
    244.5 KB · Views: 296
  • fiat panel 17.jpg
    fiat panel 17.jpg
    279.2 KB · Views: 242
  • fiat panel 18.jpg
    fiat panel 18.jpg
    288.9 KB · Views: 289
Thought I'd share a picture I found online yesterday that shows a car exactly how I'm hoping mine will turn out - even the colour is perfect.

[ame="http://www.flickr.com/photos/mauboi/3589997514/sizes/l/in/photostream/"]All sizes | Fiat 500 Abarth | Flickr - Photo Sharing![/ame]
 
It's a Flickr link, not sure why they do that. Anyway, if you click on the orange bar above the box where it says "all sizes... Etc etc" then you should get the link.

If anyone has any other pics of this car I'd be keen to see them, shame the wheels aren't more visible.

I am happy to be a sticky, just hope I can live up to it!
Cheers Roger
 
My panel work is still ticking over slowly, so in the meantime I have been working on all the various small sub-assemblies as well as stripping down the engine and gearbox. In some ways I find this the best part of a resto, taking apart various components, seeing how they work, cleaning then up, reassembling, testing etc then setting aside for later incorporation into the finished project. There is always a huge range of processes involved in renewing parts - painting, polishing, annodising, powdercoating, zincing, welding etc etc. I have used a lot of powdercoat and still more of a product called hypercoat, which is marketed by a company called HPC (High performance coatings) and is extensively used on engine and running gear parts for hot rods, drag cars and motorcycles, as well as industrial applications. It is very much thinner than powdercoat and withstands huge temperatures, oil, petrol etc. It's very satisfying to take in a rusty old part and come back in a week to collect the same part looking like new - check out m 500F swingarms, they'd been under a hedge for 10 years and came up really well. Mind you, getting the new bushes in was a hassle. If anyone else is doing this in future I strongly suggest having them put in a lathe and a small 'lead' turned in to the steel casing on one end. Only after doing this was I able to press them in straight because they are anything but perfectly round!
BTW - I used vibro-polishing to get my alloy parts like engine mount, pedal block, Idle arm block etc polished. They simply get placed in with a grainlike media and tubled until they shine. Beats the elbow grease!
Cheers Roger
 

Attachments

  • Fiat rebuilt parts horn.jpg
    Fiat rebuilt parts horn.jpg
    175.8 KB · Views: 220
  • Fiat rebuilt parts handbrake, starter, throttle.jpg
    Fiat rebuilt parts handbrake, starter, throttle.jpg
    198.6 KB · Views: 196
  • Fiat rebuilt parts front brake.jpg
    Fiat rebuilt parts front brake.jpg
    250.8 KB · Views: 240
  • Fiat rebuilt parts engine mounts.jpg
    Fiat rebuilt parts engine mounts.jpg
    255.6 KB · Views: 279
  • Fiat rebuilt parts aircon.jpg
    Fiat rebuilt parts aircon.jpg
    190.1 KB · Views: 246
  • Fiat rebuilt parts swingarms.jpg
    Fiat rebuilt parts swingarms.jpg
    246.9 KB · Views: 248
  • Fiat swingarms as found.jpg
    Fiat swingarms as found.jpg
    341.6 KB · Views: 249
  • Fiat rebuilt parts rear brake.jpg
    Fiat rebuilt parts rear brake.jpg
    288.8 KB · Views: 272
  • Fiat rebuilt parts pedal block.jpg
    Fiat rebuilt parts pedal block.jpg
    220 KB · Views: 739
  • Fiat rebuilt parts idler arm.jpg
    Fiat rebuilt parts idler arm.jpg
    234.6 KB · Views: 322
  • Fiat rebuilt parts swingarm detail.jpg
    Fiat rebuilt parts swingarm detail.jpg
    236 KB · Views: 203
  • Fiat starter motor before.jpg
    Fiat starter motor before.jpg
    312.5 KB · Views: 793
  • Fiat starter motor rebuilt.jpg
    Fiat starter motor rebuilt.jpg
    349.7 KB · Views: 207
Also some pics of the "hammer finish" coating I used on the engine cover, thermostat housing etc...
 

Attachments

  • Fiat  rebuilt parts thermostat housing.jpg
    Fiat rebuilt parts thermostat housing.jpg
    321.9 KB · Views: 190
  • Fiat air filter housing hammer finish.jpg
    Fiat air filter housing hammer finish.jpg
    493.2 KB · Views: 281
Roger,

man after my own heart. Love the work on the parts. The contast that the black and bright sets up throughout the car makes the work worth it. You will see this when you start bolting bits back onto the body.

Regards

Joe R
 
Back
Top