Getting started - removing the pipes!
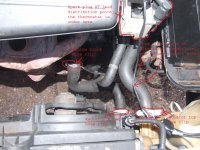
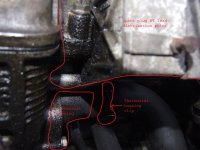
The following 2 pictures should help you understand where you are looking for each clip:


Method
*checkpoint* You should now have a clean pair of mating faces for the thermostat and clean pipes if you have taken the top off and cleaned it and flushed through the bottom one. The next step is to get and flush the engine and radiator out. As a word of warning this can get messy!


Method
- The first step is to get the car into position for where-ever you are going to carry this out and allow the engine and coolant to cool down until they are completely cold. I am not being responsible for over enthusiastic people scolding themselves or burning themselves! (You can get a rough idea by putting your hand near, but not on, the engine block or radiator; or better yet the pipes between the two).
- You need to pop the bonnet and hold it open using the equipment provided (doing this step and allowing the engine to cool off with the bonnet raised should speed up the cooling a bit)
- Now you need to position your container under the pipe that connects to the radiator. ENSURE THE SYSTEM IS COLD BEFORE PROCEEDING
- Remove the top up bottle's top at the top of the radiator and disconnect the negative battery terminal.
- If someone has already replaced the coolant fluid they will have probably used the jubilee type pipe clip (that being one with a screwdriver head attached), if that is the case remove the clip at the bottom of the radiator using a screwdriver. If not then get hold of your pliers and cutters, you need to maul the metal ring off the top of the clip and then prize the two small metal tabs that the ring was holding together apart and then either cut it off or open it up as much as possible and slide it up the pipe it is attached to out of the way. Open the two bleed points to help draining, I totally removed mine, but that is up to you!
- Remove the pipe from the radiator and do your best to catch as much fluid as possible in your container.
- Once you have drained the fluid out you can now repeat the clip removal process for the clip at the top of the radiator.
- Using the 10mm bolt removal technique of your choice (be it ratchet or spanner), remove the bolts holding the thermostat onto the side of the engine. The thermostat is located to the right of the air intake as you look from the bumper towards the windscreen, and is hidden underneath the metal housing with 4 wires coming off it (if you have a cover over these wires, remove it as it shouldn't be there, it can cause the wires to overheat!)
- Check you have all the bolts out and then remove the thermostat; you may have to wriggle it or gently tap it with the back of a screwdriver to loosen the gasket.
- Scrape off and collect as much of the gasket as you can from both the engine block and the thermostat housing. You may want to clean the thermostat off; mine was buried in thick residue and required a lot of attention with a cheap toothbrush and plenty of water. You may wish to check the operation of the thermostat; this is done by immersing it in hot water (such as a pan of boiling water, preferably a pan you don't eat out of!) and checking that the thermostat physically reacts to the change.
- Wipe any oil or dirty from around the thermostat contact area and gently wet and dry the area until it is a good, clean looking flat surface. If you spot oil here, you have a leak higher up the engine and it is probably the o-ring for the cam shaft. Using the same technique on the mating face of the thermostat (let it cool obviously if you just put it into hot water) clean the face of the thermostat, there is an indentation running around the mating face of the thermostat, use the blunt knife to get all the rubbish out of there!
- If you want to go for cleaning the pipes out then you need to remove the remaining clips on both pipes via the same method as above and take the top pipe and clean it with water away from the engine. The bottom hose pipe has to be cleaned in situ unless you fancy figuring out how to remove it (this part runs has a split that goes towards the heater matrix)
*checkpoint* You should now have a clean pair of mating faces for the thermostat and clean pipes if you have taken the top off and cleaned it and flushed through the bottom one. The next step is to get and flush the engine and radiator out. As a word of warning this can get messy!

