Applicability
This guide is based on my 1999 mk1 Punto's 1.2L 8v engine. The method is pretty much the same for all versions of the FIRE engine system but some parts may vary in layout, if things don’t match up to my description then ask in the forum section or use your prior knowledge, whichever suits. This guide has been split up into as many small sections as possible so that referencing each part of the job is as easy as possible")
Foreword (nearly)
After a period of time (about 2 or 3 years) your antifreeze could do with being removed and replaced with a new, fresh mix of antifreeze. If tap water or other impurities have been allowed to enter the coolant system (such as oil via a head gasket failure) then the surfaces of the pipes and metal surfaces can become lined with a layer of thick gunk. In my case this was from a mixture of tap water being put in by the previous owner and the coolant system having NEVER been flushed in the 9 years the car had been running!
There are a variety of radiator system flushing liquids such as Holt's radflush, feel free to use those in conjunction with this guide (I will comment on this later in the guide for those who want to use it).
*Note* If you are using radflush then you will need to follow this guide a second time after running the engine with the radflush in after the first clean out. As such you would need double the amount of coolant for this method.
Tools required
Spare parts required
Other applicable guides
The only other guides that may be of help are those that instruct on how to bleed the radiator system in more detail. I have included a basic description but these may also be of use:
How to: bleed a mk1 Punto Cooling System - by Dave
Bleeding the cooling system on a mk1 punto. - by vtec
Things to expect
Precautions
There are a number of things to be aware of whilst carrying out this job. The most obvious one is injury through coming into contact with hot engine coolant. Please be careful in making sure the system is cold before pulling it to pieces or trying to remove the pressure cap on the radiator bottle (it will shoot out due to being under pressure if it is hot enough!). Also you need to dispose of the old coolant and any fluids generated carefully. They must not be disposed of in a method that allows them to enter a water supply and not just left on the ground. Anti-freeze attracts the attention of animals and small children and is lethal if ingested. Please read the information on the back of the bottle or search on the internet for more information (or come and ask on here).
Finally, a helpful hint with filling and bleeding the radiator
I found it was easier to park the car with the nose pointing up a slight incline (my driveway has a slope of about 20 degrees) as this brings the heater matrix bleed point closer to level with the filler cap point!
This guide is based on my 1999 mk1 Punto's 1.2L 8v engine. The method is pretty much the same for all versions of the FIRE engine system but some parts may vary in layout, if things don’t match up to my description then ask in the forum section or use your prior knowledge, whichever suits. This guide has been split up into as many small sections as possible so that referencing each part of the job is as easy as possible
Foreword (nearly)
After a period of time (about 2 or 3 years) your antifreeze could do with being removed and replaced with a new, fresh mix of antifreeze. If tap water or other impurities have been allowed to enter the coolant system (such as oil via a head gasket failure) then the surfaces of the pipes and metal surfaces can become lined with a layer of thick gunk. In my case this was from a mixture of tap water being put in by the previous owner and the coolant system having NEVER been flushed in the 9 years the car had been running!
There are a variety of radiator system flushing liquids such as Holt's radflush, feel free to use those in conjunction with this guide (I will comment on this later in the guide for those who want to use it).
*Note* If you are using radflush then you will need to follow this guide a second time after running the engine with the radflush in after the first clean out. As such you would need double the amount of coolant for this method.
Tools required
- 10mm socket and associated socket wrench or a 10mm spanner
- Pliers and/or wire cutters
- Screwdriver
- Garden hose pipe and associated water supply and whatever fitments your system happens to need or is convenient for use
- A container to catch purged fluids in (this needs to be as large as you can get under), I used a 5L screen wash container with the lid firmly attached and the side cut off.
- A blunt knife (such as an old butter knife)
- Some wet and dry material
- Disposable cloth or clean work rag
- Work clothes and shoes you don’t mind getting wet and/or dirty
- New, cheap toothbrush (possibly)
Spare parts required
- Jubilee hose pipes
- 2x 35-50mm (so long as it goes down to 35mm its fine)
- Plus 1 extra if removing the bottom pipe
- Plus 1 extra if replacing the thermostat housing or removing the pipe from the housing for cleaning
- New thermostat gasket or liquid gasket compound (I used a liquid gasket; it's been fine so far)
- Aew o-ring if you're taking the metal pipe off as well, please don't ask me how this is done, I haven't tried this but I happen to know there is an o-ring that will need replacing in there!
- Approximately 5 litres of ethylene glycol based antifreeze mixed in a one to one ratio with pure distilled water (or 5L of ready for use ethylene glycol antifreeze made up from the same mixture) per flush
Other applicable guides
The only other guides that may be of help are those that instruct on how to bleed the radiator system in more detail. I have included a basic description but these may also be of use:
How to: bleed a mk1 Punto Cooling System - by Dave
Bleeding the cooling system on a mk1 punto. - by vtec
Things to expect
- Get wet
- Get dirty
- Get annoyed at the original pipe clips
Precautions
There are a number of things to be aware of whilst carrying out this job. The most obvious one is injury through coming into contact with hot engine coolant. Please be careful in making sure the system is cold before pulling it to pieces or trying to remove the pressure cap on the radiator bottle (it will shoot out due to being under pressure if it is hot enough!). Also you need to dispose of the old coolant and any fluids generated carefully. They must not be disposed of in a method that allows them to enter a water supply and not just left on the ground. Anti-freeze attracts the attention of animals and small children and is lethal if ingested. Please read the information on the back of the bottle or search on the internet for more information (or come and ask on here).
Finally, a helpful hint with filling and bleeding the radiator
I found it was easier to park the car with the nose pointing up a slight incline (my driveway has a slope of about 20 degrees) as this brings the heater matrix bleed point closer to level with the filler cap point!
Getting started - removing the pipes!
The following 2 pictures should help you understand where you are looking for each clip:


Method
*checkpoint* You should now have a clean pair of mating faces for the thermostat and clean pipes if you have taken the top off and cleaned it and flushed through the bottom one. The next step is to get and flush the engine and radiator out. As a word of warning this can get messy!
Method
- The first step is to get the car into position for where-ever you are going to carry this out and allow the engine and coolant to cool down until they are completely cold. I am not being responsible for over enthusiastic people scolding themselves or burning themselves! (You can get a rough idea by putting your hand near, but not on, the engine block or radiator; or better yet the pipes between the two).
- You need to pop the bonnet and hold it open using the equipment provided (doing this step and allowing the engine to cool off with the bonnet raised should speed up the cooling a bit)
- Now you need to position your container under the pipe that connects to the radiator. ENSURE THE SYSTEM IS COLD BEFORE PROCEEDING
- Remove the top up bottle's top at the top of the radiator and disconnect the negative battery terminal.
- If someone has already replaced the coolant fluid they will have probably used the jubilee type pipe clip (that being one with a screwdriver head attached), if that is the case remove the clip at the bottom of the radiator using a screwdriver. If not then get hold of your pliers and cutters, you need to maul the metal ring off the top of the clip and then prize the two small metal tabs that the ring was holding together apart and then either cut it off or open it up as much as possible and slide it up the pipe it is attached to out of the way. Open the two bleed points to help draining, I totally removed mine, but that is up to you!
- Remove the pipe from the radiator and do your best to catch as much fluid as possible in your container.
- Once you have drained the fluid out you can now repeat the clip removal process for the clip at the top of the radiator.
- Using the 10mm bolt removal technique of your choice (be it ratchet or spanner), remove the bolts holding the thermostat onto the side of the engine. The thermostat is located to the right of the air intake as you look from the bumper towards the windscreen, and is hidden underneath the metal housing with 4 wires coming off it (if you have a cover over these wires, remove it as it shouldn't be there, it can cause the wires to overheat!)
- Check you have all the bolts out and then remove the thermostat; you may have to wriggle it or gently tap it with the back of a screwdriver to loosen the gasket.
- Scrape off and collect as much of the gasket as you can from both the engine block and the thermostat housing. You may want to clean the thermostat off; mine was buried in thick residue and required a lot of attention with a cheap toothbrush and plenty of water. You may wish to check the operation of the thermostat; this is done by immersing it in hot water (such as a pan of boiling water, preferably a pan you don't eat out of!) and checking that the thermostat physically reacts to the change.
- Wipe any oil or dirty from around the thermostat contact area and gently wet and dry the area until it is a good, clean looking flat surface. If you spot oil here, you have a leak higher up the engine and it is probably the o-ring for the cam shaft. Using the same technique on the mating face of the thermostat (let it cool obviously if you just put it into hot water) clean the face of the thermostat, there is an indentation running around the mating face of the thermostat, use the blunt knife to get all the rubbish out of there!
- If you want to go for cleaning the pipes out then you need to remove the remaining clips on both pipes via the same method as above and take the top pipe and clean it with water away from the engine. The bottom hose pipe has to be cleaned in situ unless you fancy figuring out how to remove it (this part runs has a split that goes towards the heater matrix)
*checkpoint* You should now have a clean pair of mating faces for the thermostat and clean pipes if you have taken the top off and cleaned it and flushed through the bottom one. The next step is to get and flush the engine and radiator out. As a word of warning this can get messy!
Cleaning the system out and putting it all back again
Flushing
- To clean out the radiator you can use the hosepipe through either the pressure cap or the top pipe hole and flush water out through the bottom pipe (easy to catch); or if the system is particularly bad you may have to reverse flush (through the bottom pipe hole, this needs a rag to help create a seal and is a pain for catching the water). Keep putting enough water through the system and stopping so you don’t overfill your container. Keep doing this having emptied the container until you get clean water out with no bits floating (took me about 100 litres for my radiator).
- To clean inside the engine block coolant areas, you have to be very careful; you don’t want to go spraying water around in your engine bay! Using the hosepipe, put water into the system and try to catch it at the bottom of the engine, again you want to keep going until you get no bits in the water, this took me about 150 litres. I reverse flushed mine but I have had plenty of practice!
- Re-attach the flexible flexible pipe to the bottom radiator hole and the metal pipe (if you took it off) using jubilee clips to secure the pipes. If you have taken the metal pipe off for cleaning, good luck refitting it, I haven't a clue!
- If you have separated the top pipe from the thermostat, you should reapply the pipe using a jubilee clip and then get the instant gasket or appropriate gasket to hand.
- Apply the appropriate gasket to the thermostat, if you are using a liquid gasket then run a 5mm to 7mm (obviously guess this) all the way around the ridge you cleaned out and then re-attach the thermostat housing to the engine and bolt it into place.
- Attach the remaining end of the top hose back onto the radiator and secure with the final jubilee clip.
*side note* If you have used an instant gasket, go do something else for an hour to let it set firmly!
Filling back up
- Now you can start to top the coolant back up. If you are using radflush then I would advise you put that in about half way through the filling up procedure. If you have premixed coolant then simply pour a bit of coolant (say half a litre), do your best to ensure you have no air locks, pour another half litre in and continue (for coolant bleeding, see one of the associated guides I linked to at the top) until coolant comes out of one of the two bleed points without any bubbles in it. Re-apply the screw if you took it out and carry on looking for the same at the next bleed point and continuing the bleeding methods (the usual pattern is radiator then heater matrix, as usual try to catch as much fluid as possible). Reapply the screw to the second bleed point’s hole once you again get a good flow of coolant out of there. If you are using concentrated antifreeze and purified water, put about a litre of water in, add the appropriate amount of antifreeze (that being 2.3L) and then carry on the bleeding process using water; again I suggest this in half litres (or as close as possible; I would probably put 2.5L of antifreeze in considering you will lose some through the bleed points).
- Put the pressure cap back on, re-attach the negative lead to the battery and close the bonnet.
Finally, how the insides of your cooling chamber shouldn't look
When I came to clean my coolant system out some time ago, I was hunting the source of a leak in the coolant system, the car returned normal results on the compression test so I was pretty sure it wasn't a head gasket failure (which it wasn't, thankfully).
Anyway, one day the car heated up quicker than normal and the radiator fan was struggling to keep the system cool, after letting the coolant cool off I opened the expansion bottle and took a look inside. To my horror a thick brown substance that can only be described as someone having poured a melted aero-chocolate bar on top of my coolant was visible.
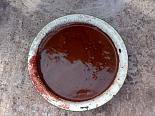
I couldn't find the leak in the system so decided to try cleaning the system out to see if fresh coolant would be any more visible than the current coolant for identifying the leak, so I emptied the radiator system out by detaching the bottom radiator hose clip. This is how the coolant looked:

Obviously I was horrified by the condition of it, there were solid lumps in the coolant for a start
So it was time to dismantle the rest of the system. When I took the thermostat off I found the gasket had died with old age, causing a leak (there was actually a second leak at the front core plugs but that was found about a month later). The thermostat couldn't be seen under a mound of thick gel like coolant that was everywhere inside the engine, I gave the thermostat a clean and eventually I found there was something under the gel:

I then decided to have a look inside the chamber that the thermostat is a part of and couldn't see very well, so I got the camera on my phone and took a couple of pictures, you can imagine my surprise at seeing this:


So using the flushing methods I have described in this thread I went about cleaning out the radiator (used about 100 litres of water) and then the coolant chamber inside the engine (using about 150 litres of water) before the water was finally clean. Being a touch cynical I decided to use a bottle of radflush I still had from when I owned my Rover Metro and had purchased for a service that it didn't survive to. Seeing as it was a summer’s day, I inserted just distilled water and the radflush as it instructs and then ran the engine through the cycle length the radflush instructs and then let the whole thing cool down before emptying the contents back out.
Now please bear in mind that the water was coming through both the engine and radiator crystal clear with no bits in less than an hour before this lot was pulled out of the engine:

Stunned doesn't cover it, so I pulled it all to pieces and flushed it again and then took another look into the coolant chamber in the engine with the camera to see this:

Obviously not perfect but a lot better than it started, after going through another 50 litres for the radiator and 75 for the engine block the water was clear again so until next year's service it will do.
After locating a core plug leak and having that fixed (I didn't have time to do it with University by this point, the local garage charged £60 to change all 4 across the front whilst it was in for an MOT), the car runs brilliantly again. The car warms up better, doesn't get as hot and isn't losing any more fluids.
But how do you know the coolant was 9 years old?
Well not all of it was, but when I bought the car, the owner said it had had the first 3 mandatory services and then all the work it had after that was whatever it needed to pass an MOT and timing belts when they were needed :bang:. All it had after that was an oil change every year and a fluid top up every time something 'ran a bit low or started acting strange'.
Needless to say I've gone around the whole thing checking it all against the MOT certificates and the service schedule and have brought the car back up to where it should be servicing wise
I hope all goes well when you change your coolant and clean out the system and the car isn't in as much of a state as mine was