Solutions to a problem you didn’t know you had. Many Stilo owners will have had to change their brake light switch through ASR warning lights and brake lights not working or brake lights staying on sort of problems but for those that haven’t then I feel you should be forewarned of something that may be coming your way if it hasn’t already.
Imagine the scene, I’m driving along a dual carriageway and a young lass draws up along side and is pointing and mouthing something unintelligibly like “I thought my bum looked big enough until I saw the backside of your Stilo”. At least I think that’s what she says and so I smile sweetly, give her a thumbs up and say back something which probably looks like “Yes you can get a full wax, back and crack down the road for £45 don’t you know”
Anyway, I decide to check things at the rear when I get home and I’m lucky in being able to check my rear lights in a neighbours front window acting like a mirror -spoils his TV viewing but handy for me. So everything looks intact and I check my brake lights a few times in the window –
Fine, fine, fine, fine, fine, uh?
Did I imagine that? Did the high level brake light come on but not the low level ones? Is that possible?
Fine, fine, fine, fine, then same again!
Fine, fine, fine then NOTHING! What’s going on?
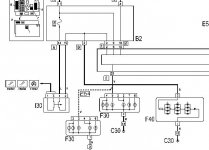
Looking at the circuit diagram, you can see the high level brake light is on a different circuit to the low level ones, the high one being directly connected to the brake light switch and the low level ones only being turned on by the body computer so it’s easily possible for the high level lights to work with no low level ones
Now I hear that new brake light switches are better designed and more robust than the originals, the operating point isn’t right at the top and therefore over sensitive and the switch isn’t so affected if you happen to trip your foot underneath the brake pedal. (The original would often reset it’s brake light operating point just by a simple act of pulling up on the brake pedal or catching your foot underneath it. Not good).
So I’d advise everybody to check out the operation of their brake lights, not by asking someone to check as you won’t know what’s happening, but by reflections and watching what happens with your own foot operating the brake pedal. If you’re getting odd things happening too then it’s time to replace the brake light switch before someone reshapes your rear end
New switches are £5 from Fiat. Not too difficult to fit but I’d advise practising shuffling a deck of cards with one hand in the dark upside down first
HOW TO REPLACE
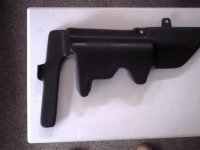
Remove the sound deadening over foot panel and throw it away if you haven’t already done so, more room for your feet and you can hear the indicators as well then.
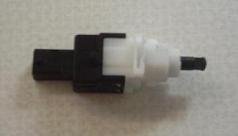
Switch is a bayonet, light bulb type, half turn to remove. Connector to it is a pull up release catch which is where you’ll need the fingers of steel and origami in the dark skills
It's fiddly and requires some good control one handed under the dash. Get the driver's seat as far back as it will go. The switch is right above the brake pedal arm and, at first, looks like a right pig to do as you can only just get your fingers on it and have to go almost toally by feel but, like a light bulb, just a half twist of the switch and it's out, push it upwards to release it from it's securing bracket. i did it so many times i can do it in seconds now so it's not difficult but a bit of a strain to get to so get comfy
Once it's released you have a bit of slack in the wiring so you can move the switch over the top for a bit more slack so you can get to the electrical connector. This is just a raise release catch on the side of the connector and pull off, again tricky because yoi could only use one hand on it but, once the connector is off, the switch is out.
Imagine the scene, I’m driving along a dual carriageway and a young lass draws up along side and is pointing and mouthing something unintelligibly like “I thought my bum looked big enough until I saw the backside of your Stilo”. At least I think that’s what she says and so I smile sweetly, give her a thumbs up and say back something which probably looks like “Yes you can get a full wax, back and crack down the road for £45 don’t you know”
Anyway, I decide to check things at the rear when I get home and I’m lucky in being able to check my rear lights in a neighbours front window acting like a mirror -spoils his TV viewing but handy for me. So everything looks intact and I check my brake lights a few times in the window –
Fine, fine, fine, fine, fine, uh?
Did I imagine that? Did the high level brake light come on but not the low level ones? Is that possible?
Fine, fine, fine, fine, then same again!
Fine, fine, fine then NOTHING! What’s going on?

Looking at the circuit diagram, you can see the high level brake light is on a different circuit to the low level ones, the high one being directly connected to the brake light switch and the low level ones only being turned on by the body computer so it’s easily possible for the high level lights to work with no low level ones
Now I hear that new brake light switches are better designed and more robust than the originals, the operating point isn’t right at the top and therefore over sensitive and the switch isn’t so affected if you happen to trip your foot underneath the brake pedal. (The original would often reset it’s brake light operating point just by a simple act of pulling up on the brake pedal or catching your foot underneath it. Not good).
So I’d advise everybody to check out the operation of their brake lights, not by asking someone to check as you won’t know what’s happening, but by reflections and watching what happens with your own foot operating the brake pedal. If you’re getting odd things happening too then it’s time to replace the brake light switch before someone reshapes your rear end
New switches are £5 from Fiat. Not too difficult to fit but I’d advise practising shuffling a deck of cards with one hand in the dark upside down first
HOW TO REPLACE

Remove the sound deadening over foot panel and throw it away if you haven’t already done so, more room for your feet and you can hear the indicators as well then.

Switch is a bayonet, light bulb type, half turn to remove. Connector to it is a pull up release catch which is where you’ll need the fingers of steel and origami in the dark skills
It's fiddly and requires some good control one handed under the dash. Get the driver's seat as far back as it will go. The switch is right above the brake pedal arm and, at first, looks like a right pig to do as you can only just get your fingers on it and have to go almost toally by feel but, like a light bulb, just a half twist of the switch and it's out, push it upwards to release it from it's securing bracket. i did it so many times i can do it in seconds now so it's not difficult but a bit of a strain to get to so get comfy
Once it's released you have a bit of slack in the wiring so you can move the switch over the top for a bit more slack so you can get to the electrical connector. This is just a raise release catch on the side of the connector and pull off, again tricky because yoi could only use one hand on it but, once the connector is off, the switch is out.
Testing the switch
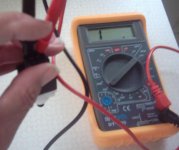
Once the switch is out you can check the operation with a multimeter if you feel the need
REFITTING
Refitting is absolutely nothing like removal (just like it should truthfully say in the Haynes manuals) as you will be all out of patience and fed up with being upside down by then
Why won't it go in?
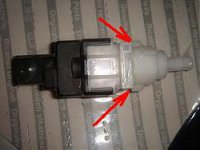
NB FOR THE NEW SWITCH. Much cursing!
I had a problem fitting the new switch as it just would not rotate to lock into position no matter how hard i tried. I needed to file off a small amount of the plastic from here on the locating lugs of the switch to enable it to fit. The plastic moulding lugs had some overhanging plastic preventing the switch rotating in to secure it. You might have this too. That was frustrating as it could have gone in first time and took a while to realise why the new one just wouldn't go in but the old one would go straight in
Adjusting and testing
ADJUSTING THE SWITCH
Once installed, remember to adjust the centre plunger. To do this, push the brake pedal down out of the way, then with long nosed pliers, pull the switch centre plunger down and out further, then gently release the brake pedal with out pulling it up and the switch will ratchet set itself
JOB DONE - NOW CHECK IT
You can check the operation either by reflections or by raising your tailgate as you can then see the high level light whilst you put your foot on the brake
Make a note of just where the brake lights come on, ie how far down did you have to push the pedal? Check the hi level and the low brake lights both illuminate (you may notice one occurs before the other)
NB if you jam your foot under the brake pedal one day then you will reset the switch too high and your brake lights will be permanently ON so now you know how to reset it again, you can deal with it yourself.
Questions? Problems? Comments?
Refer to the discussion thread, found here.

