Before buying a new catch confirm that the wiring is sound in the boot hatch cable duct
What you will need........

New boot catch mechanism fiat part number #55702917
10mm spanner or socket set
PZ2 pozzi drive screw driver..
New lock
bit of grease for the threads if you have some..
Estimated time 10 -15 mins with odd slurp of tea..
remove the metal catch as you wont need this (press the little tab on the side of the lock to release it) (watch it as it fly out)

Lets get cracking...
First open the boot if it wont open see your handbook for the way to override the lock from inside the boot...
Once your in to the boot....
remove the 1x pozzi screw from in the grab handle

next remove the boot cover get your fingers between it and the boot and carefully work your way round releasing it from its plastic tit retaining clips...


And place cover to one side

Now you have exposed the lock as best you can take your 10 mm spanner and remove these 2 bolts

and withdraw lock inside the boot lid

Next unclip the cable...

refit new one in reverse order... (just ensure you put it in the correct way round") ..
..
What you will need........
New boot catch mechanism fiat part number #55702917
10mm spanner or socket set
PZ2 pozzi drive screw driver..
New lock
bit of grease for the threads if you have some..
Estimated time 10 -15 mins with odd slurp of tea..
remove the metal catch as you wont need this (press the little tab on the side of the lock to release it) (watch it as it fly out)
Lets get cracking...
First open the boot if it wont open see your handbook for the way to override the lock from inside the boot...
Once your in to the boot....
remove the 1x pozzi screw from in the grab handle
next remove the boot cover get your fingers between it and the boot and carefully work your way round releasing it from its plastic tit retaining clips...
And place cover to one side
Now you have exposed the lock as best you can take your 10 mm spanner and remove these 2 bolts
and withdraw lock inside the boot lid
Next unclip the cable...
refit new one in reverse order... (just ensure you put it in the correct way round
.. Lock repair
So you have had the boot light stop working or message on the dash.. You might be able to repair this for a couple of quid
(Be aware that if you muck this up your boot catch will be unusable so check your local dealership is open and they have a boot catch on the shelf should the worst happen before you start
So first you have to get into it
carefully unclip the clips try not to snap them although im sure you will the plastic is a bit brittle (Chemical metal or epoxi such as Aradite is your friend on reassembly )
Now withdraw the motor its held in place by 2 spring contacts to the Printed Circuit Board (PCB)
give it a wiggle and a pull and it will come away...

You could now try contact cleaner directly on to the micro switch.. if that fails replace it with a solding iron obviously
Now thats out its time to be brutal The way the lock is assembled should stop you removing the PCB (in theory) But well..........
Take a dremal and a milling bit or sanding drum or cutting disc and get trimming :devil:
you need to remove a bit of plastic from here...

like this take care not to damage the PCB

Now for the delicate hooliganism :devil: the last thing holding the PCB in place is a plastic tag which holds the Microswitch to the plastic body of the lock but insert a screw driver with care and give a bit of "persuasion"


you can see the snapped of plastic peg here...
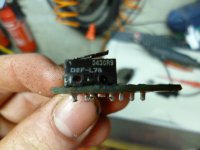
and the part number for the microswitch which should be obtainable on line.. but first try soaking it in contact cleaner
Finally rebuilt this lock with a new switch soldered In place and packed the lock full of lithium grease to hopefully keep water out

old and new switch (switch cost me £1)