The Panda Nut
Nutty about Pandas Infected by Panda virus and OPD
I takes pics of every Panda I can.... I suppose they will all now be in a protective police compound. Somewhere around 3000 pics so far. SAD.


Nooooooo, Not sad!I takes pics of every Panda I can.... I suppose they will all now be in a protective police compound. Somewhere around 3000 pics so far. SAD.

Well, I'd have never thought of that. What a very sad reflection on modern life that this thought should occur to you.The Police possibly told him to park it elsewhere, because someone was photographing it...
Sadly it's possibly a very accurate reflection of what many parts of the UK are now like.Well, I'd have never thought of that. What a very sad reflection on modern life that this thought should occur to you.


I quite like the red against the charcoal as well, i think the worst combo i've ever seen was when I was about 6 my mum had a brown Volvo 340 with tan cloth interior, what a disgusting combination, still makes me cringe to this day. Although my dads's mate had a black Alfa 166 with cream interior which was also a bit much but nowhere near as evil as that VolvoBrilliant job! Personally I like the look of the red against the charcoal upholstery. Our Becky has colour highlights but unfortunately it's a really insipid washed out yellow. We put black seat covers on her within the first week of ownership!
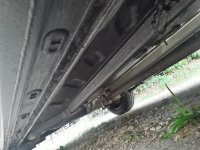
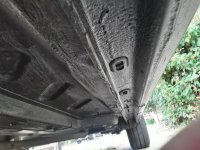
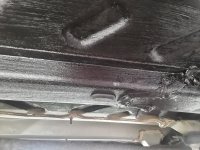
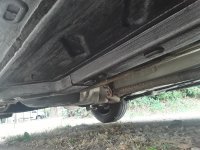
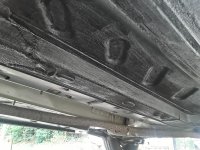
Hope you did inside the wheel arches and inside the doors ( mines just starting to show signs of going in these areas)Decided to redo the rustproofing on the floor as I wasn't happy with the coverage, instead of using the aerosol product that I used before which made a right mess & went everywhere I used the brush on version of the same product, now much better than it was. Still going off as it takes 24 hrs to cure
I did inside the arches & box sections of the floor last year with Bilt Hamber Dynax S50 which supposedly lasts 3-4 years & is still looking good with no signs of peeling off even with regular cleaning. The only part that is starting to look a bit iffy is the rear beam even though it's been kept clean from new, I'll keep on top of it with vactan until it needs replacing, their cheap enough to buy when the time comes so not really worth messing around with, also my sump could do with another clean up at some point.Hope you did inside the wheel arches and inside the doors ( mines just starting to show signs of going in these areas)


A black car really does look so nice when polished up like this. Looks great and well worth all your effort.Got some pics after fully detailing the Panda yesterday, was a bit nervous about using a cutting compound as the only time I have ever used it was on my dads mates 131 last year which I posted on the forum, but it did need it as it had lots of minor clear coat scratches along with a few swirls up close from the last 4 years & was starting to look noticeable even when the sun wasn't out, the worst areas being the roof, bonnet & the front bumper. I spent from 7.30am to about 5pm on it but the results are worth the time & hard work, there is still the odd imperfection here & there but it is a daily driven car so will never be perfect & it also adds to the character of the car
View attachment 409247View attachment 409248View attachment 409249View attachment 409250View attachment 409251View attachment 409252View attachment 409253View attachment 409254View attachment 409255View attachment 409256View attachment 409257