I've just googled for the Sip topweld and at that price level it interests me. I always thought they were much more expensive, i will further google and watch some youtube, i know sooner or later i'm going to need something like this. For now i've avoided something almost impossible to remove then breaking and leaving the car somewhat trashed, so i'm future proofing myself. And its just interesting to learn about new things
")
The Wolf Dakota looks great, i'd need a garage for that. Most of my tools are in the porch, and a few in the conservatory. Our garage was converted into an extra bedroom by someone else many years ago.
So what exactly could I do with a Sip Top weld? When is it most useful?
I'll say right away that if you don't have a welding machine and have never tried to weld before you'd be much better to save up your shekels and buy a gas shield type MIG/MAG welder. Don't buy a No Gas machine for welding thin stuff like body panels. The MIG is much easier to learn how to weld with and also more versatile in what you can weld. Unfortunately a fair bit more expensive with potentially more to go wrong and more "disposables" to buy. However a better bet if it's to be your only machine.
When I first got interested in welding at home I was trying to repair an old DAF 33. I used gas welding at work and was quite good at it - if I can say that - however getting set up with gas bottles and all the associated gear like torch, nozzles, hoses, regulators, anti flash back valves - is expensive and also your insurance company is going to have kittens if they find out you've got a bottle of compressed highly inflammable gas in your garage! Back in those days little DIY MIG machines were just starting to get popular and still expensive so I believed all the lying claims about what you could weld with a stick welder and bought the SIP TOPWELD. It took me a few hours to learn how to strike the ark and then I spent the rest of the weekend blowing holes in just about everything I tried. What I didn't know, and what the adverts I'd read lied about, is that the average driveway grease monkey is not going to have the skill to weld thin metal with a stick welder, especially not with one of these cheap wee machines and their course controls. After several attempts on different days, I concluded I'd wasted my money and the machine got stored away under my workbench where it lived for a number of years until I became a trainer in light vehicle repair and maintenance. In the same establishment there was a course for welders and I became friendly with the instructor. On a visit to my house he spotted the machine under the bench and a conversation followed about how useless I thought it was and how I'd wasted my money. Nonsense he berated me. you're just trying to do the wrong things with it. Bring it into work and I'll show you what to do in the lunch hour. So I did and it was a revelation. In a few words, absolute magic for welding up stuff like angle iron and other bits and pieces of that sort of thickness but relatively hopeless for welding car wings etc. I kept the machine behind my desk at work for a number of weeks while munching sandwiches and welding during my lunch break and bothering my friend when I didn't know what I was doing wrong. You can learn how to do this on your own but it's very much easier to take a short course - I taught evening classes for beginners for years - where you'll learn how to strike the arc properly, lay down a decent bead and how to tell if the weld is good or not.
Having said that though, if you can become proficient with a "stick" welder (the sort of machine which the Topweld is) there's still a lot you can do with them for not a lot of outlay. Internally they are very simple, just a sodding great transformer core of wire wound round a former with a solid slug which the black wheel on the front allows you to wind in and out of the core to increase or decrease the magnetic flux and thus the amperage output to the welding electrode (stick as many call it). There's a "new kid on the block" in the form of inverter technology but these have more complicated internals and I don't think you'll pick up a used one so cheap. Potentially much more to go wrong with one too. So, staying with our good old transrormer type, if you're going to buy one, somewhere around a 130/140/150 amp machine is useful. Some of the wee ones are only 90 amp and the problem with them is they overheat very quickly. Don't make the mistake of thinking the lower powered machines will have a "gentle" arc so are less likely to blow holes, doesn't work like that. In fact they can actually be more difficult to use as they are often more difficult to strike an arc with. This is a direct function of the set's open circuit voltage and this tends to be higher on the bigger output machines.
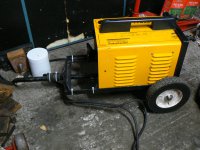
Here's mine:
One of the first things you'll be noticing is it's on wheels. Well, that was one of the first things my welder pal suggested I make. I was already into agricultural machines in my spare time and the wheels were off one I scrapped for parts. The rest is just inch angle and some tube all welded up with the machine. I was quite pleased with the way it came out.
When in use I position it as shown in the picture above, but I also made the base so it can be stored on it's end and it has a handle to make it easier to move about:
It "lives" tucked away next to my MIG and the two of them take up very little room:
These are the very simple controls:

On/off switch top left and an indicator light on the right top which illuminates when powered up. In the middle is the big wheel which winds the core into or out of the transformer so increasing or decreasing the magnetic density and thus the current output through the wires. At the bottom are the two wires - one goes to the earth clamp and the other to the torch which holds the rod. Now a wee tip. If you buy one then take the top cover off and dismantle the two big terminals at the bottom. Why? Well, a poor connection on either will make striking the arc much more difficult and also interfere with the weld. Most of these machines use aluminium winding wire - it's cheaper than copper - which reacts with the steel from which the terminals are made. Cleaning the wire ends and the steel terminals they are secured to makes a big difference to how the machine performs. I've refurbished a number of these and every one I've done performed measurably better after cleaning up these connections. One of the "secrets" to making a good weld is for all connections to be good - of low resistance.
You're likely to find an indicator somewhere on the machine which indicates roughly what amperage is being output, Here's the wee window slot on the top of mine, the red marker moves as you wind the knob on the front:

You can see it gives a rough guide as to where it needs to be for different electrode (stick) sizes. Notice it rates the machine as capable of continuous welding with 1.5 to 2.5mm diameter rods (electrodes, sticks, whatever) and intermittent with larger sizes. I've tried it with 3.2mm and it can only weld a couple of inches or so before the thermal overload protection cuts it out and you have to wait for ages for it to cool down enough to work again. Annoying, but without thermal protection the core would go into meltdown! I use nearly exclusively, 2.5mm rods and even then the machine would tend to cut out if doing long runs. I did buy some 1.6mm rods when trying to weld car wings but they are difficult to strike an arc with (you have to select quite a low amps setting) and they burn down very quickly.
Here's the 3 rod sizes I have, 3.2 at the top and 1.6 bottom with the 2.5 in the middle:
As I said above I really only use 2.5's these days and I buy them from my local welding supply shop in standard industrial size packs. Here's the label on the one I have just now:
With these wee machines you need to buy all position Rutile rods.
The most ambitious thing I've built with it was my trailer:
and, especially when welding in the thick wall heavy duty tubing for the axle and drawbar - using 2.5 rod - It did tend to cut out now and again. So I thought "what this needs is some forced cooling". So I installed blanking plates inside the rear louvers in the cover - you can see the pop rivets here:
and blanked off the lower louvers in the rear cover. again you can see the pop rivets holding the plate inside in this picture:
Then I installed a "flat fan" - like the sort of thing you get in computer cabinets - inside the louvers of the back cover and connected it to the mains switch on the front cover. So it pulls air in through the front louvers on both sides and flows it over the transformer core before pumping it out the back. I connected it so it doesn't go through the switch itself, just uses the live feed. So now, whenever the mains is powered up this fan runs regardless of whether the machine is powered on with the switch in the front of it. It's never cut out using 2.5mm rods since I did this. Mostly what I use it for now is welding up cracked chassis rails on horticultural machines and, I must say, it does a cracking job for this sort of heavier task. The MIG is my "go to" for bodywork, MOT chassis repairs etc though.
Edit. Maybe I should say, in reply to "what exactly could you do with it"? Well' it's for melting metal (mostly steel) together. It's not a heat source like a flame, so useless for heating stuff up like we've been discussing earlier in the thread.
Welding, once you get over the initial, frustrating, learning period, is a very satisfying and somewhat addictive activity. I rank it alongside making metal brake lines for satisfaction.