

You are using an out of date browser. It may not display this or other websites correctly.
You should upgrade or use an alternative browser.
You should upgrade or use an alternative browser.
Technical Rusty bits - suspension
- Thread starter smahaley
- Start date
- Replies 160
- Views 4K
Currently reading:
Technical
Rusty bits - suspension

OP
OP

smahaley
Established member
Thank you - yes I have left the rear suspension bits loose and am trying to lose weight in anticipation of sliding under the car when it is on its natural-born weightMore random thoughts:-
Note carefully how far the bushes are pressed in before removing the old ones, iirc the top arm bushes have little projections on the bush outer metal part to indicate how far they enter the arm - if you press the bushes in too far, the upper arm won't fit onto its mounting.
The lower arm spindle (on which the arm pivots) has iirc a washer/spacer ring each end between the spindle and the bush, don't forget to fit these washers/spacer rings.
And, as all the 'shop manuals advise, don't tighten up any of the suspension arm (front or rear suspension) mountings until the weight of the car is on its wheels.
Alternatively, jack up the suspension, F or R, until the suspension is at normal ride height, then tighten - remember you won't be able to jack up the front suspension sufficiently until the engine and transmission is re-installed in the car. (because until then it's too light in the front to compress the springs).
These rubber bushes are designed to operate in torsion as the wheels move up and down in use (unlike the Urethane conversions), they should be under no torsion with the car at normal ride height i.e. with the car on it's wheels.

OP
OP
smahaley
Established member
Yes, thank you for not spending my money (lol) I seem to be really good at doing that on my own!Yes, probably best to wait until you've had an opportunity to carefully examine the crossmember before deciding how best to proceed - it may indeed be repairable (see, even I don't like spending your money
Upon further consideration, I think that a new bolt/stud should be fitted out of caution, apart from possibly/likely damaged threads, the spot welding may have weakened the stud material - heating and then allowing to cool slowly anneals (softens) steel.
I still think it would be interesting to try to remove the nut anyway just to see if the thread under the nut was indeed stripped and consequently it was decided to add a spot weld?
Here's a picture of a crossmember (for a '70-'72 model?, so may not be the same as your car's) that shows the crossmember bolts/studs being supplied separately - if you enlarge it you may be able to see that the bolt/stud seems to have a square? head (but I seem to recall that they originally had a circular head with a flat to prevent turning?) .
View attachment 481875
If the stock bolt/stud isn't available, -and my searching didn't find any available as a separate part other that when supplied loose with the aforementioned crossmember for a different model, - it would probably be possible to slightly modify a regular hex headed bolt of the same strength/size to fit.
Yep - the bolt is sufficiently boogered (technical term) that - once we get out of the current cold spell - I’ll carefully cut it off and seek a replacement. Thanks @AndrejsLV for your suggestion - I’ll check my US suppliers and may end up at the hardware store…
Will follow up!
I seem to have made a little mistake
Previously I suggested that the crossmember bolts were 10mm x 1.25mm thread, however, this only applies to the '66 - '69 models, the '70 - '85 cars used 12mm x 1.25mm bolts as stated by @AndrejsLV in post #61 above.
I did a little checking but couldn't find a US supplier of this Lada part. (YMMV)
However I did find a Swiss supplier of this part and their website helpfully gives both the size and the original Fiat part number of this bolt - note the price is in Swiss Francs, CHF 6 = $7.75 each plus shipping, see below:-

Also, using the now determined bolt size (12 x 1.25mm thread x 80mm length), I found what may be a suitable alternative on the Mc Master-Carr website @ $12.13 for a pack of 5, so you may indeed be able to find something suitable at your local hardware store (don't forget to buy some nuts), tensile strength of the original bolt was R50 i.e. 5.5 metric strength class so R80 i.e. 8.8 metric strength class should be fine to use. see below:-

Previously I suggested that the crossmember bolts were 10mm x 1.25mm thread, however, this only applies to the '66 - '69 models, the '70 - '85 cars used 12mm x 1.25mm bolts as stated by @AndrejsLV in post #61 above.
I did a little checking but couldn't find a US supplier of this Lada part. (YMMV)
However I did find a Swiss supplier of this part and their website helpfully gives both the size and the original Fiat part number of this bolt - note the price is in Swiss Francs, CHF 6 = $7.75 each plus shipping, see below:-
Also, using the now determined bolt size (12 x 1.25mm thread x 80mm length), I found what may be a suitable alternative on the Mc Master-Carr website @ $12.13 for a pack of 5, so you may indeed be able to find something suitable at your local hardware store (don't forget to buy some nuts), tensile strength of the original bolt was R50 i.e. 5.5 metric strength class so R80 i.e. 8.8 metric strength class should be fine to use. see below:-
Look at this lada shop: https://ladapower.com/catalog/suspension-1/lada-2101-2107-front-axle-bolt-m12-81-complete-detail
Attachments

OP
OP
smahaley
Established member
Hello good folk - here is the update. Enjoy the video () and below are photos of the welded-on shims (!) and condition of the threads (or lack thereof) on the mounting bolt. IF I can manage to back the remnant bolt out I’ll source a replacement.
What an adventure!
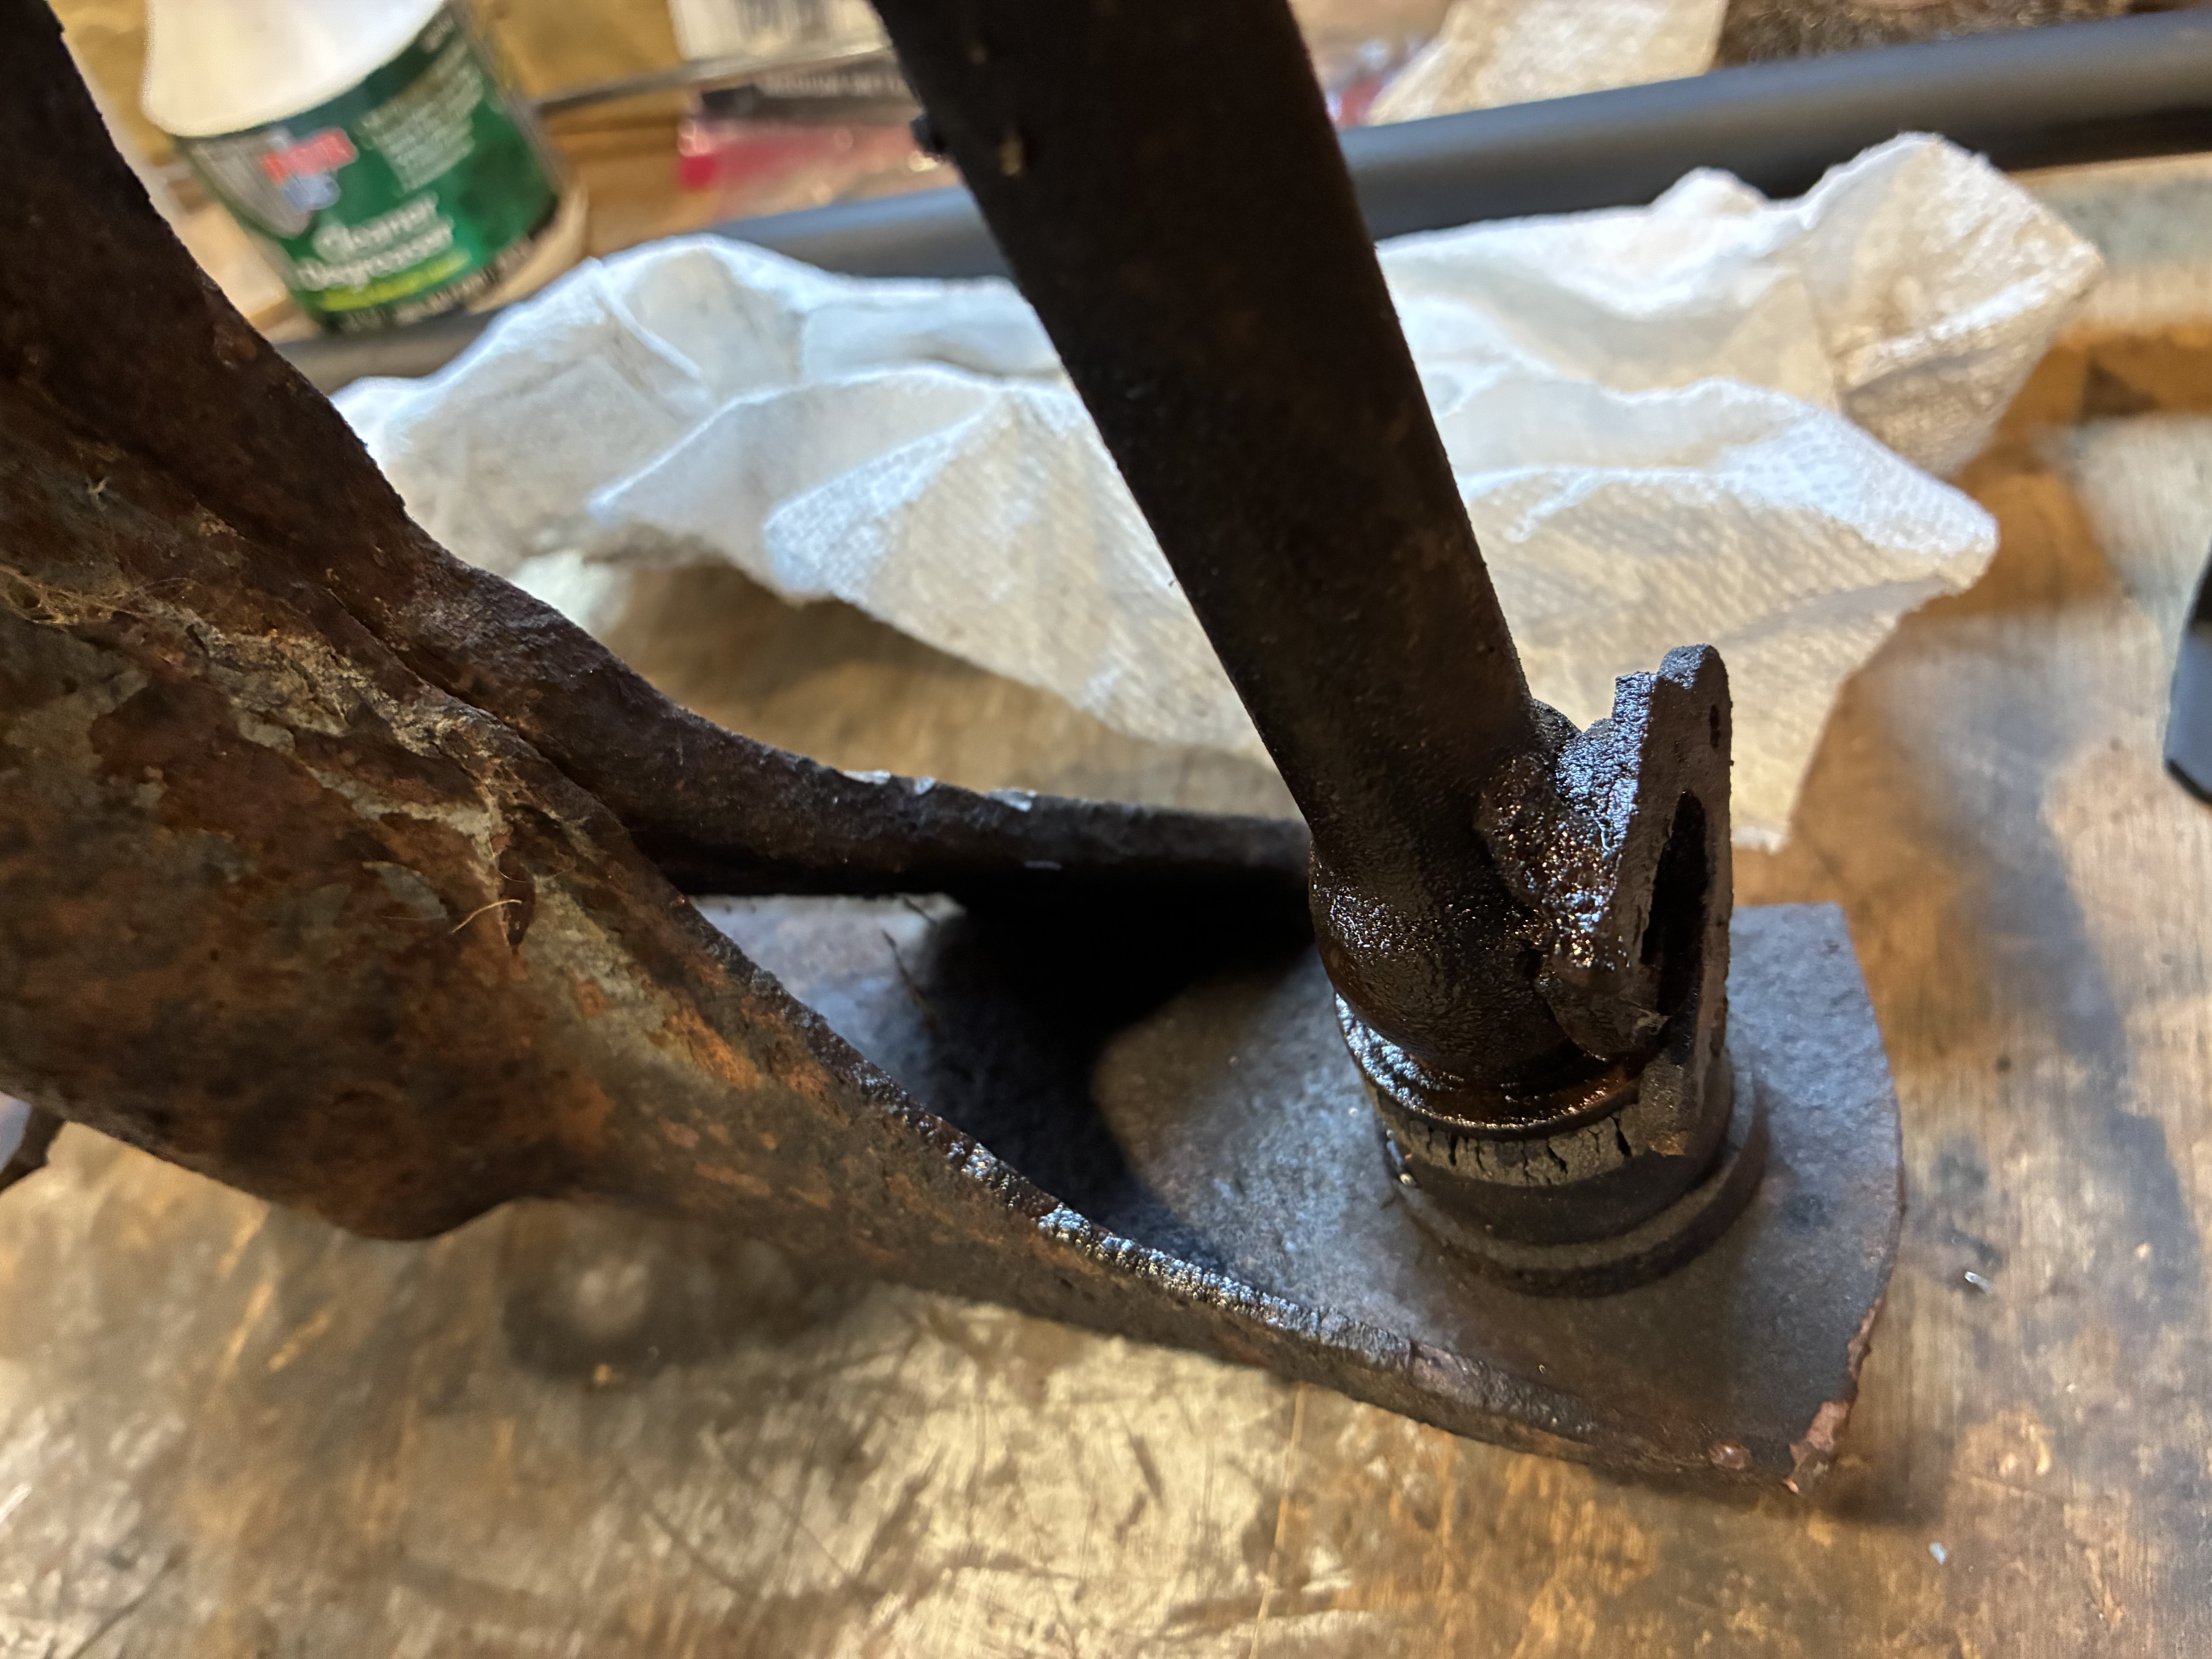
Above - those are shims welded onto the pivot arm. Ugh. Should I scrap the whole thing?
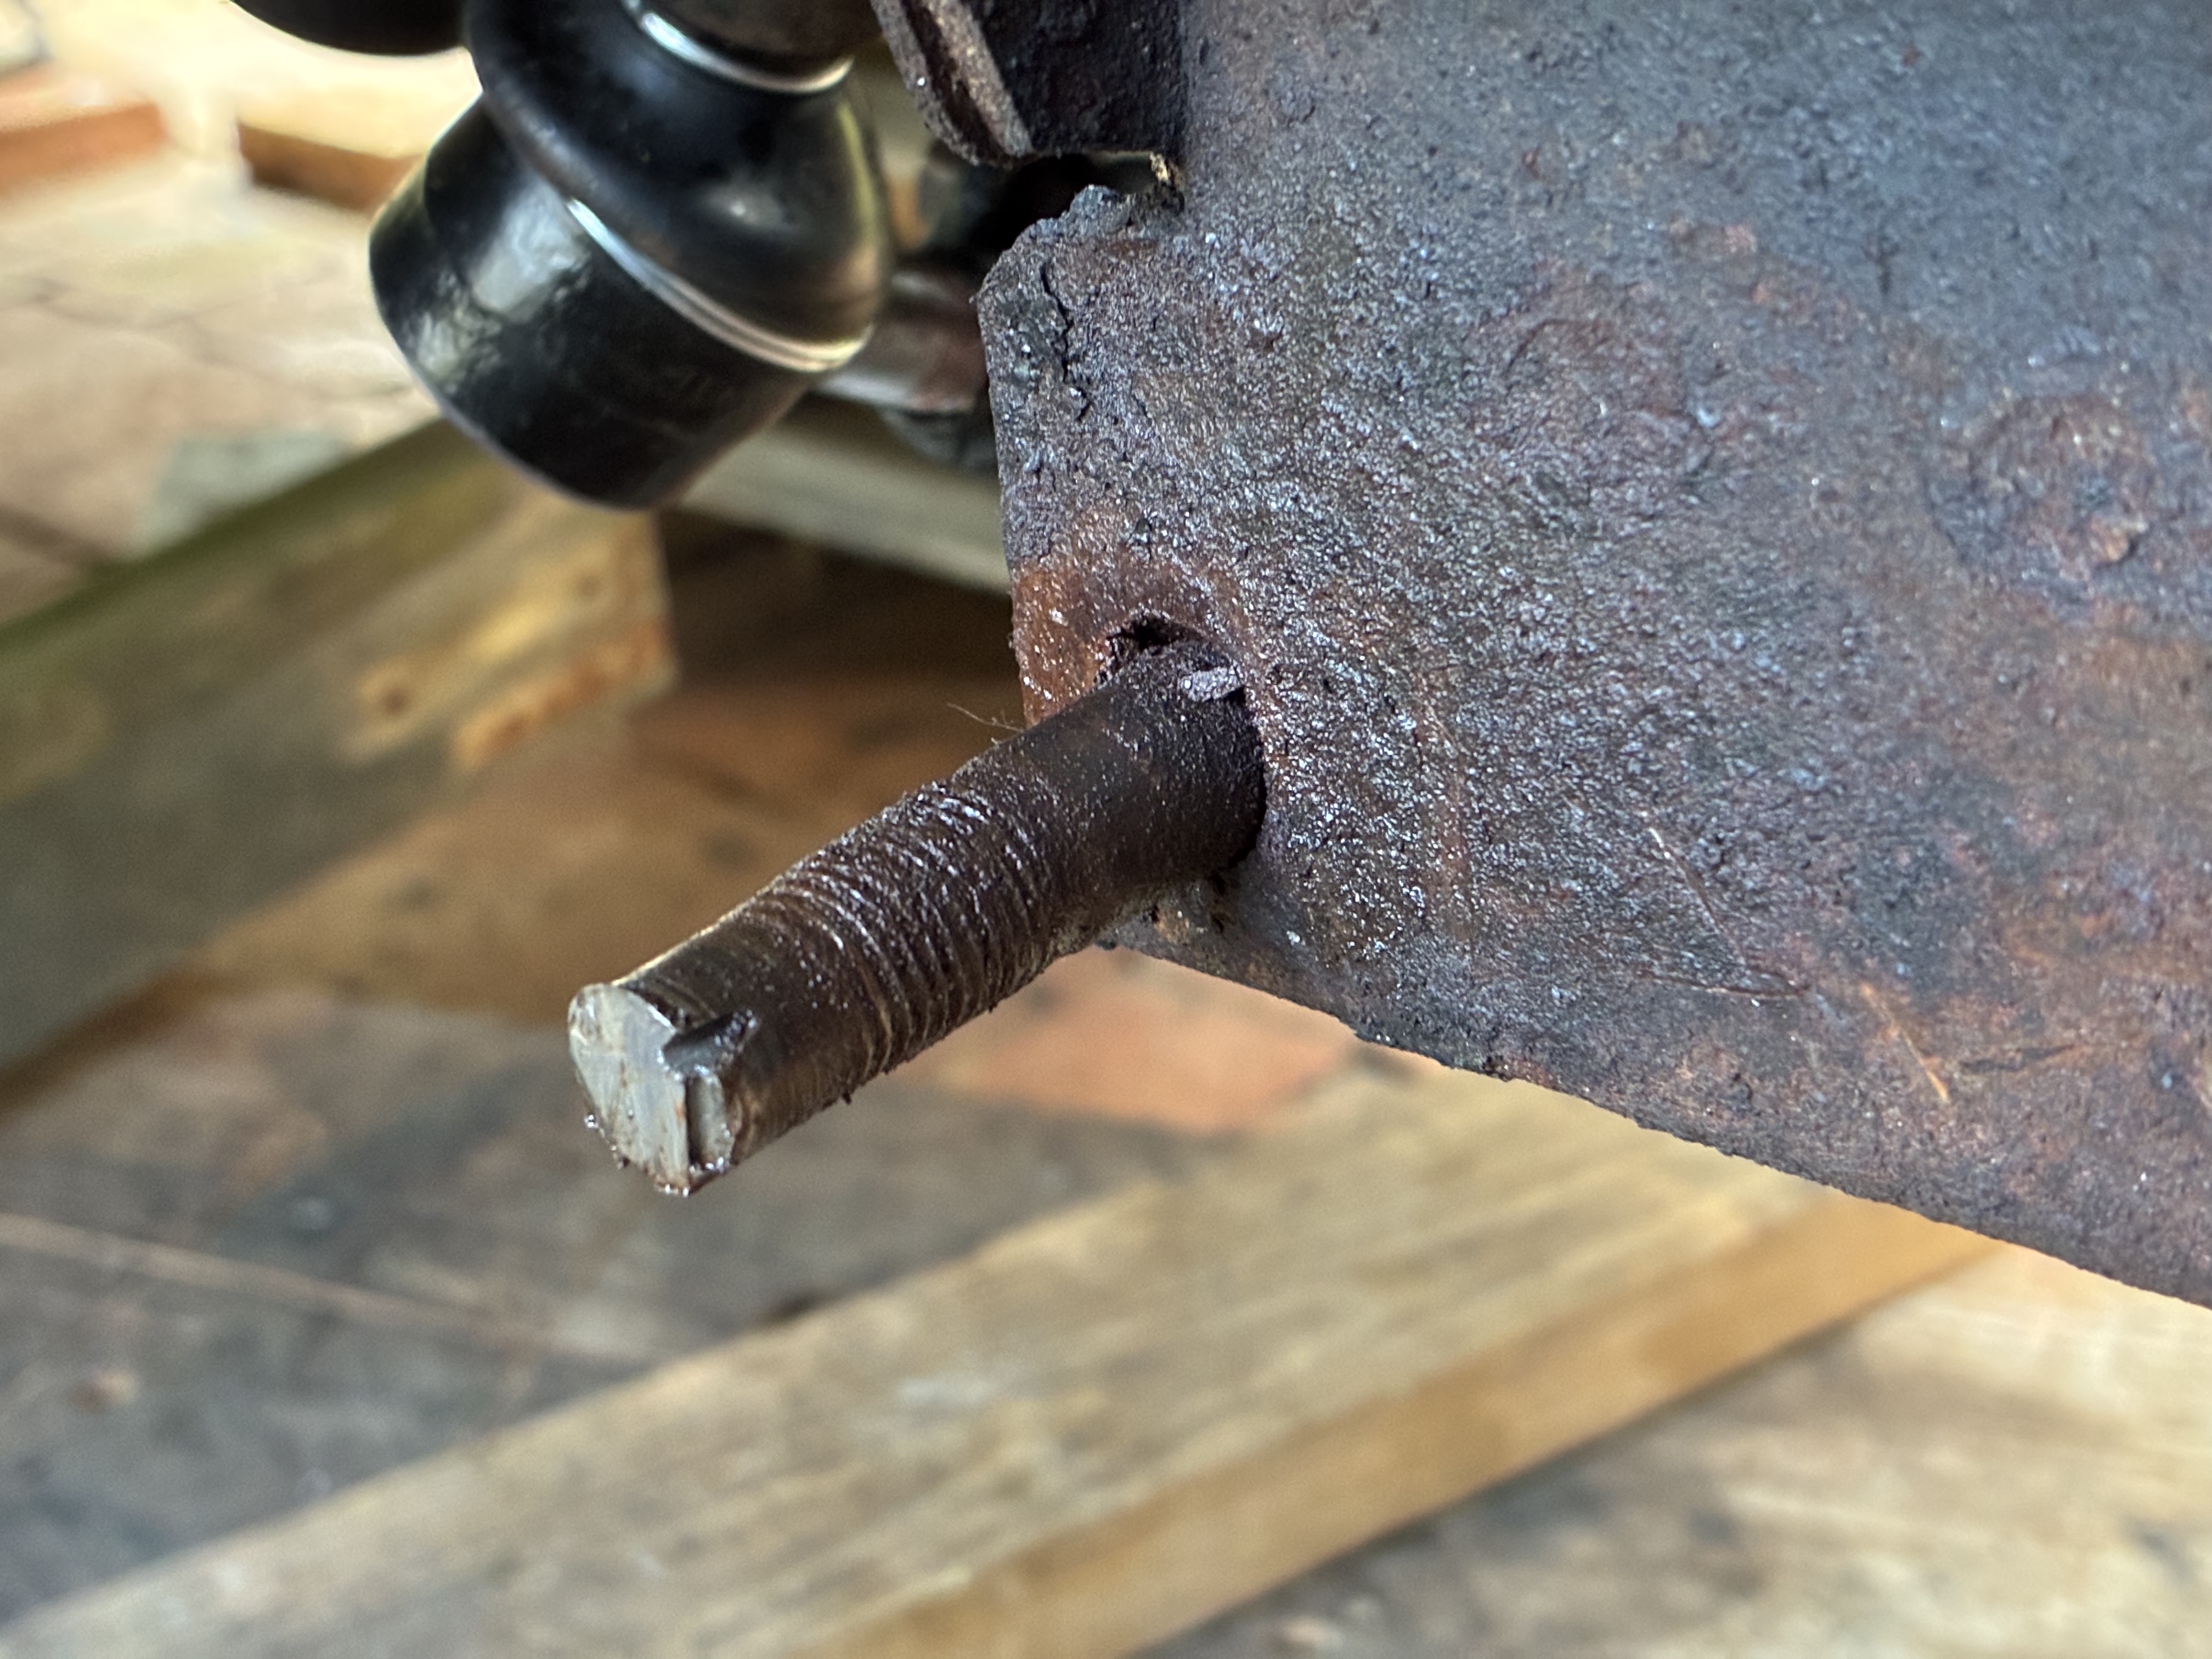
The remnant bolt after cutting off the tip and the nut. Noting missing threads…
What an adventure!
Above - those are shims welded onto the pivot arm. Ugh. Should I scrap the whole thing?
The remnant bolt after cutting off the tip and the nut. Noting missing threads…
Hello good folk - here is the update. Enjoy the video () and below are photos of the welded-on shims (!) and condition of the threads (or lack thereof) on the mounting bolt. IF I can manage to back the remnant bolt out I’ll source a replacement.
What an adventure!
View attachment 481982
Above - those are shims welded onto the pivot arm. Ugh. Should I scrap the whole thing?
View attachment 481983
The remnant bolt after cutting off the tip and the nut. Noting missing threads…
Well done getting the thing stripped out, not a five minute job.
I understand better now where your old nut was welded on from these later photos, so my advice on cutting the side of the nut would have been little use, sorry.
Comparing where the wishbone pivot is bolted to the cross member with the similar general layout on the Lada pictures above and what I recall from 1970s, the original shims were just circular different size washers and they sat against a flat surface on the crossmember and against the pivot.
Perhaps @124BC1 can confirm.
Would a new cross member come with those bolts already trapped in place or will you have to cut an access hole to fit new bolts on your existing one?
Your pivot looks to have had some plate welded on in that area in it's previous life. My eyes are not as good as good as they used to be.
Do you recall what the tyre wear pattern was like on the original ones it came with?
When you have it all rebuilt I think you are going to need a lot of time setting the steering geometry, castor and camber etc. to get the handling/road holding where you want it.
OP
OP
smahaley
Established member
Hi @bugsymike - please don't apologize for making a suggestionWell done getting the thing stripped out, not a five minute job.
I understand better now where your old nut was welded on from these later photos, so my advice on cutting the side of the nut would have been little use, sorry.
Comparing where the wishbone pivot is bolted to the cross member with the similar general layout on the Lada pictures above and what I recall from 1970s, the original shims were just circular different size washers and they sat against a flat surface on the crossmember and against the pivot.
Perhaps @124BC1 can confirm.
Would a new cross member come with those bolts already trapped in place or will you have to cut an access hole to fit new bolts on your existing one?
Your pivot looks to have had some plate welded on in that area in it's previous life. My eyes are not as good as good as they used to be.
Do you recall what the tyre wear pattern was like on the original ones it came with?
When you have it all rebuilt I think you are going to need a lot of time setting the steering geometry, castor and camber etc. to get the handling/road holding where you want it.
This has been and continues to be a journey of discovery - I should make a list of all the 'not-quite-right' discoveries on this car. The pistons, the starter, the floorpans, the fuel lines, the brake lines, the master cylinder... I could go on...ANYWAY - New cross members (https://autoricambi.us/engine-crossmember-1966-78/?setCurrencyId=1) seem to have the mounting bolts pre-installed. And yes, the pivot arm on this side does have shims welded to it (ugh) and on the other side a nice set of washers plus a wishbone-shaped shims (that are removable of course). Regarding tire wear, the car came with a new set of tires, so I have no data on that front.
I would love to avoid buying a cross member or new control / wishbone arms, if possible. The crossmember, by the way, on the rear side does have an access hole cut in to feel the head of the mounting bolts on that side - so it *may* be possible for me to hammer out the existing (and now shortened) stud and replace it, although my first taps didn't give me a lot of confidence....
I suppose if you look at it, it has taken nearly 50 years to get like this so if it takes you a few months to put it right you are not doing bad.Hi @bugsymike - please don't apologize for making a suggestion
ANYWAY - New cross members (https://autoricambi.us/engine-crossmember-1966-78/?setCurrencyId=1) seem to have the mounting bolts pre-installed. And yes, the pivot arm on this side does have shims welded to it (ugh) and on the other side a nice set of washers plus a wishbone-shaped shims (that are removable of course). Regarding tire wear, the car came with a new set of tires, so I have no data on that front.
I would love to avoid buying a cross member or new control / wishbone arms, if possible. The crossmember, by the way, on the rear side does have an access hole cut in to feel the head of the mounting bolts on that side - so it *may* be possible for me to hammer out the existing (and now shortened) stud and replace it, although my first taps didn't give me a lot of confidence....
@bugsymike-----------------
Comparing where the wishbone pivot is bolted to the cross member with the similar general layout on the Lada pictures above and what I recall from 1970s, the original shims were just circular different size washers and they sat against a flat surface on the crossmember and against the pivot.
Perhaps @124BC1 can confirm.
Would a new cross member come with those bolts already trapped in place or will you have to cut an access hole to fit new bolts on your existing one?
Your pivot looks to have had some plate welded on in that area in it's previous life. My eyes are not as good as good as they used to be.
Do you recall what the tyre wear pattern was like on the original ones it came with?
When you have it all rebuilt I think you are going to need a lot of time setting the steering geometry, castor and camber etc. to get the handling/road holding where you want it.
I remember the Fiat shims as being, the same as you say, circular washers, iirc, I usually encountered 1 thick (i.e. normal) washer and a variable no. of thin shims.
However... an old Fiat parts book I have shows a thick 'U' shaped washer/shim and thinner full circle shims. This thick 'U' shaped washer/shim appears to be part of what is welded to the lower A arm pivot pin on OP's car, as seen in the picture below the video in post #66.
Here's a screenshot of shims available from one of the US parts suppliers, showing shims with a cut-out (what I mean by 'U' shaped) enabling these to be fitted without removing the lower pivot, as bugsymike described in detail in an earlier post.
On vehicles destined for use in competition, I was always concerned about using 'U' shaped thin gauge shims in case they might spread when heavily loaded resulting in the lower A arm pivot pin becoming loose, so after final setting of the suspension angles, I used to then compress the coil spring, remove the lower arm pivot pin from the crossmember studs/bolts and replace the U shaped shims with full circle shims of the exact same total thickness, then reassemble. If I had no shim-stock, I used to make my own thin shims from tinplate e.g. old baked bean tins, canned fruit etc - the sheet metal in these cans, iirc, varies from 7 to 10 thou (0.007 - 0.010" ; 0.18 - 0.25mm)
Above is the image of a crossmember (for '70 - '72 cars) I posted in post#60 - I've just noticed that there are only 2 bolts supplied and these are to fit the front holes, presumably the rear bolts are already installed. Crossmembers for later cars are supplied with the 4 bolts already installed.Here's a picture of a crossmember (for a '70-'72 model?, so may not be the same as your car's) that shows the crossmember bolts/studs being supplied separately - if you enlarge it you may be able to see that the bolt/stud seems to have a square? head (but I seem to recall that they originally had a circular head with a flat to prevent turning?) .
View attachment 481875
If the stock bolt/stud isn't available, -and my searching didn't find any available as a separate part other that when supplied loose with the aforementioned crossmember for a different model, - it would probably be possible to slightly modify a regular hex headed bolt of the same strength/size to fit.
@smahaley
You may not believe this, but I wrote and then deleted a paragraph at the end of a previous post mentioning that I vaguely remembered that one of the bolts was easy to replace but the other wasn't, I deleted it because I thought you were dealing with the easy bolt and didn't want to worry you.
After reviewing your previous pictures, I now realise that you were dealing with the passenger side lower arm therefore the left stud/bolt is the rear one - the difficult one to replace.
( I thought you were dealing with the driver side lower arm in which case the left bolt is relatively easy to replace, being at the front of the crossmember - this is also why I was droning on about the crossmember cracking around the front bolt potentially allowing the lower arm to move rearwards under braking).
The crossmember doesn't look too bad now that the lower arm + pivot pin has been removed, apart from the damaged stud. I was expecting what looked to me like welding to have been a repair to a cracked crossmember but thankfully the genius only managed to weld the lower arm pivot pin to the shims.-----------------
I would love to avoid buying a cross member or new control / wishbone arms, if possible. The crossmember, by the way, on the rear side does have an access hole cut in to feel the head of the mounting bolts on that side - so it *may* be possible for me to hammer out the existing (and now shortened) stud and replace it, although my first taps didn't give me a lot of confidence....
I reckon the crossmember will be fine to re-use (but do clean and check carefully for cracking), if you can install a new stud/bolt - the rear bolt iirc is the difficult one to replace - I can't remember why but I vaguely recall thinking (back in the day) that it might be necessary to cut an access hole to get a new bolt into place , then weld the removed piece back into place? I can't remember how the stud/bolt is held in place, could be a metal tab (as @ bugsymike suggested), could be a tack weld.
The lower arm pivot pin should be fine to re-use after removing the welded on shims - some might just refit it as is to keep the shim pack the same but you'll have great difficulty if you need to remove a shim when setting the suspension angles, at the very least, grind off the weld and separate the shims.
If the pivot pin is damaged because of the welding, it can simply be turned 180* afaik it's symmetrical.
OP
OP
smahaley
Established member
One word: wow!@bugsymike
I remember the Fiat shims as being, the same as you say, circular washers, iirc, I usually encountered 1 thick (i.e. normal) washer and a variable no. of thin shims.
However... an old Fiat parts book I have shows a thick 'U' shaped washer/shim and thinner full circle shims. This thick 'U' shaped washer/shim appears to be part of what is welded to the lower A arm pivot pin on OP's car, as seen in the picture below the video in post #66.
Here's a screenshot of shims available from one of the US parts suppliers, showing shims with a cut-out (what I mean by 'U' shaped) enabling these to be fitted without removing the lower pivot, as bugsymike described in detail in an earlier post.
View attachment 482055
On vehicles destined for use in competition, I was always concerned about using 'U' shaped thin gauge shims in case they might spread when heavily loaded resulting in the lower A arm pivot pin becoming loose, so after final setting of the suspension angles, I used to then compress the coil spring, remove the lower arm pivot pin from the crossmember studs/bolts and replace the U shaped shims with full circle shims of the exact same total thickness, then reassemble. If I had no shim-stock, I used to make my own thin shims from tinplate e.g. old baked bean tins, canned fruit etc - the sheet metal in these cans, iirc, varies from 7 to 10 thou (0.007 - 0.010" ; 0.18 - 0.25mm)
OP
OP
smahaley
Established member
Ah well - @124BC1 you know way more than I do, and yes, I’m dealing with the difficult side of things - and with stuff that has been welded onto the pivot arm! Btw the shims described earlier - I do have a combo of one U shaped shim + circular shims on the driver’s side setup - and that all seems normal.Above is the image of a crossmember (for '70 - '72 cars) I posted in post#60 - I've just noticed that there are only 2 bolts supplied and these are to fit the front holes, presumably the rear bolts are already installed. Crossmembers for later cars are supplied with the 4 bolts already installed.
@smahaley
You may not believe this, but I wrote and then deleted a paragraph at the end of a previous post mentioning that I vaguely remembered that one of the bolts was easy to replace but the other wasn't, I deleted it because I thought you were dealing with the easy bolt and didn't want to worry you.
After reviewing your previous pictures, I now realise that you were dealing with the passenger side lower arm therefore the left stud/bolt is the rear one - the difficult one to replace.
( I thought you were dealing with the driver side lower arm in which case the left bolt is relatively easy to replace, being at the front of the crossmember - this is also why I was droning on about the crossmember cracking around the front bolt potentially allowing the lower arm to move rearwards under braking).
OP
OP
smahaley
Established member
I will attempt a 1) de-welding (aka grind/
Cut off) of shims from the pivot arm and 2) removal of the shortened stud.
Wish me luck!
Cut off) of shims from the pivot arm and 2) removal of the shortened stud.
Wish me luck!
I share @124BC1 dislike of horse shoe shims in the unlikeyhood of the bolt slackening , there is little to stop the horse shoe dropping out. All the Lada ones were circular although more of a pain to fit.
If it is anything like the Lada's which were brand new when I worked on them, the correct shimming process was quite labour intensive to get the geometry where you want it.
Apart from the Castor, I always like a little Negative Camber to improve road holding on bends.
If it is anything like the Lada's which were brand new when I worked on them, the correct shimming process was quite labour intensive to get the geometry where you want it.
Apart from the Castor, I always like a little Negative Camber to improve road holding on bends.
OP
OP
smahaley
Established member
Update: Warm weather is back. I ran into another fun piece of trouble:
1 - with further review and some semi-gentle percussive persuasion, the bolt(s) afixed to the lower / outer edges of the center support *do not* wiggle or seem to want to come loose. More persuasive activities could be attempted, but I've already ruined one mounting site, and I'm afraid of deforming / cracking the structure.
2 - Shims on the passenger side (the woeful side) are welded onto a) the rotating bar for the lower arm and b) against the face of the center support.
Given the above, I am approaching the 'delete-replace' point. I have spied the two vertical nuts on each side as well as those bolts (I think) that are on the inner face of the frame rails. I think the air wrench will do the trick, but I am interested in any thoughts on the above before I proceed.
Meanwhile. New carpet going in. Some drilling of control arms to remove old ball joints.
1 - with further review and some semi-gentle percussive persuasion, the bolt(s) afixed to the lower / outer edges of the center support *do not* wiggle or seem to want to come loose. More persuasive activities could be attempted, but I've already ruined one mounting site, and I'm afraid of deforming / cracking the structure.
2 - Shims on the passenger side (the woeful side) are welded onto a) the rotating bar for the lower arm and b) against the face of the center support.
Given the above, I am approaching the 'delete-replace' point. I have spied the two vertical nuts on each side as well as those bolts (I think) that are on the inner face of the frame rails. I think the air wrench will do the trick, but I am interested in any thoughts on the above before I proceed.
Meanwhile. New carpet going in. Some drilling of control arms to remove old ball joints.
Any chance of getting some penetrating oil around the bolts or trapped nuts before the appliance of violence?Update: Warm weather is back. I ran into another fun piece of trouble:
1 - with further review and some semi-gentle percussive persuasion, the bolt(s) afixed to the lower / outer edges of the center support *do not* wiggle or seem to want to come loose. More persuasive activities could be attempted, but I've already ruined one mounting site, and I'm afraid of deforming / cracking the structure.
2 - Shims on the passenger side (the woeful side) are welded onto a) the rotating bar for the lower arm and b) against the face of the center support.
Given the above, I am approaching the 'delete-replace' point. I have spied the two vertical nuts on each side as well as those bolts (I think) that are on the inner face of the frame rails. I think the air wrench will do the trick, but I am interested in any thoughts on the above before I proceed.
Meanwhile. New carpet going in. Some drilling of control arms to remove old ball joints.
OP
OP
smahaley
Established member
Yes - have done so; and upon inspecting the visible (forward most) studs, they appear to be 'fixed' - round heads and seem to be integrated with the crossmember. So I'm not optimistic... but will check tomorrow.Any chance of getting some penetrating oil around the bolts or trapped nuts before the appliance of violence?
Update: Warm weather is back. I ran into another fun piece of trouble:
1 - with further review and some semi-gentle percussive persuasion, the bolt(s) afixed to the lower / outer edges of the center support *do not* wiggle or seem to want to come loose. More persuasive activities could be attempted, but I've already ruined one mounting site, and I'm afraid of deforming / cracking the structure.
2 - Shims on the passenger side (the woeful side) are welded onto a) the rotating bar for the lower arm and b) against the face of the center support.
Given the above, I am approaching the 'delete-replace' point. I have spied the two vertical nuts on each side as well as those bolts (I think) that are on the inner face of the frame rails. I think the air wrench will do the trick, but I am interested in any thoughts on the above before I proceed.
Meanwhile. New carpet going in. Some drilling of control arms to remove old ball joints.
As I previously intimated, (iirc) the studs had a round head and had a tack weld to hold them in place/prevent them from turning. It's also possible that they have a round head with a square hidden underneath, like a carriage bolt? I'll see if I can get a look at an old crossmember tomorrow to refresh my memory.Yes - have done so; and upon inspecting the visible (forward most) studs, they appear to be 'fixed' - round heads and seem to be integrated with the crossmember. So I'm not optimistic... but will check tomorrow.
1 - I'd remove the front suspension crossmember (centre support in your parlance) in order to see what's going on and be able to properly work on it. But iirc, removing/replacing the rear stud/bolt is going to be somewhat difficult. You might even have to resort to brute force (note- I didn't say brute force and ignorance), possibly have to cut an access hole, remove old bolt, install a new bolt then weld removed piece back on or cover with a repair .patch.
2 - As previously suggested, you could grind the weld off to separate the shims, if the rotating bar can't be cleaned up by grinding, it can be turned over to present a clean, undamaged face to the shims and mounting point. (afaik the bar is symmetrical).
You've correctly identified the crossmember mountings, so after allowing the penetrating fluid to do its work, an air wrench should work fine.
(I prefer to use a breaker bar myself but then I'm phenomenally strong
, don't use torque wrenches either, just use my fingers gently ).Might I suggest you don't fit the new carpets yet (by all means do a trial install to check for correct fit), as they may get soiled during any bodywork/painting yet? to be done - plus iirc your car is outdoors under a carport so still potentially exposed to bad weather/critters/birds...
