Well that was fun!
I had the old one out inside 5 minutes and it took a further 2 hours to get the new one in including 2 days driving round with the unit held in place with a piece of wood and a wedge below that to trap it in place. That bolt was a nightmare to reinstall.
The old bolt was 5.5mm, I was using a small socket in fingers to (try and) replace and after about 90 goes (couldn't find the hole..) it slipped out of my cold fingers and then dropped behind the panel in the floor. The new resistor pack was supplied with a bolt that's 6mm so I had another go and getting it in and after much hassle got it in.
I then had to prise a panel off the floor which revealed a further two nuts to be able to remove a scuttle that wouldn't lift right out (what is all this mystery under the floor??) and so I risked losing fingers rummaging behind to try and find the missing hex socket. The bolt was still stuck in it.
Tip:Use a little blu-tack to hold screws/bolts in the socket for such awkward access, it''ll make your life a lot easier!
I did the wedging of the resistor into the mount because even just testing it out in the open when I put the new on into the wiring loom fitting, it got warm really quickly so I decided the place it lives is in the line of the ducted air which keeps it cool. The next day as I drove to work I could smell that distinctive 'hot electronics' aroma which I put down to its newness and the smell went off after about 15 minutes.
So basically it's an easy swap but be prepared with a good light, a good back, 5.5mm or 6mm sockets (mine are from a small 1/4" drive set so low profile) a lot of patience and the ability to be flexible. You can do it lying across the seats or from leaning in through the pax door.
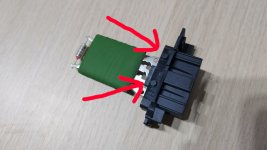
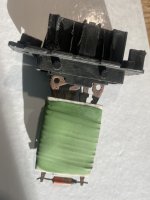
My car has spent its life up to now in the Isle of Skye where according to a brief look at the map has most of its main road round the perimeter of the island, so by the sea. That I thought perhaps accounted for the awful rusty state of the resistor (my pic below) but looking at the picture above in Creekmoorchris's post, his too is red rust! Maybe it's just pulling all air in and passing it over the unit makes it rust as there's bare metal?
R-V-M


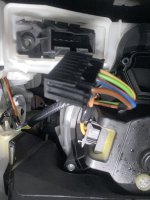
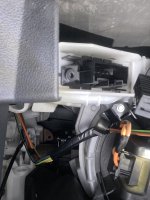


") The best way to access the part is to lie down on your right side. And your head should be where the passenger has their feet
The best way to access the part is to lie down on your right side. And your head should be where the passenger has their feet