when you do something you do it good just hope its worth it is there any way the polihing etc an 899 cinq or sei throttle body would make a difference as someone i know with a sei was asking about performance mods for them


You are using an out of date browser. It may not display this or other websites correctly.
You should upgrade or use an alternative browser.
You should upgrade or use an alternative browser.
Technical Punto 75 Throttle Body
- Thread starter DJ_Bucho
- Start date
Currently reading:
Technical Punto 75 Throttle Body
OP
OP
DJ_Bucho
Established member
Thanks for all your kind comments about my car and how I go about doing things to it, all very much appreciated
Pictures will be posted up tomorrow, with any luck.
Brian
Pictures will be posted up tomorrow, with any luck.
Brian
OP
OP
DJ_Bucho
Established member
Finally what you've all been waiting for, pictures of my Punto 75 Throttle Body modified to fit Mr Cinq.
I'd first like to say a BIG thanks to my dad's mate (Black Peter) for doing all the machineing work, without him I wouldn't have been able to do this
Next, Although all the machineing and smoothing with wet and dry has been done, the throttle body isn't quite finished yet. I'm going to paint the throttle body black along with the new inlet manifold that has been modified to accept the Punto 75 throttle body. However the inlet manifold isn't quite finished yet so I will be spraying the throttle body and spacer for the time being, and once the inlet manifold is finished that will also be sprayed and the whol lot can be assembled ready to go on Mr Cinq in one go.
I know the pictures are fantastic, but I'll take some good quality ones with my digital camera instead of my phone, once the whole throttle body is painted, and assembled.
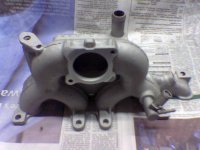
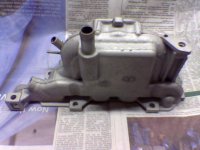
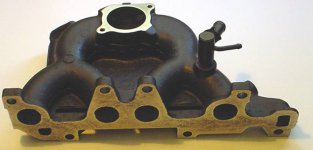
The 1st picture shows the inlet manifold, and the 2nd a close up of the enlarged inlet hole, (now at about 42mm instead of the normal 40mm).
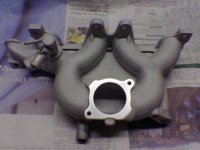
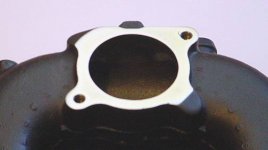
The 3rd picture shows the mating face that goes onto the inlet manifold.
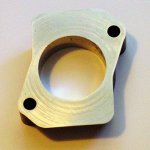
Because the Punto 75 spacer was 10mm taller than the standard Cinq one both the top and bottom surfaces had to be machined down.
The 4th picture shows the side profile of the machined Punto 75 spacer.
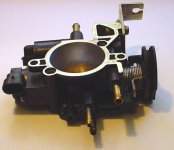
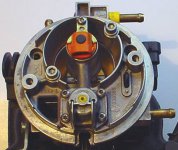
The 5th picture shows the top mating face that mates onto the underside of the throttle body.
The 6th and 7th pictures show the Punto 75 spacer on the inlet manifold, it isn't very clear but the 7th picture shows there is no longer a lip on the inlet manifold as it has been enlarged by 1mm all the way round.
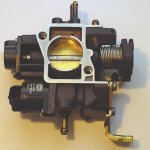
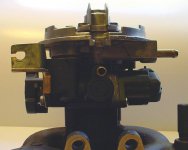
The 8th, 9th, 10th and 11th pictures show the machined Punto 75 throttle body, so that it will fit the top part of the Cinq throttle body (containing the injector). Picture 10 shows the machined throttle body sitting on-top of the spacer.
The 12th picture shows the gas flowed shaft in place.
And finally pictures 13 and 14 show the gas flowed butterfly in place.
Once the parts are painted and assembled I will take some good quality pictures will my digital camera, so you can see the work I've done more clearly, but I thought I'd take some quick photo's now so you lot could see how it looks.
Brian
I'd first like to say a BIG thanks to my dad's mate (Black Peter) for doing all the machineing work, without him I wouldn't have been able to do this
Next, Although all the machineing and smoothing with wet and dry has been done, the throttle body isn't quite finished yet. I'm going to paint the throttle body black along with the new inlet manifold that has been modified to accept the Punto 75 throttle body. However the inlet manifold isn't quite finished yet so I will be spraying the throttle body and spacer for the time being, and once the inlet manifold is finished that will also be sprayed and the whol lot can be assembled ready to go on Mr Cinq in one go.
I know the pictures are fantastic, but I'll take some good quality ones with my digital camera instead of my phone, once the whole throttle body is painted, and assembled.
The 1st picture shows the inlet manifold, and the 2nd a close up of the enlarged inlet hole, (now at about 42mm instead of the normal 40mm).
The 3rd picture shows the mating face that goes onto the inlet manifold.
Because the Punto 75 spacer was 10mm taller than the standard Cinq one both the top and bottom surfaces had to be machined down.
The 4th picture shows the side profile of the machined Punto 75 spacer.
The 5th picture shows the top mating face that mates onto the underside of the throttle body.
The 6th and 7th pictures show the Punto 75 spacer on the inlet manifold, it isn't very clear but the 7th picture shows there is no longer a lip on the inlet manifold as it has been enlarged by 1mm all the way round.
The 8th, 9th, 10th and 11th pictures show the machined Punto 75 throttle body, so that it will fit the top part of the Cinq throttle body (containing the injector). Picture 10 shows the machined throttle body sitting on-top of the spacer.
The 12th picture shows the gas flowed shaft in place.
And finally pictures 13 and 14 show the gas flowed butterfly in place.
Once the parts are painted and assembled I will take some good quality pictures will my digital camera, so you can see the work I've done more clearly, but I thought I'd take some quick photo's now so you lot could see how it looks.
Brian
Attachments
-
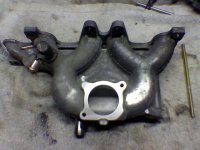 Image000.jpg37.1 KB · Views: 135
 -
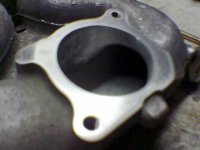 Image001.jpg23.7 KB · Views: 105
 -
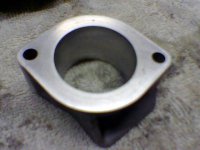 Image003.jpg27.3 KB · Views: 115
 -
 Image004.jpg35.8 KB · Views: 114
 -
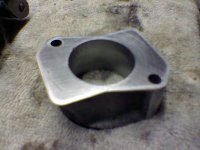 Image002.jpg30 KB · Views: 101
 -
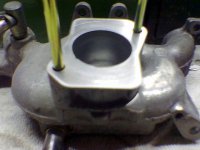 Image005.jpg28 KB · Views: 119
 -
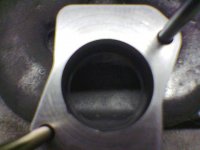 Image006.jpg23.2 KB · Views: 100
 -
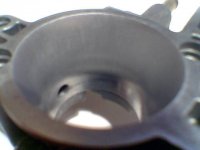 Image008.jpg16.8 KB · Views: 115
 -
 Image007.jpg19.6 KB · Views: 111
 -
 Image009.jpg23 KB · Views: 104
 -
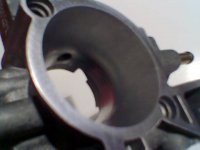 Image010.jpg19.6 KB · Views: 106
 -
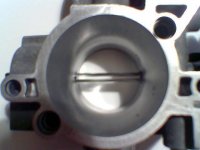 Image011.jpg22.7 KB · Views: 107
 -
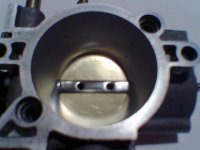 Image012.jpg23.5 KB · Views: 111
 -
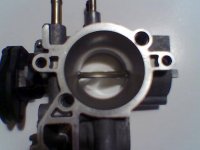 Image013.jpg22.1 KB · Views: 117
that is looking mighty fine, this needs to be sticky'ed or the info collated into a guide of some sort
one suggestion, don't spray them. Powder coat them. I sprayed my manifolds and they looked good when first done - but not so great now. I think powder coating on engine bits is the way for go
one suggestion, don't spray them. Powder coat them. I sprayed my manifolds and they looked good when first done - but not so great now. I think powder coating on engine bits is the way for go
OP
OP
DJ_Bucho
Established member
Cheer's Arc, I'm really pleased at how its come out.
I'll post good quality pics up when its all finished.
I'm really pleased at how its come out.I'll post good quality pics up when its all finished.
- Joined
- Jan 1, 2005
- Messages
- 49
- Points
- 15
yep its looking real nice, it will be interesting to see what the results are like when you get it fitted.
well is it on and working and does it make a difference
OP
OP
DJ_Bucho
Established member
Sorry everyone I've been really busy with work recently so haven't done much more on the TB, although its almost finished. I just need to finish smoothing the top part of the TB itself and modify the gasket that goes between the too parts.
I'm getting the inlet manifold blasted tomorrow, ready for painting so hope fully in about a week or so I should have everything that I need to get it fitted
Fingers crossed and I'll keep you posted.
Brian
I'm getting the inlet manifold blasted tomorrow, ready for painting so hope fully in about a week or so I should have everything that I need to get it fitted
Fingers crossed and I'll keep you posted.
Brian
OP
OP
DJ_Bucho
Established member
Ok updates on the process of my TB.
Today I took my modified inlet manifold to the local powder coaters and got them to blast it, and I also dropped off my smoothed Cam cover so they could Powder Coat that.
The lad blasted my inlet manifold while I waited, and it's looking really good.
Upon returning home I smoothed the inside of the inlet manifold to help aid the air flow as smoothly as possible.
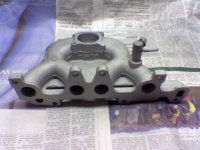
Once that was done I began to spray it with black high temp paint, at the moment its still drying so I haven't got any pictures of it painted, but below is a picture of the inlet manifold as I got it back from being blasted.
Not long now until its all put back together and after my MOT its going on the car
Today I took my modified inlet manifold to the local powder coaters and got them to blast it, and I also dropped off my smoothed Cam cover so they could Powder Coat that.
The lad blasted my inlet manifold while I waited, and it's looking really good.
Upon returning home I smoothed the inside of the inlet manifold to help aid the air flow as smoothly as possible.
Once that was done I began to spray it with black high temp paint, at the moment its still drying so I haven't got any pictures of it painted, but below is a picture of the inlet manifold as I got it back from being blasted.
Not long now until its all put back together and after my MOT its going on the car
Attachments
Last edited:
OP
OP
DJ_Bucho
Established member
Well Mr Cinq passed his MOT on Saturday without any problems.
Which means I can fit the modified Punto 75 TB to him. . . . . .
However I have since come across a small problem,
because the spacer block on the Punto 75 is made form alloy and is 40mm tall compaired to the standard Cinq spacer of just 20mm tall, it would mean the whole of the TB and airbox would sit 20mm taller and not allow me to shut my bonnet
When I got the rest of the TB machined I had 10mm taken off the spacer as this was really as much as could realistically be taken off, however this isn't enough. I'm going to have to go and get another 10mm taken off it and hopefully this won't effect the strength of the spacer itself.
I'll let you know how I get on.
Brian
Looking at the side profile pics of the spacer you have I don't think it can be reduced anymore with out a compromise in it's sealing quality's. why not just get a new spacer made up from a blank piece of aluminium, this is what Tricker does on his 40mm TB and its very good and seals very nicely.
Aaron.
Aaron.
OP
OP
DJ_Bucho
Established member
Well thats the other option,
I'll see what the spacer seals like once it has had the extra 10mm taken off it.
The walls of the spacer are actually quite thick anyway, so fingers crossed it shouldn't be a problem, only a very small amount can be taken off the top of the spacer, that part that seals with the TB itself, but I think I should be able to get a good few more mm off the bottom, and hopefully that will solve the problem.
I'll keep you posted
Can you not grind out the bore on a plastic throttle body spacer?
OP
OP
DJ_Bucho
Established member
I haven't tried to grind out the standard plastic spacer I must admit, but I thought I'd try with the metal one first seeing as that came with the TB itself.
Plus I'me trying to get everything built up on the modified Inlet manifold, so that I can just swop the whole unit over as one, and I don't have a spare standard spacer.
Plus I'me trying to get everything built up on the modified Inlet manifold, so that I can just swop the whole unit over as one, and I don't have a spare standard spacer.
OP
OP
DJ_Bucho
Established member
Finally after what seems like a lifetime of hard work (well a month and a half anyway) the Punto 75 Throttle Body is ready to be fitted to Mr Cinq.
All I need to do now is wait for the weather to get its act together, the mountains of snow to clear, and the temperature to get above freezing and I'll have it fitted to Mr Cinq quicker than a very quick thing.
Those of you following this thread will remember I had a slight problem with the spacer being 10mm or so too tall, meaning I was unlikely to get my bonnet closed as I've also got a Novitec Carbon Fibre Airbox fitted.
However this problem has since been resolved, by taking it back to "Black Peter" (my dad's mate) and getting the extra 10mm machined off. Its now exactly 20mm (the same thickness as the standard Cinq spacer), which is about half of its original height. Meaning the Punto 75 throttle body will sit in exactly the same place as the original, allowing me to close my bonnet, (which is always a good thing I've been told ).
Pictures 1,2 and 3 show the top, underside and side profile of the newly machined spacer.
Right onto the other pictures, these show the other work that's been done in order for the Punto 75 38mm throttle body to be fitted to the top half of the 1108 / 1242 SPI throttle body, as well as fit onto the 1108 / 1242 Inlet manifold.
We'll start with the top part of the throttle body (this is the part that contains the injector), I got this part from Brickfoot (thanks mate ) as he didn't need it seeing as he’s now sold his Cinq. However seeing as I’d be doing work on the rest of the throttle body and the inlet manifold I couldn't just leave this standard.
From the factory the chamber that funnels the air to the butterfly and the housing that holds the injector has a number of mould lines running along it. These mould lines disturb the flow of air going to the butterfly, so to start with I simply filed these away until the chamber and injector housing were nice and smooth. I then used various grades of wet and dry to increase the size of the chamber funnelling air to the butterfly, and smooth off the entire surface to allow the air to flow as quickly and smoothly as possible.
The next step was the Punto 75 butterfly part of the throttle body. Here the butterfly shaft was filed down and then wet and dry used to smooth it even more. The butterfly was also given a knife edge on either side, this again would allow air to flow as smoothly as possible. The main job however was to get the 38mm butterfly housing machined down so that it would mate up with the top half of the 1108 / 1242 throttle body.
My dad's mate "Black Peter" machined this down for me, so that the opening at the top of the butterfly housing matched perfectly with the underside of the injector part of the throttle body. The assembled Punto 75 throttle body can be seen in picture 4. From this picture you can see just how close to the bolt holes the machining was.
Picture 5 shows a side profile of the throttle body, this shows how smooth the throat leading to the butterfly is, again this was gone over with wet and dry after the machining had been done to get rid of any of the cut lines the lathe left
Picture 6 shows the underside of the throttle body. In this picture you can clearly see the profiled butterfly shaft as well as the cut down butterfly screws. This was all done to aid in air flow.
Picture 7 and 8 shows the back and front of the flowed inlet manifold after it had been bead blasted and painted with high temp exhaust paint.
Picture 9 clearly shows the modified mating face to accept the Punto 75 spacer. Because the Punto spacer block increases in diameter from 38mm to around 42mm, the inlet hole on the manifold had to be increased in size to ensure there was no lip restricting the air flow.
However because the Punto spacer has been machined down the diameter of the final opening was reduced and for this reason the inlet manifold opening only needed to be increased by about 1mm
The inside of the standard manifold is quite rough, so seeing as I had spent all this time working on making the air flow as smoothly as possible while in the throttle body I thought I might as well take the time to make sure the air flows as smoothly while in the inlet manifold.
Placing my finger inside the inlet hole on the manifold I was surprise to feel quite a noticeable lip . In no time at all I'd decided that this lip was coming off so I broke out the Dremel and equipped with sanding drum.
After spending a couple of minutes with the Dremel I then used some sand paper and worked my way as far into the inlet manifold as I could, the end result was that the lip had been completely removed and was replaced with a nice smooth radius that the air and fuel mixture would flow over smoothly.
I then started work on the side of the inlet manifold that bolts to the head.
Again using the sanding drum on the Dremel, I kept a good couple of millimetres away from the mating face as I didn't want to increase the size of the holes. As by doing so might have meant they wouldn't line up with the ports on the head and this would mean I have done all the work for nothing. After using the Dremel I finished off with some sand paper, to take out any of the scoring marks the Dremel had left and to get rid of any final imperfections from inside the manifold. I didn't want the manifold super smooth so I didn't use any wet and dry, I just wanted to get rid of any lumps, bumps and lips that would impede the air flow.
These final three picture (10,11 and 12) show the throttle body fully assembled and bolted to the modified.
Hopefully the weather will clear and I can get it fitted soon .
I know its taken ages to finally get sorted but I hope someone will find this information usefull, and might be able to use it.
Please let me hear your comments
Brian
All I need to do now is wait for the weather to get its act together, the mountains of snow to clear, and the temperature to get above freezing and I'll have it fitted to Mr Cinq quicker than a very quick thing
.Those of you following this thread will remember I had a slight problem with the spacer being 10mm or so too tall, meaning I was unlikely to get my bonnet closed as I've also got a Novitec Carbon Fibre Airbox fitted.
However this problem has since been resolved, by taking it back to "Black Peter" (my dad's mate) and getting the extra 10mm machined off. Its now exactly 20mm (the same thickness as the standard Cinq spacer), which is about half of its original height. Meaning the Punto 75 throttle body will sit in exactly the same place as the original, allowing me to close my bonnet, (which is always a good thing I've been told
).Pictures 1,2 and 3 show the top, underside and side profile of the newly machined spacer.
Right onto the other pictures, these show the other work that's been done in order for the Punto 75 38mm throttle body to be fitted to the top half of the 1108 / 1242 SPI throttle body, as well as fit onto the 1108 / 1242 Inlet manifold.
We'll start with the top part of the throttle body (this is the part that contains the injector), I got this part from Brickfoot (thanks mate
) as he didn't need it seeing as he’s now sold his Cinq. However seeing as I’d be doing work on the rest of the throttle body and the inlet manifold I couldn't just leave this standard.From the factory the chamber that funnels the air to the butterfly and the housing that holds the injector has a number of mould lines running along it. These mould lines disturb the flow of air going to the butterfly, so to start with I simply filed these away until the chamber and injector housing were nice and smooth. I then used various grades of wet and dry to increase the size of the chamber funnelling air to the butterfly, and smooth off the entire surface to allow the air to flow as quickly and smoothly as possible.
The next step was the Punto 75 butterfly part of the throttle body. Here the butterfly shaft was filed down and then wet and dry used to smooth it even more. The butterfly was also given a knife edge on either side, this again would allow air to flow as smoothly as possible. The main job however was to get the 38mm butterfly housing machined down so that it would mate up with the top half of the 1108 / 1242 throttle body.
My dad's mate "Black Peter" machined this down for me, so that the opening at the top of the butterfly housing matched perfectly with the underside of the injector part of the throttle body. The assembled Punto 75 throttle body can be seen in picture 4. From this picture you can see just how close to the bolt holes the machining was.
Picture 5 shows a side profile of the throttle body, this shows how smooth the throat leading to the butterfly is, again this was gone over with wet and dry after the machining had been done to get rid of any of the cut lines the lathe left
Picture 6 shows the underside of the throttle body. In this picture you can clearly see the profiled butterfly shaft as well as the cut down butterfly screws. This was all done to aid in air flow.
Picture 7 and 8 shows the back and front of the flowed inlet manifold after it had been bead blasted and painted with high temp exhaust paint.
Picture 9 clearly shows the modified mating face to accept the Punto 75 spacer. Because the Punto spacer block increases in diameter from 38mm to around 42mm, the inlet hole on the manifold had to be increased in size to ensure there was no lip restricting the air flow.
However because the Punto spacer has been machined down the diameter of the final opening was reduced and for this reason the inlet manifold opening only needed to be increased by about 1mm
The inside of the standard manifold is quite rough, so seeing as I had spent all this time working on making the air flow as smoothly as possible while in the throttle body I thought I might as well take the time to make sure the air flows as smoothly while in the inlet manifold.
Placing my finger inside the inlet hole on the manifold I was surprise to feel quite a noticeable lip
. In no time at all I'd decided that this lip was coming off so I broke out the Dremel and equipped with sanding drum.After spending a couple of minutes with the Dremel I then used some sand paper and worked my way as far into the inlet manifold as I could, the end result was that the lip had been completely removed and was replaced with a nice smooth radius that the air and fuel mixture would flow over smoothly.
I then started work on the side of the inlet manifold that bolts to the head.
Again using the sanding drum on the Dremel, I kept a good couple of millimetres away from the mating face as I didn't want to increase the size of the holes. As by doing so might have meant they wouldn't line up with the ports on the head and this would mean I have done all the work for nothing. After using the Dremel I finished off with some sand paper, to take out any of the scoring marks the Dremel had left and to get rid of any final imperfections from inside the manifold. I didn't want the manifold super smooth so I didn't use any wet and dry, I just wanted to get rid of any lumps, bumps and lips that would impede the air flow.
These final three picture (10,11 and 12) show the throttle body fully assembled and bolted to the modified.
Hopefully the weather will clear and I can get it fitted soon .
I know its taken ages to finally get sorted but I hope someone will find this information usefull, and might be able to use it.
Please let me hear your comments
Brian
Attachments
-
 Top Of Spacer.jpg14.8 KB · Views: 106
 -
 Underside Of Spacer.jpg13 KB · Views: 102
 -
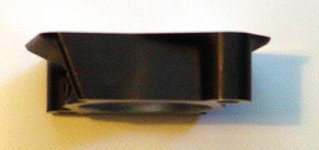 Side Profile Of Spacer.jpg8.5 KB · Views: 89
 -
 Top Of Throttle Body.jpg31.2 KB · Views: 124
 -
 Side View Of Throttle Body.jpg25.2 KB · Views: 138
 -
 Underside Of Throttle Body.jpg31.2 KB · Views: 119
 -
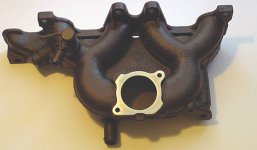 Back Of Inlet Manifold.jpg23.2 KB · Views: 89
 -
 Front Of Inlet Manifold.jpg24.7 KB · Views: 123
 -
 Inlet Manifold Mounting Face.jpg11.8 KB · Views: 89
 -
 Fully Assembled.jpg37.7 KB · Views: 118
 -
 Top View Fully Assembled.jpg24.9 KB · Views: 113
 -
 Side Profile.jpg30.1 KB · Views: 113
Julio_Scorchio
Member
This is about the most informative thing I've seen on the Throttle Body conversion and the number and quality of photographs is excellent. It's certainly a very comprehensive 'How-to' on the subject and would be well worth making into a 'sticky'.
I can't wait to see how well Mr Cinq goes after all the effort......
Tosh
I can't wait to see how well Mr Cinq goes after all the effort......
Tosh
OP
OP
DJ_Bucho
Established member
Thanks for the comments, I just need to wait until the weather gets a little better now, and then I'll have it fitted in no time .
.Yep it does look nice, I seen it in the flesh the other day when I was round and was impressed with your work.Nice one mate, I can not wait to see the performance imcrease.
David
David
- Joined
- Feb 14, 2004
- Messages
- 7,311
- Points
- 983
Yeah, gotta keep it for a nice, dry sunny Sunday when you can really cane it around and let it do the car justice