Technical Project Paolo

Currently reading:
Technical Project Paolo

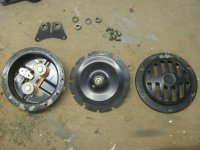
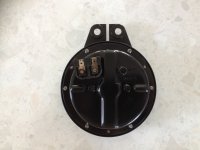
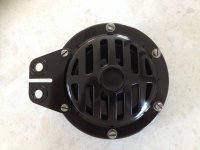
Tackled one of the rear swingarms today and fitted the handbrake, brake pipe etc. That handbrake mechanism in the drum is fiddly to fit but got there in the end. Was going to change all bolts for stainless steel ones but like the original hub bolts with Fiat written on them. Was hoping to use the old springs but measured them and both are short and one is shorter than the other. Another order going in! Been refurbishing the horn as well today. Was going to buy a new one but they are about £40 so refurb it is. Its an original Magnetti Marelli one so worth saving.
IMG_0110.JPGIMG_0111.JPGIMG_0112.JPGIMG_0113.JPGIMG_0115.JPG
 
More great results(y). Fully agree about saving/re-using the bolts where possible, those FIAT stamped bolt heads are fantastic and iconic:D:D and saving and refurbishing the horn will give so much more satisfaction than spending £40 would ever give!
 
Looking very smart Damian
smile.gif


What are those springs over the brake pipes? I didn't have those on mine.


Just a tip on the horn. When I took mine apart the gaskets all fell apart.
I made some new ones out of thin card and also some paper.
Then you will need to play about with the thickness of the gaskets to adjust the horn to work again. I cant remember if it was to thick or thin, but one of them stops it from working.
Once it starts working you can adjust the screw to alter the tone.
mine ended up looking like new
biggrin.gif
 

Attachments

  • IMG_6804.JPG
    IMG_6804.JPG
    499.5 KB · Views: 27
  • IMG_6352.JPG
    IMG_6352.JPG
    1.8 MB · Views: 25
  • IMG_6351.JPG
    IMG_6351.JPG
    1.8 MB · Views: 28
I had those springs on the original pipes Sean. I think they protect the pipe from stone chips. Have to make a gasket for my horn as well
 
When fitting the glass back in is it necessary to apply sealant or can the rubbers go in dry? Mine didn't have any sealant when I took them out and I didn't have any leaks. What did you do Sean? (@Franko500)
 
Definitely needs sealant otherwise because there can be large gaps where water can get in and it will eventually get inside or cause corrosion.

I would imagine pattern part rubbers probably aren't as good as the originals, but even on my car before I touched it, I always had problems with water getting it the front corners of the windscreen.

I got a bit carried away with sealant and ordered too much, so I gave the rest to Sean.

What sealant do you use Tony? Do you just put a small bead around the window aperture? Don't want to end up with sealant squeezing out onto new paintwork!
 
What sealant do you use Tony? Do you just put a small bead around the window aperture? Don't want to end up with sealant squeezing out onto new paintwork!

It was called Argo Mast Autograde. You use it in a caulking gun and it is a real pain to get out, you needs hands of a ?.

I masked off with tape on both sides of the seal, as obviously you need to get it in both sides, some bits of it need quite a lot of sealant particularly the corners. Lift the rubber seal up put the nozzle underneath and just work your way around. Leave it to dry a bit and then just smooth it off with you finger, you are going to get some on the paintwork just clean it off with a bit of petrol. The whole point of the stuff is it dries but still stays pliable. You will probably need to go over some bits twice to get a decent seal and leave no gaps.
 

Attachments

  • IMG_4188.JPG
    IMG_4188.JPG
    876 KB · Views: 25
  • IMG_4189.JPG
    IMG_4189.JPG
    856.9 KB · Views: 31
  • IMG_4589.JPG
    IMG_4589.JPG
    600.4 KB · Views: 29
What sealant do you use Tony? Do you just put a small bead around the window aperture? Don't want to end up with sealant squeezing out onto new paintwork!

Many, many years ago I worked for Kent Industries who make body shop sealants, among other things, and one product was, if memory serves, called Leak Check. This was suitable for any automotive areas be they glass or panel and was available in either black or clear. It might be worth your while visiting local car body repair workshops and asking if they use Kent products and if they have some they could sell you. One big advantage is that this is really easy to squeeze out and comes in a toothpaste type tube. Kent will supply to the public but have a minimum order which makes buying single products a bit awkward, they used to be based in West Sussex but are now somewhere in Scotland.

Hope this helps.
 
It was called Argo Mast Autograde. You use it in a caulking gun and it is a real pain to get out, you needs hands of a ?.

If you use a caulking gun place the cartridge in hot water for a while before attempting to seal the screen as this will make the sealant flow much easier from the nozzle.
 
I've found some 3M stuff that looks the business. I like using 3M where possible. Will see how I get on. Thanks guys
 
Not done much today as it was snowing here and was freezing cold even with a heater and thermals. Had the steering wheel and indicator stalk on and off a couple of times trying to get everything lined up so the horn worked. You can end up with too much of a gap between indicator stalk and steering wheel which means the contacts either dont make or are only just making. I had the multimeter on continuity and checked horn operation this way before locking everything in place. Indicator self cancel is also working as it should. A wire has come loose from the wiper motor plug so hoping I can fix that in situ otherwise it will all have to come out again.
IMG_0130.JPGIMG_0131.JPGIMG_0132.JPG
 
Got it up on axle stands and off the pallet so I can get more access to rear suspension. Trial fitted the rear swingarm and found that when the bump stop was fitted it clashed with the brake pipe. It should never hit the bump stop but couldn't leave it so had to remove the brake pipe and re-route it.
IMG_0133.JPGIMG_0134.JPGIMG_0136.JPG
 
This is my RH brake with an original brake line showing what I believe is the original position and radius of the bend. LH is much the same but my photo is not so good

Joe R

SANY1633.JPG
 
Horn looking a lot better. Went to fit it but the bracket wont fit on the mounting studs. Another job to sort
IMG_0153.JPGIMG_0154.JPG
 
Back
Top