Technical Project Paolo

Currently reading:
Technical Project Paolo

Ian - i run discs all round and a 500/126 braided brake hose kit fitted perfectly
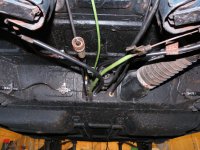
 
I also found the UK supplied brake pipe kit was of a very poor standard - with none of the lengths being correct


I got this kit from Leo Van Der Laan Andrew. Stupidly didnt take any photos of before stripdown (again)
 
I think the kit i bought was the same as European suppliers due to the instructions it came with.....but i dont know what they used as a template but it didnt fit very well. The 126 has a different master cylinder but this had nothing to do with the weird lengths they provided
 
Pretty sure the little short one goes from the T piece at the back to one of the rear wheels where it joins with the rubber hose.

You are lucky you bought the copper lines, I bought the other ones, not sure what they are made off but they are a pig to bend.
 
It's this one here.
 

Attachments

  • IMG_4105.JPG
    IMG_4105.JPG
    1,021.1 KB · Views: 29
If you made yours from scratch then you would just have made the pipe in question (forgotten exactly which but one at the master) the right length. But the kit and the factory made parts being made for LHD, one pipe just doesn't transfer to RHD being a bit short. In the old days, before I got the taste for modding?, I made a point of saving the threaded connecting piece and copied the original "U"shaped piece......Totally unnecessary ?.
 
Just fitted brake shoes and drum today. Didnt order new springs and hub end cap when I got my new brake bits so had to make do with originals. Will order these at a later date.
IMG_1484487797.551468.jpgIMG_1484487811.251791.jpgIMG_1484487824.878097.jpg
 
Looked at fitting the steering column today and mounted it to the support that sits under the speedo. The steering column is a smaller diameter than the support so it moves around. Should there be a sleeve that fits between the steering column and support?
 
Just won two dellorto fzd 30/24 on ebay for a bargain so guess one of them will be going on Paolo. Result
 
Castor angle

How do you check and set up the castor angle on the front kingpins? I have read the manual but it still doesn't make sense. Looking for 9 degrees. No problems with camber or toe in just castor.

Damian
 
Thats what I thought Peter. You cant change where the swingarm bolts to or where the damper goes and I thought this gave you your 9 degrees. Reading the book I have it says to measure it and then either pit more shims on the front or the rear depending on whether you need more or less. This to me would alter camber and toe not castor. Have to see what my other books say. Guess Sean Franko500 will have been the last person to set all this up?
 
Caster is rather difficult without a 4 wheel alignment system. Due to the suspension set up being vastly different to modern cars the caster won't be so critical.
Personally I set the toe on the rear first making sure the 2 rears were evenly lined up with the centre line of the car. Placed 2 long bars across the wheels held on by bungy straps and measured the distance from the sill.
Then set up the front suspension using spacers to obtain the same distance for front to rear wheel centres. At least that way you have the 4 wheels in the correct position. Then set up front camber adding or removing even amount of spacers holding the top arm to the inner wing. Then adjust toe.
If everything is correct you should be able to drive down a flat road, hands off the wheel without it wondering. Mine does but I think my toe in needs s little adjustment as it gets a little lively at 50-60 probably needs less toe in
 
Setting up the front suspension today I tried a different approach. Everything needs setting up with the car in the "static load" position. This means typically the equivalent of 4 adults in the car. As my car is still on a pallet and doesn't have much bolted to it this would have meant waiting till the end to set it all up and torque all bolts. Then to adjust anything you need the wheel off which means jacking it up and then you're not in static load anymore. Instead I removed the damper and in its place put a length of M10 stud. Fastened it to the kingpin with a couple of nuts and washers and put the other end through the damper hole in the wing. I fastened this with a large washer for protection and a nut. Then I just tightened that nut and in doing so this raised the spring. I just kept going until that side of the spring was in static load (theres a measurement in the manual). This then allowed me to check the kingpin was set at 95 degress and then I torqued everything up. Used an inclinometer on my phone to check camber and adjusted that. Will recheck it all with wheels on the ground but I shouldn't have to adjust anything other than toe.
IMG_0088.JPGIMG_0089.JPGIMG_0090.JPGIMG_0091.JPG
 
As others have found, the indicator stalks are vunerable to cracks. Mine were no different and I decided to try and repair rather than replace. Not the best repair in the world but its not now obvious and should go for another 50 years
IMG_0092.JPGIMG_0105.JPGIMG_0106.JPGIMG_0109.JPG
 
Back
Top