Technical Project Paolo

Currently reading:
Technical Project Paolo

Wow Sean, the housings look great, as does all the other work you've done.

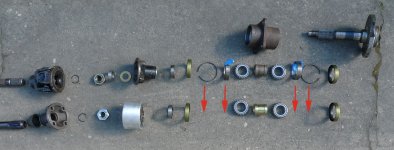
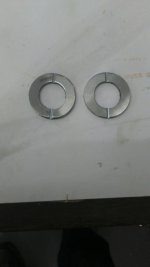
With regards to the small spacer, it sounds like you've got its location worked out. Here's another exploded view if you need it to confirm. Refer to the lower row of parts, not the top. The top was the old stuff I took out. Note that the bottom row doesn't include the bearings or circlips. Hence, the red arrows to place them in the line up.

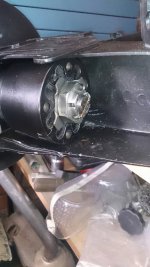
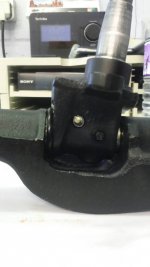
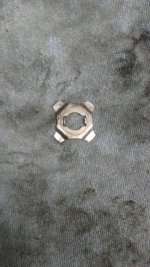
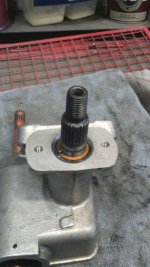
As for setting the the preload, yeah, it feels like you're going to break something. I had a huge cheater bar on a 1/2" breaker bar and I thought something was going to snap. It's easier with the engine out of the car. Maybe a little grease on the back side of the nut where it rubs against the rubber coupling would help in reducing the requisite force. You'll need a 30mm socket, too.
 

Attachments

  • Rear bearings and all 1.jpg
    Rear bearings and all 1.jpg
    164.6 KB · Views: 53
One kingpin done. Unless you have access to a lathe and grinder I wouldn't tackle this. I ground the two washers flat as they were just stamped washers. Then had to grind a little off the bottom washer but be careful as you don't want to take too much off! Now just want to find a neat way of covering the hole at the top to stop dirt sitting in there. Think I'll just silicone it up.
 

Attachments

  • 1442331614474.jpg
    1442331614474.jpg
    24.4 KB · Views: 37
  • 1442331631157.jpg
    1442331631157.jpg
    30.5 KB · Views: 37
  • 1442331642696.jpg
    1442331642696.jpg
    32.2 KB · Views: 34
  • 1442331659664.jpg
    1442331659664.jpg
    37.9 KB · Views: 40
  • 1442331678756.jpg
    1442331678756.jpg
    40.7 KB · Views: 34
Looking good Damian.
I know from experience what a job these are, especially to get those washers right!
The hole at the top? isnt that sorted out by inserting the top bush for the top arms?
 
The sticking out hole is for attaching the damper Sean but the other hole is only there to allow a drift in to push the bushes out. Its only as deep as the bush but it does trap dirt. Just my ocd again!
 
Getting the rear swingarms together. Certainly looking a lot better than when they came off! Ocd got the better of me again so had to give the bolts and spring washers a clean on the wire wheel.
A couple of questions for rear wheel bearing installation:
The old nut was castellated for a split pin but the new one is not. I assume you have to make a slot where you want the split pin?
Do the little lugs on the funny washer have to go in the flexible coupling?
 

Attachments

  • 1442672182997.jpg
    1442672182997.jpg
    90.8 KB · Views: 34
  • 1442672200446.jpg
    1442672200446.jpg
    52.7 KB · Views: 34
  • 1442672212086.jpg
    1442672212086.jpg
    53 KB · Views: 32
  • 1442672228526.jpg
    1442672228526.jpg
    87.9 KB · Views: 38
The new flexible couplings I have don't have the cut outs in them for the lugs of the washer to sit in. Have to mill some in at work.
Been cleaning and rebuilding the steering box. Quite pleased with how its going so far
 

Attachments

  • 1442759697839.jpg
    1442759697839.jpg
    67.9 KB · Views: 35
  • 1442759711394.jpg
    1442759711394.jpg
    73 KB · Views: 32
  • 1442759724443.jpg
    1442759724443.jpg
    62.8 KB · Views: 24
  • 1442759735243.jpg
    1442759735243.jpg
    68.5 KB · Views: 30
very nice.
I got the same problem with the flexi joints.


still haven't removed my arm from the steering hub.
must get around to it soon.


just spent the day getting the 500D out of the garage to make some room. Might have a go at painting my 500 myself!
 
I don't think that big "star" washer is a locker; I think it is just to spread the load and provide a bit of "gription". I think my new and original Fiat part lacked that opened out part in the internal splines.
BRA_9547 by Peter Thompson, on Flickr
Knowing me, I probably just ground the tabs off the washer and no problems so far.
Sean, I really think you should go for it with the paint. You know you can do it and apart from the grit-blasting, haven't you done everything else yourself. So what, you might get the odd flaw; there were a few bits I wish I could have done better with, But overall, the painting is bound to be very easy for someone like you after all the complicatons of welding such a rusty structure.:worship:
 
Yes Peter I've been thinking about that washer and trying to figure out what it actually does. To be such a funny shape it must be meant to do something more than just keep the nut away from the coupling. The new nuts you get in the kits don't allow a split pin and you can't not lock them in place as they will become loose
 
If you think about it, the most that washer can actually do is to possibly act as a stop if the rubber got over-flexed. It does slightly over-ride the function of the rubber in providing a vague connection direct from the internal splines to the aluminium coupling. To an extent it might also protect the rubber from contamination by any grease that drifts away from the splines.
I think my bearing kit had the alternative nuts, but I thought they were too small anyway. Incidentally, it also came with new split-pins.....and they were too big...it all sounds a bit Golidilocks and the Three Bears. Anyway, now it's just right.:)
 
Just got to put the steering arm on the box in the correct place and check the travel and angles. Will do that nearer the time of fitting. A before and after of the box. Of all the items I've cleaned so far this is the one I'm most pleased with.
DSCF4404.JPG

DSC_0047.JPG

DSC_0048.JPG

DSC_0049.JPG

DSC_0050.JPG
 
That really is going to be a showstopper. All I did to my steering-box was to remove the worst of the external dirt. ;)

It's not dirt Peter its patina? I much admit I did clean mine with some degreaser but that's about it. Damian has, as I said before, well and truly surpassed my level. I tended to replace washers rather than polish them!:eek:
 
It's not dirt Peter its patina? I much admit I did clean mine with some degreaser but that's about it. Damian has, as I said before, well and truly surpassed my level. I tended to replace washers rather than polish them!:eek:

I think that when you work so hard on the shine it deserves to have a clear lacquer put on. I was amazed at how quickly any raw new metal under the car, such as plated washers and nuts and brakes lines, developed an unwelcome patina. Yes, there is such a thing...just look at my face as an example.:hm:
 
I've now done the rear bearings and torqued them up. I don't understand where all these horror stories came from of people hanging off the hub with a scaffolding pole and the likes.
One thing I did notice whilst practising putting everything together was that the hubs needed polishing slightly so that the bearing races fit on correctly. The first picture shows the bearing race sitting proud of where it should be.
Once everything was greased and bedded in the amount of torque required on the nut was minimal. I made a rig up and checked the 1 lb weight at 4.3" just started to move the hub. I used the old nuts with split pins. New ones were smaller and didn't have split pin slots.
 

Attachments

  • 1443461516671.jpg
    1443461516671.jpg
    55.6 KB · Views: 41
  • 1443461537786.jpg
    1443461537786.jpg
    59.9 KB · Views: 47
  • 1443461566727.jpg
    1443461566727.jpg
    60.3 KB · Views: 38
  • 1443461581571.jpg
    1443461581571.jpg
    64 KB · Views: 54
Congrats on getting such a good finish on all those mechanical parts Damian...puts me to shame.
But are you sure you used new spacer tubes between the inners of the two bearings? That's what causes the hot sweats because a new one is a bit longer than it needs to be. The torque is needed to compress the tube and make it barrel out. It then has tension which maintains just the right amount of preload pushing the two inner races towards the outers, thus taking any play out of the rollers which are sandwiched between.
I have read that there are some spacers which are made with a bit of barrelling built in and that they collapse more readily. But a pre-used one, which wouldn't look wrong, would be easy to tighten as all of the "collapsibility" would already have been used up.
 
Definitely used a new spacer Peter. I checked the measurement against the old one and they were longer. Guess I just got lucky. Even backed nut off to next split pin hole but when I checked the rotational torque it was a bit loose (weight pulled the hub too easily). When I tightened it to the next hole it was ever so slightly too tight but I reckoned it was best too tight than too loose. I repeated this a couple of times just to check. Found out why the new nuts don't have split pin slots. A 126 hub has a slot rather than holes so you tighten and then bash the nut into the slot to lock it off. If you have 500 hubs you must only use split pin nuts
 
For those of you who have replaced a front panel before you will know the challenge I have faced today. Got that and the battery bay panel fitted today. You've got to love the fit of replacement panels! Bonnet fit is spot on and I welded the battery tray braces to the front panel so it is really rigid now. Just the front wheel arches to repair now and thats all the welding done. Still got to dress everything so it still looks a bit rough
 

Attachments

  • 1443883880513.jpg
    1443883880513.jpg
    71.5 KB · Views: 63
  • 1443883921152.jpg
    1443883921152.jpg
    38.2 KB · Views: 64
  • 1443883951252.jpg
    1443883951252.jpg
    56.4 KB · Views: 61
  • 1443883967172.jpg
    1443883967172.jpg
    53.1 KB · Views: 57
First major obstacle overcome today as all the welding is now finished(y)
Just got to dress it all now and seam seal it but well chuffed that it's done and the standard of the work
 
Back
Top