1.jpg

Tipo (Classic) Nice new Tipo piccies

Introduction

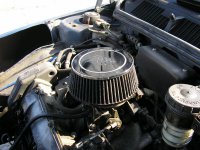
gave the tipo a good clean and polish up this morning and also did some engine bay blinging in the form of a cinqi K&N which fitted straight on perfect :) the engine sounds gorgeously loud and sounds great when you floor it :) now just for exhaust :D its also got a bit quicker too but needs a cold air feed!

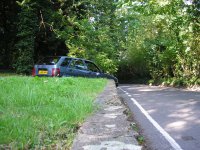
took it up into epping forest (just up the road) and took some nice piccies on someones driveway :D they wernt too pleased :)
depends :p

pick up poject car tomorrow night which ill be running around in for a while (few months or so) so ill be able to do some work on the tipo whilst its off the road (new lower front arms on both sides, new backbox, full service etc.)

Then the project will be going off the road so i can play aboutwith that and respray it myself for the experience etc.

once thats done and im happy with it, we will see which one stays :)

thanks again ben! top man!
 
Last edited:
Bushboy said:
depends :p

pick up poject car tomorrow night which ill be running around in for a while (few months or so) so ill be able to do some work on the tipo whilst its off the road (new lower front arms on both sides, new backbox, full service etc.)

Then the project will be going off the road so i can play aboutwith that and respray it myself for the experience etc.

once thats done and im happy with it, we will see which one stays :)

thanks again ben! top man!


No worries anytime!(y) I reckon lowering would look good on it though.
 
been planning it in my head for weeks now but ive finaly gone and started it! its also my first go and playing with fibreglass (y)

all ive done so far is build the wooden base. original plan was to build over the spare wheel but i changed my ideas so that I can still have access. dont wanna get stuck with a puncture :( its essential to have a nice system in a car but if its in a car that doesnt move, its pointless :D (y) .

anyway, piccies

1.jpg
Nice big empty boot

2.jpg
Carpet removed

3.jpg
The new floor cut to shape using the carpet as a template

4.jpg
floor in place

5.jpg
Drawing out the template for the spare wheel

6.jpg
spare wheel hole cut out!

7.jpg
extra brackets to hole the wheel cover in place

8.jpg
the floor and the wheel in place. lovely jubbly

9.jpg
The backboard cut and bolted in nicely

10.jpg
first wall cut and put into place

11.jpg
and the second wall! install base complete!

12.jpg
and look, i can still get to the spare wheel :D


right, now im off to go and seal the base. wont post anymore pictures untill the fibreglass is in :) well maybe some just before i start it heh.
why didn't you use the sides and tailgate plus the parcel shelf or mdf substitute to make a box shape? works a treat.the back seat is one side,the tailgate the other side,and the shelf the top.:)
 
Bushboy, what are you doing for the parcel shelf?

I just bought a new MDF one cheap on Ebay (from a member I think), but might not actually use it now. I'm upgrading my standard 6" x 4" front and 4" rear speakers so I'll see how they sound - I'm not serious about ICE, I was thinking about some 5 1/4" jobs for the rear in the MDF shelf.

If you're interested let me know.
 
Back
Top