Technical My stepson has bought a lemon - timing belt

Currently reading:
Technical My stepson has bought a lemon - timing belt

Ive just ordered two timing belt kits (with water pumps) from Shop 4 parts. One for the 1.2 and one for the 100HP.
I went for this timing tool kit as the 1.4 16V is specifically mentioned. https://www.ebay.co.uk/itm/124599863828

The 1.2 is easier to time up and not catastrophic if I get it wrong.
 
Last edited:
This post contains affiliate links which may earn a commission at no additional cost to you.
Ive just ordered two timing belt kits (with water pumps) from Shop 4 parts. One for the 1.2 and one for the 100HP.
I went for this timing tool kit as the 1.4 16V is specifically mentioned. https://www.ebay.co.uk/itm/124599863828

The 1.2 is easier to time up and not catastrophic if I get it wrong.

Hi Dave. I'm not that confident about the 16 valve engine, but I believe the kit you've bought is specifically for the 16 valve engines which are timed up by using the two long rods in two adjacent spark plug holes to allow all pistons to be set half way up/down the bores before locking the cams with the two wee screwed "blockers" on the left in your posted link.

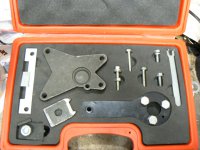
That kit does not include the cam locking tool needed for the 8 valve engines. This is the kit which you need for them : https://www.ebay.co.uk/itm/183543522472?hash=item2abc0be4a8:g:~DwAAOSwaL1doCV1 I have the Neilsen branded version of this and it worked a treat on our 1.2.

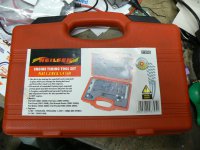
Here are some pics of mine:

P1090690.JPG

P1090692.JPG

P1090693.JPG

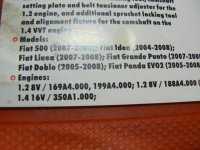
You can see there is an extra tool just to the left of the crank locking tool, this is a flywheel locking tool I made for it and is not a standard part that comes with this kit. These far eastern manufactured kits (I presume that's where they are made?) seem to be themselves a bit mixed up about which kits do which engines. I notice my kit actually says on it's label - which you can see in the second picture - that it does the 16 valve engines when, in fact, it doesn't. The crank locking tool looks similar though? maybe it's the same? in which case you might be able to buy a cam locking tool separately on ebay or the like? The cam locking tool, which you can see on the left in my third picture, is not just a straight bar, it's locking part is on an angle. I think it would be quite difficult to make one accurately?

PS. It will do the 8 valve VVT engines. Maybe that's where they got mixed up about it being able to do the 16 valvers?
 
Last edited:
This post contains affiliate links which may earn a commission at no additional cost to you.
Hi Jock. I had the same thought so went for one that specifically included the 100HP. The two piston setting pins sealed it (though I'd prefer four pins to sight across the top).

I will do the 1.2 - 60 with the Tippex method. It's valves are safe so if I get it wrong there's no harm done. ;)
 
Hi Jock. I had the same thought so went for one that specifically included the 100HP. The two piston setting pins sealed it (though I'd prefer four pins to sight across the top).

I will do the 1.2 - 60 with the Tippex method. It's valves are safe so if I get it wrong there's no harm done. ;)
Good plan I would say Dave. As you probably know I did both our (60 hp) panda and my boy's 1.4 VVT Punto by the tippex method and then followed up by checking their timing was correct by installing the timing tools just to be sure, so I know it works. I think the only time you could "catch a cold" with the tippex is if the timing was incorrectly set up before you start. However, if the engine has been running well before you start the belt change then the chances are very good that the timing is going to be correct and all will be well.

Good luck, hope all goes well.
 
As you probably know I did both our (60 hp) panda and my boy's 1.4 VVT Punto by the tippex method and then followed up by checking their timing was correct by installing the timing tools just to be sure, so I know it works.

Here's a wee observation/thought concerning a possible advantage of doing this by the Tippex method.

Shortly after we'd bought the Panda and then with my boy buying the Punto and realizing both cars would be the best of having their belts renewed gave me the excuse I needed to justify buying my own copy of MES because I had discovered, from posts I'd read on the forum, that I was likely to need to do a Phonic Wheel Relearn/Reset after I'd changed the cambelts.

However neither have had any problems, have run perfectly, posted no codes and required no resets. (So I didn't need to have bought MES at that moment. However I consider it to be one of the most useful aids to maintaining our Fiats that I've so far bought) I've pondered over this, the Phonic Wheel "thing", at some length and I've come to this conclusion:-

The whole problem revolves around the way the ECU "sees" the relationship between the crankshaft and camshaft sensors. If you follow the "recommended/official" way of doing the job then you will slacken the big Hex/Torx bolt on the cam sprocket thus allowing the sprocket to "float" on the end of the cam. Then, having fitted the new tensioner and belt, maybe water pump too, applied tension to the belt and with the crank and cam locked up in the correct positions you would tighten the cam sprocket bolt thus locking the sprocket to the cam. Job done, just the guards, engine mount etc to reassemble.

So why do some people end up with the check engine light on? - usually after the car has had a wee run out on a dual carriageway or just a run in the country, somewhere where the engine is run at higher RPM for a wee while - My theory is that when the cam sprocket is slackened, no matter how careful you are, I doubt if it will be in absolutely exactly the same position when that bolt is retightened - I've noticed there is a wee bit of backlash in the cam locking tool and also there must be a small clearance in the bolts which hold the crank locking tool. There's also always the possibility of a very small movement taking place whilst you are tightening the cam sprocket bolt itself as you must not do this with the cam locking tool in place to avoid potentially damaging the end of the cam - Now when the engine runs the ECU notices that the signals from the crank and cam sensors are no longer arriving with exactly the same time interval between them and fires up the CEL. Performing a Phonic Wheel Relearn "tells" the ECU that this is the new norm and not to "worry" about it, so the light doesn't illuminate any more.

If you change the belt using the tippex method you totally eliminate the possibility of introducing these variables - I believe the belts are produced to such close tolerances that differences introduced by using different makes of belt are inconsequential - So the sensor signals will be seen by the ECU as exactly the same as they were before. The only caveat I'd place on this is that the first time you do an "unfamiliar" engine you need to check the timing of cam to crank by installing the timing tools before you strip the old belt off to be sure someone before you hasn't timed it up incorrectly and, as you will have had to remove the cam cover to do this, you might as well confirm the timing is correct by reinstalling the timing tools when you've finished just to double check the timing is still spot on. Once you've done your engine this way and know the timing to be correct, from then on you can just do belt changes by the tippex method without needing to remove the cam cover which means you only need access to the belt end of the engine so considerably quicker and easier to do.

Supporting evidence would seem to come from inquiries I've made at local garages. The main agent service department tells me they do the belts the "official" way, using the official tools and always do a Phonic wheel relearn. I learned this when I challenged them over the considerably greater price they quoted for the job when I inquired. The wee local garages all seem to do it by the tippex method and apart from my favorite wee Fiat Indy non of them perform the relearn and report no subsequent problems. Indeed they probably don't have diagnostic gear that could do the relearn anyway.
 
Last edited:
The wee local garages all seem to do it by the tippex method and apart from my favorite wee Fiat Indy non of them perform the relearn and report no subsequent problems. Indeed they probably don't have diagnostic gear that could do the relearn anyway.

I've given the impression that my local indy always do a relearn which is wrong. In fact they change the belts by the tippex method but do have the "gear" to do a relearn if it becomes necessary later.
 
Let me give you my take on this.

Most marques with belt driven OHC engines use keyed sprockets and timing marks. With these engines, it's relatively simple to replace the belt without special tools, but there is one limitation; you can only set the timing in increments of a complete tooth. Most of the time, it's obvious how everything should be aligned, but occasionally you find the fixed timing marks come between two teeth, then you just have to choose which one is nearest and set the belt to that.

Fiat chose a different design philosophy; the camshaft sprocket isn't keyed, so the timing is infinitely adjustable and can be set to any position you wish, rather than just to the nearest tooth. This has advantages; there will always be some slight variation in tolerances of individual parts, and by having an infinitely adjustable system, those tolerances can always be precisely taken care of when setting the belt position. So on a FIRE engine, it makes no sense to talk of the timing being 'one tooth out'; it might be half a tooth out, or 1 1/4 teeth out, or 0.6986 teeth out.

However, the drawback is that you can only set the belt to that level of accuracy if you use the correct tools, loosen the cam sprocket and follow the Fiat recommended procedure. All these improvised alternative ways of doing the job effectively negate Fiat's intention of having an infinitely variable adjustment to precisely set the timing. If you use tippex method, for example, you are at the mercy of any variation in the manufacturing tolerances of any replaced components; there will always be some small discrepancy in, for example, the spacing of the belt teeth. Just because it works once, twice, or even quite often, doesn't mean it will work always. If you want to set the timing precisely, you need to use locking tools and follow the manufacturer's recommended procedure.

Lots of folks don't, and many of these have successfully changed the belt without causing any issues. But this forum is littered with posts who've had problems after belt changes, so if you do replace a belt using one of these alternative methods, please be aware of the risk.

The official procedure is described in detail in eLearn, and you can find a copy in the downloads section of the forum.
 
Last edited:
Thanks JR, I'm not at odds with any of that. In fact I notice my wee Ibiza has both the crank and cam sprockets "free running" in this way and I totally agree that optimal timing will be achieved every time if you follow the "official" way of doing it. Indeed I would say that anyone who is not 100% on top of the task and understands, in depth, the implications of what they are doing, would be well advised to follow the "official" method.

What these procedures very much remind me of is "dialing in" a cam on one of the old engines where the sprockets were keyed so you fiddled about with offset keys or vernier sprockets to get the ideal timing. Here's an absolutely delightful video of a young lad (wish one of mine had inherited my passion) setting up the timing on a "fast Road" cam in his? Mini - a "proper" Mini too! He's even hand filing his own offset key! I did this, back in the day (1964) on my 1275 "S" when I uprated it with a Downton Fast Road kit. Those of you who aren't "into" degree wheels and DTIs just sit back and enjoy the spectacle of this skilled young lad. https://www.youtube.com/watch?v=khxDPgEbbAo. The other way of doing it is with a, relatively much more expensive, Vernier sprocket like this one for a Ford Pinto where the sprocket is in two parts so you can alter how the outside teeth relate to the keyed central hub using the clamping bolts shown. https://www.burtonpower.com/kent-ca...C6mAF-NQQn4P8wz8b8dq2Hvy8qjVmNaAaAjcMEALw_wcB In fact I prefer this arrangement compared to the way the modern sprockets are held simply by friction with one central bolt. Bean counters at work on that one I'm sure.
 
I go along with everything that has been said and will also say that if you're doing the cam belt you may as well do the water pump at the same time. I would allocate a weekend for the job. Saturday, strip down and replace the water pump, let the sealant cure and then on Sunday put the new belt on. There is a good guide in the Punto section, I've changed the belt on both a MK2 and a MK2b (both having the 1.2 engine). The Mk2b had the later engine shared with the Grande, it's got the round screw on oil filler cap. I used two wooden skewers to make sure the pistons were at the right position. I used the tippex method. Now that I have a 100HP Panda I've got the locking kit, same one Dave has.
 
Its not a hard job on the 1.2 literally set the cam at 12 o'clock and line up the dots. Tensioning the belt will probably show that it's out by one tooth so set it forward by one tooth and check after tensioning.

My 100HP belt was well within miles, but the water pump was leaking. It turned out the seal was fine but a small core plug was leaking. There was quite a lot of coolant staining inside the belt cover. All that for a faulty part. Getting it apart was "fun because the belt cover front bolt was seized solid and no space to get in with grinder or hack saw and the Dremel just shattered its cutting discs. I made new brackets not a job I'd have wanted to pay for.
 
Last edited:
Back
Top