Technical JTD Timing Belt tools.

Currently reading:
Technical JTD Timing Belt tools.

Joined
Dec 3, 2003
Messages
4,384
Points
1,130
Location
The land that time forgot
I bought a timing belt tool kit... :D

It has a collar that clamps to the crank pulley and a long rod that screws into a locating bolt-hole.

It has a little notch thing that locks the camshaft pulley (I presume the second pulley is just the injector pump and doesn't need locking).

And it has a dibber-dobber which looks like the tensioner setting (round hole) liner-upper.


But.. it also has two fairly hefty bolt things about 5" long... with a hex' section (suggesting a spanner goes on there).. a threaded section and a spring-loaded smooth rod that retracts into the rest of the device.

What are these for? For the life of me I couldn't work out what the ****** I'd use them for... :eek:


Ralf S.
 
Last edited:
This is all you need for the 8 valve JTD engine.
.
 

Attachments

  • JTD Crank Pulley Tool 2.JPG
    JTD Crank Pulley Tool 2.JPG
    844.8 KB · Views: 90
  • PICT0158.JPG
    PICT0158.JPG
    1 MB · Views: 93
  • PICT0166.JPG
    PICT0166.JPG
    788.4 KB · Views: 89
The big collar is essentially the piece I used.

I also had a little hollow rectangular piece with a "tooth" on it that fitted under the bolt at 8 o'clock to the camshaft pulley. The "tooth" fits into the pulley teeth and prevents it rotating.

It's interesting to see the marks on the pulley and the belt. My belt had a very faint line on it and because the pulley was locked, I didn't really look under the dust for a painted mark on the pulley.... but since the belt slipped when my tensioner came over all moody/wasnt' actually tightened... I'll have a look and see if the marks are there/to line it all up again.

I'm still curious what the big spring loaded jobbies are for though.. :D


Ralf S.
 
Full instructions here. You don't need the flywheel locking tool, shown in the instructions.
.

Most excellent instructions.

It sounds mostly like what I was doing.. other than I didn't put the tensioner on MAX first.. I just went straight to the "normal" (arrow vs the hole) position... That's probably where it all started to unravel.

I'm blaming the tensioner bolt .. :D It initially felt tight.. but then it wasn't, which gave the belt a "slack" moment after I'd removed the locks.

I guess that's why the recommended method says set it to MAX first and then back it off. Learnt something... :eek:


Ralf S.
 
Don't know which tool kit you've bought. Some suppliers sell a complete kit suitable for both the 8 and 16 valve engines. The 16 valve engine needs two pins to lock the twin camshafts. They're not sprung though.
.
 

Attachments

  • JTD Cam Tools.jpeg
    JTD Cam Tools.jpeg
    67.3 KB · Views: 53
These are the components.

The little rectangular piece with the notch/tooth on it fits underneath the camshaft pulley (the big bolt in the photo up top holds it in place)... Once it's bolted in there, the notch locks the pulley and prevents it rotating.

Or at least, that's how I used it.. :D

The two big "pins" are definitely spring loaded... There's a screw head on the hex' end, presumably the cap that holds the mechanism in place. The narrow smooth section at the end retracts into the wider threaded part.

I guessed they were for 16V.. since once the cam and crank are locked, there's not really a need for any other tools. But I can't imagine how you would use them ...or why they would be made spring loaded. :)


Ralf S.
 

Attachments

  • camkit.JPG
    camkit.JPG
    27.1 KB · Views: 54
Sorry to bring up an old thread, did any have the right tool after to lock the crank,
I found ones for the 16v but the seem to be different.
 
The crankshaft (flywheel) locking tool for the JTD 8 valve engine is shown as Fig.4 in the Dayco instructions I posted in post 3 above.
.

Sorry it's the tool to set dtc I need. All the ones I'm finding are different and seem to be for a 16v.
 
I am going to change the cambelt on my old Jtd but I only have the long threaded bolt and not the short one that goes in the crank. Any ideas where to get one or what I can use. Plus I guess whilst I am there an alternator belt and aircon belt would be a good idea. Anything else I need to change. Got the cambelt/water pump kit from shop4parts.
 
I am going to change the cambelt on my old Jtd but I only have the long threaded bolt and not the short one that goes in the crank. Any ideas where to get one or what I can use. Plus I guess whilst I am there an alternator belt and aircon belt would be a good idea. Anything else I need to change. Got the cambelt/water pump kit from shop4parts.
I use a regular M8 bolt... about 15-20mm long from memory.

The alternator and aircon belt is a single belt. Mine was a 1270PK6 I think (6 ribs and 1270mm circumference).
To fit it, the best tool you will ever buy is a 15mm aviation spanner, to get leverage on that aux belt tensioner bolt.


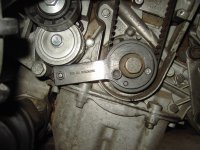
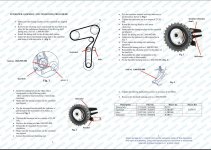
Take a photo of the belt run before you start. You can work it out (ribs over the ribbed pulleys, smooth side over the plastic pulleys) but it's easier to copy the photo. I have seen on here, someone who routed the belt over the ribbed pulley backwards and was shredding aux belts.

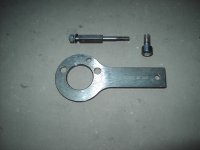
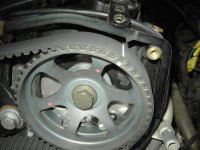
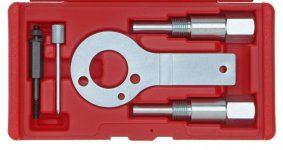
The water pump is a joy. You need to remove the cam pulley to get access to it. I would advise you to get something to lock the pulley. The JTD kit I bought (Post #7) had a little toothed widget that bolted to the block and "jammed" the pulley so you could break the stiction on the bolt. You need to tighten the bolt up pretty tight to stop the tooth lock from moving.. and the head is aluminium so it's easy to overtighten it too. A kit with the tooth lock in it is a good investment.

Don't be tempted to loosen/tighten the bolt with the pulley being held locked by the cam-belt. Some Neanderthal (actually, what humans came *before* Neanderthals?) had obviously done that on mine.. it can shear the locating key on the back of the pulley, so then it can flop about and you invented "variable valve timing" which you can only discover when you've finished and start the engine.

The water pump requires the TDC sensor to be moved and the bolts holding it might be stuck tight. They're recessed Torx I think. If they're stuck and you use an Allen key you can strip the Torx and the beast will need drilling out. I managed to get a drift and put a notch on the edge and the Gods of the Workshop were with me that day.. I was able to drift it undone... since there's no way on earth to get a drill in there. Get some Torx sockets and save yourself the aggro. Cheap ones will do... you only want to undo a tiny bolt.

The tensioner is a real Mo-Fo without the little doodah to rotate it.. basically because of no room to hold it under tension while you do the bolt up.. so have a cup of tea and swear a lot .. it helps. The timing pointer tends to go slack by about 3-4mm after you rotate the engine, so I ever so slightly overtighten it static, so that the pointer moves towards the hole after you've rotated it.

Before you fit any covers etc. start the motor for just a few seconds... (in neutral, without shoving your face in there etc.) to make sure it starts and the tensioner stays pointing at the hole still after you switch off. Ignore the charging light obviously.. mine beeped at me so loud I thought I'd broken something.

If it's all good...put the beast back together. One of my pulleys was rubbing on the cover, which must have been deformed slightly. I stuck an M8 washer behind it to move the pulley away from the cover. As long as the belt is more or less centred on every pulley it doesn't hurt.


Ralf S.
 
This post contains affiliate links which may earn a commission at no additional cost to you.
So, Managed to do the cam-belt but something isn't quite right. It's ticking ever so slightly now and the revs creep up to a thousand rpm so I am thinking the timing is slightly off. The water pump was probably the easiest part about the whole thing once I had used that locking tool that came with the timing kit I bought. I will go back and redo it again tomorrow as I had missed the bits out where you tighten it up turn it then slacken it off and realign to the hole.
The fuel pump doesn't matter a bit does it?
But once I get it sorted it's not all that a bad job.
Thanks for your input Ralph, Much appreciated.
 
All sorted, I watched a youtube video last night and realised I hadn't timed it properly, went out this morning and took it all apart and started over using the timing marks I hadn't seen yesterday and the marks on the belt and it's absolutely brilliant now.
 
Nice one!

Yes, the fuel pump is just driven by the rear pulley... but as you found out, it does it's own thing and doesn't need to be "timed".

Mine used to "hunt" a bit whenever I mis-timed it (or rather when I fitted the cam sprocket slightly out of phase, due to the snapped off locating key) so I got used to running the engine up to see how it sounded before I put everything back together.

In the end I got fed up with it and just bought a new sprocket, with an undamaged locating key, so it now goes on right first time.. 🧐

Ralf S.
 
Back
Top