

You are using an out of date browser. It may not display this or other websites correctly.
You should upgrade or use an alternative browser.
You should upgrade or use an alternative browser.
Technical Handbrake problem
- Thread starter Roady27
- Start date
Currently reading:
Technical Handbrake problem
Drums not adjusted or set correctly I'd be checking both rear drums
The two cables should not be that unbalanced.
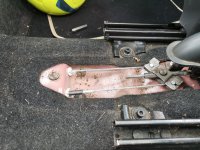
Looks to me from the picture that the outer part of the driver's side cable has pulled through its connector into the car. That would explain what your son felt and heard.
You'll need to replace the handbrake cables. When you adjust the new ones, be careful not to overtighten, or the self adjusters won't work correctly.
I'd advise you not to drive the car again until this has been fixed.
Last edited:
Yup, jrk is right. That spirally bit on the O/S cable is the outer cable which has pulled through it's retainer into the cabin. It should look like the other one on the N/S. This cable needs to be investigated to find out what went wrong and probably replaced to rectify. I'd be looking carefully at the N/S one too just to check it's ok - and be aware the handbrake is almost certainly not going to hold the car on anything you could call a hill. Needs looked at immediately as the car is technically unroadworthy like this so Police and insurance company are going to be very unhappy if something happens.
As jrk says, don't over tighten the cables when you fit the new one or the self adjusting mechanism won't work as intended.
As jrk says, don't over tighten the cables when you fit the new one or the self adjusting mechanism won't work as intended.
I'd be looking carefully at the N/S one too just to check it's ok
I'd recommend replacing both; they'll balance better and the last thing you want is to be doing the same job again on the other side in a few weeks time.
You can get new cables from shop4parts for about a tenner each, and there's another 10% off that if you make a donation to the forum.
Last edited:
Note the two cables are different lengths be careful when replacing to get the right one on the right side, also the end at the drum(assuming drums) has a "star lock" washer that breaks on removal and probably doesn't come with the new one but can be bought easily on Ebay.
I also had to modify one of the cable clamps that hold the cable in place bit sawing/filing.
Hope the drums come off without issue, they can be a complete nightmare that can require a new fitting kit one per side.
Once "fitted" be careful that the handbrake end is correctly seated in the floor pan pattern part ones don't always lock in place at first, and you may need to grind(not file) off any excess cable that sticks proud of the toggle that fits in the handbrake attachment point its a very tight fit to slide it in.
Last edited:
Hope the drums come off without issue, they can be a complete nightmare
Indeed they can. I remember one where the lining had detached and locked the wheel solid; unbelievably, the owner drove it home from the supermarket like this, and claimed not to have noticed until they came out next morning and saw that the tyre had deflated. The tyre was completely shredded, and the rim wasn't much better. I somehow managed to get the drum off without further damage, but the shoes, drums, tyre and wheel were all scrap.
Fortunately in this case the OP said they'd already had the drums off to check everything was OK.
For anyone who may be struggling, note that the holes in the drums for the locating pins are threaded (at least on OE parts); you can insert suitable bolts to extract a stubborn drum. Before you do, make sure the handbrake is off! Even yours truly managed to overlook this - once.
If replacing the shoes and the wheel cylinders are sound, note that the pistons have a tendency to drop out of the cylinders once the shoes are removed; if you're leaving it with the shoes out for any length of time, consider clamping them.
Last edited:
Thanks jrk, as always from you some good and very relevant advice. Can I just add that if someone is having trouble getting the drum off to not only make sure the hand brake is off - lever on the floor - but also that the screw adjuster is fully backed off so there is slack in the cables. If someone has over adjusted (over tightened) the cables in the past it may be that simply releasing the handbrake lever will not fully return the shoes inside the drums.Indeed they can. I remember one where the lining had detached and locked the wheel solid; unbelievably, the owner drove it home from the supermarket like this, and claimed not to have noticed until they came out next morning and saw that the tyre had deflated. The tyre was completely shredded, and the rim wasn't much better. I somehow managed to get the drum off without further damage, but the shoes, drums, tyre and wheel were all scrap.
Fortunately in this case the OP said they'd already had the drums off to check everything was OK.
For anyone who may be struggling, note that the holes in the drums for the locating pins are threaded (at least on OE parts); you can insert suitable bolts to extract a stubborn drum. Before you do, make sure the handbrake is off! Even yours truly managed to overlook this - once.
If replacing the shoes and the wheel cylinders are sound, note that the pistons have a tendency to drop out of the cylinders once the shoes are removed; if you're leaving it with the shoes out for any length of time, consider clamping them.
For those who haven't tackled this problem before, the big problem here is that with higher mileages the drums themselves wear on the faces where the linings rub against them. This results in a wear ridge forming right at the inner edge of the drum - the side near the backplate. As the linings and drum itself wear the self adjusters jack the shoes out to compensate for this wear and continue to give you a "good" feel on the brake pedal but the problem with this is that the linings won't then retract far enough to clear this wear ridge on the drum so you'll find the edge of the lining digs into this wear ridge as you try to remove the drum. If you simply try to apply more force all that happens is that the shoe and it's lining, being "stuck" under this ridge, starts to compress the retaining springs and tip away from the backplate thus jamming it even more solidly against the drum and making removal almost impossible. What I do if a drum is proving reluctant to remove and I've fully backed off the handbrake cables and tried some gentle levering with no joy is firstly not to just lever harder or try jacking it off using the threaded holes. I stick a couple of wheel retaining studs back in their holes so I can use a large lever to rotate the drum and then, USING MODERATE FORCE, I lever between the backplate and drum whilst, at the same time, rotating the drum with the lever. I find this often "feeds" the edge of the lining over the lip on the drum and, often with considerable effort, once you've got the very edge of the lining over the lip you can continue to lever the drum off whilst rotating the drum with the lever. If the linings do jam under the lip simply pulling or levering harder and harder will end in tears as you will likely start bending stuff like the back plate and destroying shoe retainers and the holes they fit in the backplate. If this doesn't work I have, in the past, drilled a hole in the face of the drum so I can use a screwdriver to wind the self adjuster back and release the lining that way. Drilling a hole in this way doesn't stop you reusing the drum although, if the lip is so large you've not been able to remove it easily, you probably need to be thinking about a new drum anyway. I've never had to do this on a Panda though so don't know if it would work and you don't want to be drilling through the hub itself either so this is a last resort measure. Very exceptionally the only way out might be to simply shatter the drum with a big "persuader" and buy a new drum.
When we bought Becky - 2010 Panda - back in 2017 I ran into exactly this problem with the rear drums and it took quite some time and effort to get the drums off. They did eventually come off using the levering method. The drums had considerable lipping and there was a great deal of dust inside. It wouldn't surprise me if the drums had never been off since she was made! The simple answer to avoiding this annoying and time consuming problem is to file or grind away any trace of a lip on the drum every time you do a brake inspection - once a year for me - They just slip off and on with no effort at all now.
I’m having less luck with my replacement cables!
Swapped em yesterday all seemed fine when I got back today my rear right drum was red hot got in to investigate and think one of my shoes had been binding
After a lot of tinkering today I still can’t get my right cable in sync with the left one ?!!
Can someone talk me through how to adjust… the shoes and the cables
I’m thinking I’ve stretched my right one now though as it still seems longer that the left
And I did make sure I got them the correct way around as I say yesterday they were in sync
Attachments
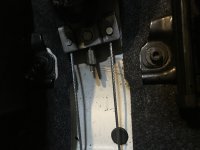
The cables new won't have stretched, you are correct one is longer than the other.
It's correctly seated at each end? New starlock washers at drum end?
After fitting you set the auto adjusters(by racking round with a screwdriver) and centralised the shoes by pressing the brake pedal, then checked the drag on the drum, adjusting as required until just catching? You then applied the hand brake 1 click and checked, it should just start to drag fully on at 5 clicks?
I suspect the shoes-adjustment not the cables
Last edited:
Thanks John I just got myself all confused today! I’m going to strip the rear brakes down tomorrow.. then I’ll follow your instructionsThe cables new won't have stretched, you are correct one is longer than the other.
It's correctly seated at each end? New starlock washers at drum end?
After fitting you set the auto adjusters(by racking round with a screwdriver) and centralised the shoes by pressing the brake pedal, then checked the drag on the drum, adjusting as required until just catching? You then applied the hand brake 1 click and checked, it should just start to drag fully on at 5 clicks?
I suspect the shoes-adjustment not the cables
I always thought both cables should be in line with each other
If they are genuine ones probably equal, yours isn't that far off ive seen far worse.
You need to adjust the shoes by adjusting the auto adjusters first, press the brake pedal(hub on) rack round the auto adjusters spin the hub, press the brake pedal(hub on), remove drum and repeat as many times as it takes on each side, now adjust the handbrake tension fully off until you can just feel drag on the hub, then try 1 click drag should be evident now both sides, certainly at 2 clicks 5 clicks fully on.
Press the brake pedal release the hand brake and check drag on hub should be almost free(very slight drag is ok), road test a few miles feel hub?
It does take "Some time/adjusting" when you've had everything off and or replaced the cables, not hard just time consuming but always check the drag on any axle when doing brakes on completion it can look right but be bar tight our Mazda rear calipers are fickle in regard to tightening the bolts unequal equals smoking brakes
Last edited:
Yeah your not kidding it can be tedious! But I’d rather be safe than sorry!!!If they are genuine ones probably equal, yours isn't that far off ive seen far worse.
You need to adjust the shoes by adjusting the auto adjusters first, press the brake pedal(hub on) rack round the auto adjusters spin the hub, press the brake pedal(hub on), remove drum and repeat as many times as it takes on each side, now adjust the handbrake tension fully off until you can just feel drag on the hub, then try 1 click drag should be evident now both sides, certainly at 2 clicks 5 clicks fully on.
Press the brake pedal release the hand brake and check drag on hub should be almost free(very slight drag is ok), road test a few miles feel hub?
It does take "Some time/adjusting" when you've had everything off and or replaced the cables, not hard just time consuming but always check the drag on any axle when doing brakes on completion it can look right but be bar tight our Mazda rear calipers are fickle in regard to tightening the bolts unequal equals smoking brakes
I’ll get on it tomorrow and update when done thanks for the tips it’s been ages since I changed my shoes and only done it the once was racking my brains trying to remember!
All done & dusted and working correctly thanks for the tips JohnThe cables new won't have stretched, you are correct one is longer than the other.
It's correctly seated at each end? New starlock washers at drum end?
After fitting you set the auto adjusters(by racking round with a screwdriver) and centralised the shoes by pressing the brake pedal, then checked the drag on the drum, adjusting as required until just catching? You then applied the hand brake 1 click and checked, it should just start to drag fully on at 5 clicks?
I suspect the shoes-adjustment not the cables
Drum brakes used to scare me not anymore I stripped em down again and double checked everything
Where do I get those star lock washers from? They don’t look like the usual flat type?
All done & dusted and working correctly thanks for the tips John
Drum brakes used to scare me not anymore I stripped em down again and double checked everything
Where do I get those star lock washers from? They don’t look like the usual flat type?
Star lock washers search Ebay "star lock washers" allow big enough size to just get over large end rather thsn the narrow section or you cant get them on
Similar threads
- Replies
- 20
- Views
- 1K