Technical H/G Replacement - whats involved

Currently reading:
Technical H/G Replacement - whats involved

Joined
Dec 10, 2006
Messages
2,372
Points
743
Location
wilmslow, cheshire
Ok, to start with, I refer to my thread:misfire on startup

There isnt a guide, so I will probably make one if thats ok, also, the FAQ is only basic,

So, what am I in for when changing my head gasket, 1108 engine?

Can I take the head off leaving the inlet manny on? [to remove when off the car]

if I undo the bracket under the engine, can the exhaust manny be moved forward out of the way with the downpipe/rest of system attached?

Do I need any special tools? it all looks simple enough - I ask cos although I have a great 1/2" drive set with all sizes, and all spanner sizes, I dont want to start the job and then need something I aint got!!

I have a torque wrench though

erm, if I think of anything else, I shall re-post

thanks!
 
Last edited:
I reckon you can take the head off without taking the inlet manifold off, but I took it off when I did it. It's not as hard to get to those nuts as it may seem, with a 1/2 inch drive. Unbolt the TB assembly (i.e. leaving the various hoses alone to avoid the aggro of taking them off) and support it out of the way with string (I tied mine to the wiper).

I would imagine you may get enough play in the flexi section to avoid unbolting the downpipe, but its only three bolts to disconnect anyway. No harm in trying. A ratchet spanner would be a great help with the manifold - head bolts, but not a necessity.

Good idea to get the head skimmed as you've no doubt read already. Stanley knife blade scrapes off old gasket on the block effectively, be careful not to scratch the surface though (keep a low angle to the block).

Have fun :)
 
every fire engine i've done the HG on, i've left the manifolds in place and removed them with the head. the exhaust can be unbolted from the downpipe easy enough, and with the inlet manifold, just remove the TB (so u dont need to upset the fuel lines)
 
cant say more than above..! just depends how anal you are about things if you want to be excessive follow the haynes way and see how much you dont need to take off though.
 
Ok, to start with, I refer to my thread:misfire on startup

There isnt a guide, so I will probably make one if thats ok, also, the FAQ is only basic,

So, what am I in for when changing my head gasket, 1108 engine?

Can I take the head off leaving the inlet manny on? [to remove when off the car]

if I undo the bracket under the engine, can the exhaust manny be moved forward out of the way with the downpipe/rest of system attached?

Do I need any special tools? it all looks simple enough - I ask cos although I have a great 1/2" drive set with all sizes, and all spanner sizes, I dont want to start the job and then need something I aint got!!

I have a torque wrench though

erm, if I think of anything else, I shall re-post

thanks!

a guide would be great (y)
 
the headbolts aren't 13mm, they're 5/8's (i think, which ever imperial size is near 13mm).

they come out ok, you'll need a big bar to make loosening them easier though. they shouldn't snap.
 
the headbolts aren't 13mm, they're 5/8's (i think, which ever imperial size is near 13mm).


Are they? Ive never had any problems with a 13mm socket slipping on it (the difference would be enough to get a slip with the torque applied)
 
the headbolts aren't 13mm, they're 5/8's (i think, which ever imperial size is near 13mm).

they come out ok, you'll need a big bar to make loosening them easier though. they shouldn't snap.


I just measured one. Guess what: 13mm.(Actually 12.88 or in imperial 0.507) so it could well be that 1/2" AF fits better.

Best bet might be to borrow a deep (impact type -- these all have 6 sides) 3/8 drive socket and an adapter.
 
I have a neighbour who has a full set of everything, so I will get all the other bits off and see whats what when it comes to removing the head bolts, that process will start in the morning and I am just about to put my camera batteries on charge ready for the guide..

wish me luck comrades!!
 
Righto
Head removed

The gasket is rotten at cylinder no1, between it and the front water jacket, the head is as smooth as silk around it, but I am having it checked later with a straight edge by somebody who knows what to do.

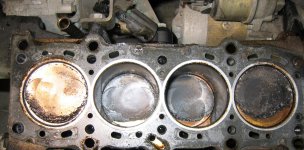
Also, the top of piston no1 was clean and shiny round its edges, while the rest of them were black in appearance, will post soem pics later - cos I took some to make a guide with (y)

The test beforehand with the pressure gauge, wasnt conclusive, as the spark plug on no1 had been put in crossthreaded by whoever serviced it last, luckily, it wasnt even in more than a few threads and I did manage to get it out ok, but I didnt want to force the gauge threads down the hole in case I made things worse, cylinders 2,3 &4 were all "in the green" on the gunsons gauge.

I will be able to sort the thread out, as I can screw in a spark plug from the chamber side, so I will get a tap and chase the thread out then put a new plug in while the head is off the car.

I decided to remove the exhaust manifold complete with system attached, it just pulled forward and down out of the way, getting to the no2 port lower nut was hard, probably as it was the only one that brought its stud out, I had to remove the oil filter to get to it - lucky for me I have a new one already.
Inlet was removed with the head, spi unit removed completely beforehand.

The removal job took me longer than I thought it would, but work on the cam belt side of things went quickly as I had already been there a year ago with the water pump change

Once I have all my stuff tidied away, I will post a couple of pics

(y)
 
Couple of pics for you

DSCF0011.JPG
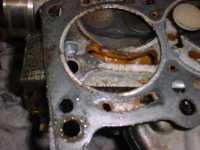
Here we have the offending cylinder [no1] head face and gasket, the gasket where the water jacket is full of old rusty material, this was easily scraped away, there was none inside the head, or inside the block.

DSCF0012.JPG
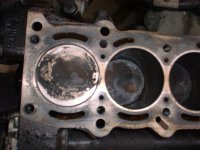
This is the cylinder, the piston has gone shiny on the edges and the muck can easily be wiped off, whereas the other pistons the black muck is more like carbon, and is more harder to remove. The top part by no1 cylinder is all blacked where the gasket ring fits, this is where it was leaking

DSCF0014.JPG
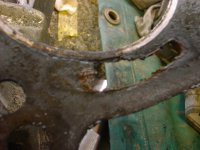
The gasket with the muck scraped away from the water jacket hole, where the metal ring fits to the head, as you can see it is perished and the ring is all black, I assume this is carbon thats been pressurised past the ring.

More pics when I have finished, and its rebuilt, with a guide.
 
Last edited:
well, it aint good - closer inspection shows that the part of metal between the chamber and the water jacket on no1 is all corroded, right up to the width of the gasket fire ring [I think thats what its called] also, the same is almost as bad on the no4 chamber too

The head is flat, but I can see that if I refitted a new gasket, it would only be a short time before it went again as the material left is very narrow, and if I took the head somewhere they would tell me it isnt worth bothering with, or, if it is, a huge cost, as below.

I will get some closer pics of this tomorrow, but it needs the head replacing, or - some welding and then skimming, but I think I would prefer to deal with a head thats in good condition, and maybe just needs a skim.

And then theres the crossthreaded plug hole, yep - best look for another head!!

(n)

Needless to say, I AM GUTTED

:cry:
 
Last edited:
Back
Top