Panda (Classic) Getting a Panda and Preparing it for a LONG drive...

Currently reading:
Panda (Classic) Getting a Panda and Preparing it for a LONG drive...

Well Vmanc that would be a great start to panda ownership, had factored that into my budget so might be a bit more in the contingency for the unexpected costs! I need to be able to wheel the car about when it gets in the way so really want to have the axle off for as short a time as possible while I sort that out so will check the bearings first and go from there. Thanks for that, plenty of things I'll need to renew so anything I can avoid would be great.


In other news Jenny's brother and a friend of ours who joined me on a road trip in Vietnam a few years back are looking into the possibility of joining us on the trip, of course they would need a suitable car... say something small, economical, mechanically simple good parts availability, reliable... come to think of it it would be handy if the spares would do for both cars... any one know of any 1 litre injection Panda's in need of some love?


Phiz
 
Sounds exactly the same Dragon Man, on both back wheels, did the same with Panda Panda's other Panda's and there was no knocking on them (well the couple I tried). I'll get a good look at it when I sort the axle at soon as possible.
 
So, been a while with no update, my motorbike developed a bit of an issue which has taken up most of what little free time I've had. On the positive side, as my bike is now in bits all over the workshop I spent this sunny Sunday afternoon getting covered in Panda related rust rather than going out for a ride :)

We got it up on the ramps in my local garage while our friendly mechanic was having a brew break so we could have a good look underneath. All round very impressed, only the one previous patch of welding on one sill visible and generally all pretty solid, the wheels did not have an alarming amount of play while up in the air and the front jacking points are both a little corroded but look easy enough to repair.

In terms of known faults the spring cups on the rear axle were both pretty knackered as expected, the one side I'd spotted while checking out the car is pretty well no longer attached to the axle at all (the little mushroom in the middle that the bump stop hits) while the other side is sat where it is supposed to be though with a good prod can be made to move independently of the rest of the axle.

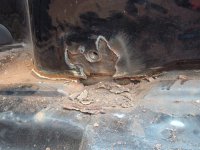
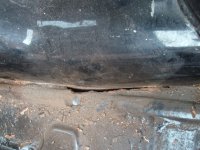
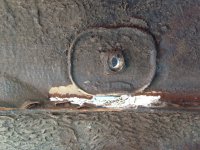
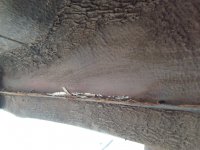
This afternoon I took the rear bumper off and had a good dig at the rust on the inner rear drivers side wing to see what the extent of the rot was. I'd always been told with rust that you should expect it to be 10 times worse than it first appears so was pleasantly surprised to find this was about 5 times worse than first appears.

See your point about the welds vmanc, not sure if the guy on the assembly line had to do a certain number of welds per seam so to save time did most of them in the same place! I did look for a logic behind it, say welds where there was a curve in the bodywork but could not find one!

What I don't understand is why this one corner of the car has been affected so much more than the rest of the car. I got the carpets up at the sides and had a quick look under and even the other inner wheel arch looks spotless. There was a remarkable amount of seam sealer on the side with the rust (not so much the other side) so not sure if there has been an old repair, or just once rust set in it has been cleaned up and covered for MOT's in the past. Either way time to get it fixed.

The rust leads right up to (if not past) the end of the boot (inside the car). I'm not sure if I'll get away with welding it up to there and not having to attach the back panel at all, or if I'll have to go past that join. One other thing is directly above the hub there is a section in the wheel arch which goes in to the boot slightly, is this to allow clearance for the hub under full load? just working out if I have to have this too or if I can just fabricate one long panel which runs right down the seam, though it would look a bit unsymmetrical against the other wheel arch inside the boot? Any thoughts from those who've been here before greatly appreciated!

Phiz
 

Attachments

  • Rusty Panda 1.JPG
    Rusty Panda 1.JPG
    281 KB · Views: 28
  • Rusty Panda 2.JPG
    Rusty Panda 2.JPG
    275.8 KB · Views: 27
  • Rusty Panda 3.JPG
    Rusty Panda 3.JPG
    281.4 KB · Views: 25
  • Rusty Panda 4.JPG
    Rusty Panda 4.JPG
    278.7 KB · Views: 21
One other thing is directly above the hub there is a section in the wheel arch which goes in to the boot slightly, is this to allow clearance for the hub under full load?

I would always try to replicate what was there before as much as possible. Maybe with a few extra spot welds.

I'm dealing with this area at the moment too, except mine has gone from the front bulkhead all the way to the back panel, both sides! I must update Pinky's thread.
 
Last edited:
I'll have a go at working that one out then, though shaping panels on an anvil might not have been what the designers at Fiat had in mind for the little car :)

Is there an online manual for Panda's (or does anyone have the appropriate Haynes kicking about?). Could be handy for removing the fuel tank prior to welding around where the filler pipe goes. I bought one on amazon for about £4 inc. postage but when it arrived it only covers cars up to 87, not what was pictured. It appears all the additions have the same ref. number so on amazon the same picture of the manual covering cars up to 95 comes up even if it doesn't. They have refunded me and told me to keep the older manual or give it to charity.
 
As far as I know Haynes produced two editions, both cover the early Panda in the bulk of the book with the later Fire engined versions covered in the supplement in the back.
 
If only Amazon could differentiate between the two! Take it there are no online resources that cover this? Still I guess the fact it's only a supplement means the pages about fuel tank removal and rear axle/brake components will be the same so nothing to hold me back for the time being :)
 
If only Amazon could differentiate between the two! Take it there are no online resources that cover this? Still I guess the fact it's only a supplement means the pages about fuel tank removal and rear axle/brake components will be the same so nothing to hold me back for the time being :)

It's all in the book you have.....

Fuel tank. Page 204.

Axle. Page 213.

Brakes are very similar to the early ones, you may have the later self adjusting system but that's self explanetory when you see it.
 
(y)
Still I guess the fact it's only a supplement means the pages about fuel tank removal and rear axle/brake components will be the same so nothing to hold me back for the time being :)

Not really, rear axle was one of the components that was completely changed when the mk2 came out. Really not rocket science back there though
 
Thanks again guys, Kolza I've bought it and it'll reach me Thursday, same day as a truck load of floor joists for the house but still recon I'll get an hour or so tomorrow after work to make a little more progress, will take the current Haynes manual in (had left it at home on the shelf of misc. Haynes manuals I seem to have collected, not really looked at it as figured it'd just confuse my crowded mind :) ).

I'll probably work on shaping up the repair sections ready, then I can drive the car in to the back of the workshop where the welding gear is, remove the tank and patch it up in one hit. Was chatting to a mate today who has a breadvan polo and a mk2 golf he intends to keep forever and he bought a spare axle for each, refurbed them, fitted them and is currently refurbishing the original axles to keep as spares for when they next need any work! Great idea in theory but only really works in situations where your domestic arrangements allow for motorcycles in the kitchen and a spare rooms which is more of a 'spares room'.

What do we recon, all the repairs I'm currently looking at being 1mm sheet, other than the seatbelt mount where I'll stick a 2mm plate in behind it?


This thread has some useful pics regarding the axle repair.......

https://www.fiatforum.com/panda-classic/230118-pandas-reunited-my-old-fizz-3.html

New axles are also available.

Checked my sheet steel and it's 1.2mm, seems to be fine for most panel repairs.
 
Back
Top