Technical Fiat Panda 2014 1.2 Lounge Front Break Pad Guide Pins spinning

Currently reading:
Technical Fiat Panda 2014 1.2 Lounge Front Break Pad Guide Pins spinning

Sounds like its undone and stuck in the rubber sleeve. You may just have the pin and holes misaligned preventing you replacing the slider pin. They can be a pain to line up. You may need to push the caliper against the springs to align the holes. Sometimes the pin is undone but does not want to clear the rubber sleeve It feels as you describe. I find you can grip the end of the pin and pull it out with fine nose pliers. You should be able to see if it is still threaded into the caliper by using a mirror on a stick to look at the back side. All is not lost if I am correct. The pins can seem quite stuck in the rubber sleeve and need a good pull to get them out. If the thread has stripped its a new caliper job. It would not be the first one to get a wrecked thread. Only use good quality brake brease to lube the pins, never copper grease.
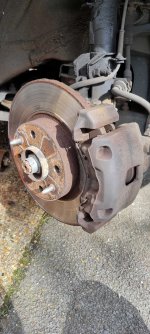
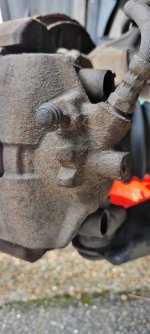
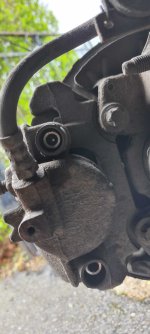
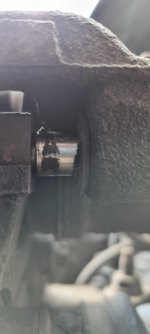
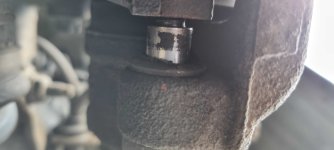
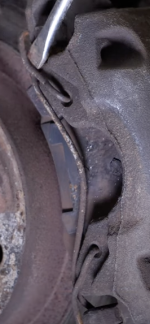
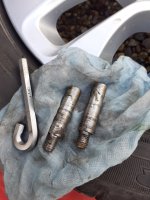
Thanks I'll try that it does feel like it was corroded and then refused to move once unthreaded.
I didn't try to unscrew or screw it in with tha spring attached though so I'll try that tomorrow.
 
Or do you mean without the pads installed at all so no spring effect from the pad clips?
Sorry I meant the side metal clip thingy it's like under tension you need to put the ends into 2 holes.
 

Attachments

  • Screenshot 2024-03-23 at 20.41.06.png
    Screenshot 2024-03-23 at 20.41.06.png
    259.5 KB · Views: 10
When the caliper is in place there is a steel spring that stops the pads rattling. You have clearly identified this. Basically to get the slider pins in, you start one off and do it up. Then you must put a hand onto the caliper and press it in fairly firmly while lining the second pin up with its hole and hold it in the right place against the spring while screwing in the second pin or other pin will not line up with the hole. You will eventually get the feel of the pins tightening as the threads catch. I have posted a photo below to show how far away the pin is from the hole when under spring tension. You could put pads in leave the spring off until last. I do it the other way. The slider pins have a thread lock 'glue' on the threads when assembled that can make it quite hard to remove them, I only use a very small amount of thread lock when replacing the pins to reduce the difficulty of undoing next time. These pins dont have a long thread so it only takes a few turns to undo them entirely. There should be a plastic cap pushed into the end of teh slider pin bush. One of mine was missing. If this is the case you need to clean the internal hex holed carefully to ensure your allen key reeally fits into the base of teh hole. If teh hole is bunged with mud the allen key can fail to fit and turn fruitlessly too. Pic shows how sticky these get even after only a few months
 

Attachments

  • 20240205_120849.jpg
    20240205_120849.jpg
    2.4 MB · Views: 13
Last edited:
I only just turned on computer Jock and noticed the 17mm;).
This is the sort of thing I used, we have a company a few miles away that specialises in all sorts of threading and bolt solutions and supplies some quite big manufacturing companies, so not a cowboy solution, although has to be done with care and obviously each kit is only for that type of thread pitch etc. so OP would need to identify if doing the job.
As you, I always screw nuts and bolts by hand before applying tools, it saves loads of grief!:)
1711267626269.png
 
I only just turned on computer Jock and noticed the 17mm;).
This is the sort of thing I used, we have a company a few miles away that specialises in all sorts of threading and bolt solutions and supplies some quite big manufacturing companies, so not a cowboy solution, although has to be done with care and obviously each kit is only for that type of thread pitch etc. so OP would need to identify if doing the job.
As you, I always screw nuts and bolts by hand before applying tools, it saves loads of grief!:)
View attachment 440729
Aye Mike, Helicoil by another name? I became very familiar with helicoils when I was into my Imps. They were famous for blowing head gaskets and, when you'd repaired it with a new gasket, would then often go on to just blow it again! This was seldom due to a warped head but because you hadn't realized the head bolt threads in the block were pulled. At a cursory glance they would look Ok but a more detailed examination invariably revealed them to have pulled up when originally torqued. If you did nothing about it and just fitted a new gasket (obviously having done your normal checks with straight edge for head and block face distortion) the pulled threads stopped the head from fully tightening down and compressing the gasket. I got over this by slightly countersinking each threaded hole and then installing a helicoil. The end result was that the thread started slightly below the block face sso even if it pulled slightly when torqued, it never pulled the thread above the deck face. The other, very nasty, thing they did involved the cylinder liners. The block was of the "open faced" type (the water jacket was open at the top of the bores so not supporting the cylinder bores) the bores themselves were sleeves installed when the block was cast - ally block - and if the engine overheated greatly then the liners could move, that was game over. Another very nasty thing they did involved the very top of the bore. The liner was just ever so slightly below the block deck face so the actual sealing face was, in effect, a thin rim of ally around the top of the liner. This could break up rendering the block unusable. The competition guys would Wills ring them to get round this but that was a bit drastic for a road engine. Back in the day, there were some very potent Imps around and you still see them being very competitive on hillclimbs and sprints. They can be made to rev to "silly" RPM and sound wonderful.

I later discovered Wurth inserts and actually now prefer them but they are considerably more expensive and require more preparation before inserting. Helicoils definitely have their place and there are some quite good copies on sale at lesser prices. I still have my 14mm spark plug repair kit which mostly now sees only very occasional use repairing the short reach plug threads in stuff like side valve Briggs and Stratton lawn mower engines. I'd hate to attempt a thread repair on some modern car engines with their plugs now mostly "buried" at the bottom of a very deep hole in the head!
 
The nut is in the boot at the same depth as the top guide which is telling me that it's threaded as it won't tighten up or come out it just spins.
Any ideas how I can get the bolt out ?
 

Attachments

  • 20240324_110324.jpg
    20240324_110324.jpg
    796.7 KB · Views: 12
  • 20240324_110335.jpg
    20240324_110335.jpg
    513.7 KB · Views: 12
  • 20240324_110844.jpg
    20240324_110844.jpg
    295.6 KB · Views: 14
Last edited:
The nut is in the boot at the same depth as the top guide which is telling me that it's threaded as it won't tighten up or come out it just spins.
Any ideas how I can get the bolt out ?
Difficult to see properly just from these images but, it looks like the pin is pretty well fully home in the threaded hole? Do I understand that the top pin is fine and can be screwed in and out? If so screw it in and compare how it looks to that bottom pin. Do they look the same? If so then the bottom pin is fully engaged with the depth of it's hole. If this is the case then, because you can turn the bottom pin but it won't come out or screw in any further then we can conclude the threads are stripped. I think I'd get my long nose locking pliers (long nose Mole grips if that describes them better to you? and get one jaw into the hex hole and the other down the side between the outside of the pin and the rubber. Then pull at the same time as turning anticlockwise and generally wiggling it about. You can quite cheaply buy pin kits which include new rubber boots - Try these folk: https://www.biggred.co.uk/ I've found them very good in the past - so you needn't worry about destroying the rubber boot to get a better grip on the pin if you really have to - maybe check on the availability of boots first though? Just in case.
 
Difficult to see properly just from these images but, it looks like the pin is pretty well fully home in the threaded hole? Do I understand that the top pin is fine and can be screwed in and out? If so screw it in and compare how it looks to that bottom pin. Do they look the same? If so then the bottom pin is fully engaged with the depth of it's hole. If this is the case then, because you can turn the bottom pin but it won't come out or screw in any further then we can conclude the threads are stripped. I think I'd get my long nose locking pliers (long nose Mole grips if that describes them better to you? and get one jaw into the hex hole and the other down the side between the outside of the pin and the rubber. Then pull at the same time as turning anticlockwise and generally wiggling it about. You can quite cheaply buy pin kits which include new rubber boots - Try these folk: https://www.biggred.co.uk/ I've found them very good in the past - so you needn't worry about destroying the rubber boot to get a better grip on the pin if you really have to - maybe check on the availability of boots first though? Just in case.
Yes the top pins is fine and fully screwed in and yes they are both at the same depth so I agree the bottom pin is threaded.
I can just get a crew drive flat blade in there and am trying to both leverage it out and unscrew at the same time ... looks like it's working.
Thanks I'll get a pin kit as you suggest .... need to also get some mole grips as I don't have one ... doh!
 
No consellation, but our Seat also destroyed its thread. In that case a very clearly faulty part with a blob of metal on the thread. It required a £500 hub change, so a caliper is at least more reasonablly priced. Those pins screwed into the hub on that. They are identical to the Fiat ones.
 
Fortunately on this fiat the ate caliper guide pins screw into a caliper carrier which is in turn bolted to the steering knuckle/hub carrier.

So the op could replace the caliper carrier rather than attempting thread repair.


Wrong side but I doubt the caliper carrier is handed left or right only, and it's cheap!
 
This post contains affiliate links which may earn a commission at no additional cost to you.
Back
Top