Technical Fiat 500 buying advice - twinair

Currently reading:
Technical Fiat 500 buying advice - twinair

Still feeling pretty miserable about making the bonnet much worse and then missing what looks like a mint one. I've been unable to do anything really due to constant high wind and rain. So close to having this on the road too! The soot/blue smoke that I'd seen when I first got it and when i started it back up for the first time seems to be gone at least.

I've totally run out of money though.


You’re nearly there now. Just a bonnet to find. You might as well sell the bonnet, get what you can for it. One will soon come up.

Did you manage to get the wing tips painted? I was impressed on how much back to shape you got them, better than I’ve ever managed. How did you do it?
 
Those are pattern parts painted to order rather than originals - I'll just keep an eye out.

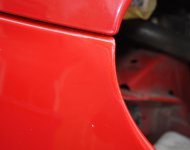
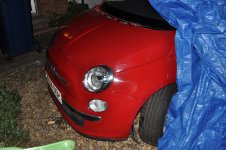
To straighten the wing tips it was just lots of gentle hammering, and some initial work with pliers. The passenger side if I can get the paint right you're never going to be able to tell. Driver side looks ok from some angles, but there's some unevenness as you get to the tip where there was quite a deep irregular dent. It'll do, not bad for a first attempt :)

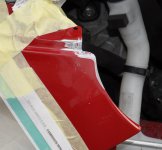
I'm having problems with the painting though - rattle can attempt was terrible, removed it all and started again. Also I didn't do a good enough job of sanding so there's a line where a whole layer of paint cracked away, you can tell when it catches the light - hopefully clearcoat will resolve that.

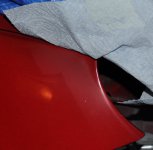
So we've been plagued with high wind and unpredicatable showers here for days - finally I got some decent weather today to put the basecoat on and ... gust of wind, bit of grit landed in the paint. It's really small and I'm so tired of the weather screwing this up and I'm just going to accept the small mark.

The larger problem though is despite masking a good few inches away from where I was painting, and despite using a fine airbrush spray, the whole panel area back to where the masking tape was got peppered with very fine dusty paint particles.

I did lots of googling and it seems that asking for non-perfect methods of resolving paint problems really sets people off - lots of capital letters everywhere saying DONT and NO and DO and MUST.

Options I can see working might be:
1) Hit it with grease remover, this will definitely 100% take the dust away but it could leave me with an advancing line where I can't get any kind of blend between cleaned and not cleaned, until I end up spoiling the new base coat where it was actually needed. Had this exact problem on the original priming attempt. Perhaps one quick single wipe across the whole area wouldnt ruin it.

2) T-cut the overspray area & new basecoat. This one particularly seems to make people on google really furious, but it would take the dusty stuff off and blend it nicely. I suppose I'd need to wet & dry it before clearcoat though.

3) 2000 grit across the whole area, wash it down then clearcoat.


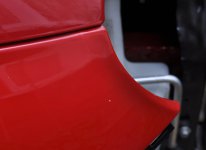
Here's the problem - you can see the bit I actually painted looks smooth and deep, but outside there is the dusty overspray with a big step shape where the masking tape was. The overspray is very rough to the touch. Didn't think a modelling airgun on such a tight cone would still result in overspray that far out.
 

Attachments

  • oops.jpg
    oops.jpg
    373.8 KB · Views: 41
Use some g3 or g4 cutting compound after a very light sand and then a good quality polish. That should sort it.

I think you’re being very hard on yourself, you’ve made a cracking job of it. Maybe it would have been better to put a new wing on.

I don’t think you’re ever going to get a perfect finish using diy equipment.
 
I found something that worked when tested on a small outer bit of overspray - Novus #2 , it's actually for polishing pinball machine playfields which are remarkably similar to car paint in terms of bases & clear over the top. There are different grades, 2 is a fine abrasive, enough to reduce light scratches.

Just paid for insurance to start on Saturday, booking windscreen for this week & headlamp/wheel alignment.
 
Last edited:
Just paid for insurance to start on Saturday, booking windscreen for this week & headlamp/wheel alignment next week. Not ideal but I'll probably put the car back together before the clearcoat if need be, now that I know my paintwork is going to be useable. Those rivets on the wing bumper clips don't half take some popping!
 
I managed to ruin the driver side and took it all back off - thankfully the degreaser is great for getting back to the beginning. So the passenger side is sprayed & polished, the driver side has been roughly done with a touchup paint (this is getting removed regardless).

Which do you think looks best? Spray version ends up with a visible paint area in a lighter shade, touchup does the same but very localised and a bumpy finish. Driver side has by far the most paint loss.
 

Attachments

  • wing5.jpg
    wing5.jpg
    181.9 KB · Views: 34
  • wing4.jpg
    wing4.jpg
    262.8 KB · Views: 37
  • wing3.jpg
    wing3.jpg
    262.6 KB · Views: 41
  • wing2.jpg
    wing2.jpg
    148.9 KB · Views: 37
  • wing1.jpg
    wing1.jpg
    262.1 KB · Views: 32
Didn't like either of them - it's back to bare metal again.

Grr.


Ok this time I'm going to do a super localised priming repair up to where it's exposed by sanding, everything else masked off - with the airbrush, just a thin coat.
 
Clipped the front bumper back on today as I'm generally happy with the latest attempt at paint, but....

Electrical problem.

The daylight driving lamp on the driver side doesn't work. As I messed with swapping bulbs and temporarily plugging in different lamp units, I somehow destroyed 4 bulbs. I THINK the problem is when you turn on the main beam, the daylight part of the other lamp blows, on the driver side - could be bad wiring in the new lamp unit?

I've run out of bulbs now, so I'll have to get more tomorrow and see where this goes. I haven't found a helpful fuse map yet. Really hope that it'll just work with 2 new bulbs in there as I don't want to have to take the bumper back off again...


Also I think my slam panel might be a few mm too low, and I'm not sure I have the right bumper bolts - should they securely hold the bumper in place? They seem to have a 'step' in them which is big enough to never clamp down completely on the plastic bumper so you can slide it in/out when they're torqued right down without too much trouble. Do I have the wrong bolts or has the plastic just thinned with age?

Photos taken without bumper to wing bolts installed, or any of the lower bumper bolts and the liners are only partially fitted. You can see on the bonnet where the lacquer got torn off by the tape, I've sprayed some lacquer on the area and made sure it flowed under the edges but it hasn't been polished yet - shouldn't look quite as bad after that but really that bonnet needs repainting. It also needs to move back towards the windscreen on both sides by about 1mm - easy job.
 

Attachments

  • fiat_day8_1.jpg
    fiat_day8_1.jpg
    1 MB · Views: 35
  • fiat_day8_2.jpg
    fiat_day8_2.jpg
    1 MB · Views: 33
  • fiat_day8_3.jpg
    fiat_day8_3.jpg
    915.3 KB · Views: 39
Nice job. The bolts do hold it tight down and it allows for a bit of back and forth movement. I had the same problem with the front panel I’ve just put on. It was too low. Loosened all the bolts and jacked it up, then retightened.

Yeah on this one they aren't holding the bumper tight - I really torqued them up too. There are 'slide' marks which suggest it's been moving around a lot before on the car it came from. I'll see if I can find some 0.3 or 0.5mm thick shim washers of the correct size.
 
The daylight driving lamp on the driver side doesn't work. As I messed with swapping bulbs and temporarily plugging in different lamp units, I somehow destroyed 4 bulbs. I THINK the problem is when you turn on the main beam, the daylight part of the other lamp blows, on the driver side - could be bad wiring in the new lamp unit?

You cannot blow a 12v lamp with 12v, whatever you do with it. There must be something else at fault if the bulbs get destroyed.
Do you have xenon headlights? They work with higher voltage, so if the wiring is wrong, that could blow a "normal" bulb. That's a dangerous area though due to high voltage.
 
Yeah on this one they aren't holding the bumper tight - I really torqued them up too. There are 'slide' marks which suggest it's been moving around a lot before on the car it came from. I'll see if I can find some 0.3 or 0.5mm thick shim washers of the correct size.


If your front panel is too low then the bumper will be too high and you’ll have a gap at the top. I sometimes pack them out with washers to get the correct gap between the bumper and the bonnet.
 
I don't think so, all the plugs were sandwich bagged and rubber banded to stop exactly that problem, I got 4 new ones on the way to work.
 
Lights fixed - just must have been a combination of some old bulbs and hamfisted changing of them with the ignition on.I still wish I'd shaped the driver wing a touch better but this will do for now. This may or may not turn into my long term project runabout, I need to drive it around a bit first.

Just the windscreen left (tomorrow AM) and some bolt tightening.
 
Back
Top