Technical DIY Servicing Panda

Currently reading:
Technical DIY Servicing Panda

Fair play, Theleman, you're a few steps ahead of me! Seems you've been busy getting a well-stocked workshop(y)
I use GT85 for rusty nuts & bolts, but I also get through a fair bit of WD40 (I get 5L cans with a hand spray) for my other ageing cars, giving an occasional spray inside sills, over suspension and inside wheelarches after washing them out.
 
I have some Sealey and Rothenburger stuff but the following are just suggestions of reasonable spec tools. If you want to check out the forums to get the best going then go for it.

I've used eBay to illustrate but much of this is available at local tool merchants and auto factors for similar money.


If you intend to use blow torch or even a hot air gun, get yourself a heat protection mat. This will protect vulnerable paint and anything else behind the item you are trying to free-off.
https://www.ebay.co.uk/itm/Rothenberger-Plumbers-Soldering-Heat-Proof-Resistant-Mat-Solder-Kevlar-67022/323597078649?epid=27022808076&hash=item4b57e39079:g:0VYAAOSwoEFcEkgs

Then get on to eBay and find a 600mm 1/2" breaker bar and six-point "impact" sockets. Unless you are a professional there's really no need for the top brand stuff. Though SnapOns are always nice to have of course. Example -
https://www.ebay.co.uk/itm/Sealey-Extension-Breaker-Bar-450mm-Long-1-2-quot-Socket-Square-Drive/141612295927?epid=5017023884&hash=item20f8c026f7:g:U5gAAOSwqu9VDeaH

Breaker bars have a short driver end so there is minimum spring in the leverage you can apply. You can prove that by fitting a long extension bar when trying to shift a really seized fastener. You can feel the spring in the extension which is reducing the peak torque you can apply to the job.

Impact sockets can cope with side loads a lot better than standard sockets (six or twelve point). Well worth using on chassis jobs as a broken socket will spoil a socket set.
https://www.ebay.co.uk/itm/Sealey-Air-Impact-Wrench-Socket-Set-13-Piece-1-2-Square-Drive-Metric-10-24mm/182947211315?epid=19025899702&hash=item2a9880e833:g:xWkAAOSw0O5aJrII

Mine are actually 3/8" drive used with an adapter. Not the strongest but handy to use in tight places and I've not broken any yet.
https://www.ebay.co.uk/itm/BERGEN-3-8-Inch-Drive-IMPACT-Socket-Set-Shallow-Impact-Sockets-7mm-19mm-6PT-Hex/131912619773?hash=item1eb69ad6fd:g:X04AAOSwYbhZ13hi


You can speed up your work by using an 18V power drill or impact screwdriver to run the nuts on/off. A proper impact wrench is better but those that actually do the job are a lot of money. Set the drill to 15 on the screw-driving torque. Then when the nut hits bottom the drill wont break your wrist or shear off the thread.
https://www.ebay.co.uk/itm/Drill-Socket-Adapter-for-Impact-Driver-with-Hex-Shank-to-Square-Socket-Dril-S5T9/123298971816?epid=15021386838&hash=item1cb53100a8:g:FrkAAOSwyXVbatRb

For work on chassis jobs you are often forced to rattle away for ages with a ratchet handle just to extract the bolt or run it in. The drill does this donkey work so all you have to do is loosen it and finally tighten it. The method is handy when threads are corroded. To avoid them galling set a lower torque and spin the drill until the clutch slips squirt on some penetrating fluid and whizz it in & out until the loosens enough to unscrew. Soon enough the thread will be out. When doing it with spanners, we are tempted to go too far each way and then the threads gall.

LAST OF ALL GET SOME STRONG AXLE STANDS.

Mine came from Halfords for reasonable cost. I use slotted wooden blocks to protect the sill jacking points. This was because the proprietary stuff did not have a deep enough to clear the sill flange.
 
Last edited:
This post contains affiliate links which may earn a commission at no additional cost to you.
I tend to buy tools as I need them

Take sockets. There's so many options


12 point 3/8 are better where space is tight
6 point 1/2 are better on sized nuts
long reach are needed if the nut is on a long stud

Same with combo spanners

where you occasionally need a stubby short one or if doing a lot tight bolts the same size then a slightly longer handle is handy instead of using a pipe

often you only use a few

8,10,13,17 and 19 spring to mind but does depend car. For example I have changed a clutch in a Splash and most bolts require a 14mm spanner. I went out and bought a 14mm spanner with a slightly longer handle to make the job easier

there's also a difference in quality. The fit and finish of the Laser 14mm is much better than my cheaper Hilka set and was well worth the purchase for a one off job.
 
One of THE most useful tools I have is the breaker bar which cost me just £15. In a tight space you might have to swap the socket one flat to get a usable angle but it means far fewer bashed knuckles. Use that to loosen the &%(* and then the ratchet to wind-off the bolt/nut.

When I did the inner track rod ends, the ordinary 1/2" T bar or ratchet were just not enough and risked injury (its well tucked in). The breaker bar with extension rod had them loose easy peasy.
 
'Morning Theleman. WD40 is a jolly good general purpose spray and I use it a lot myself for exactly the sort of thing you describe with the wheel barrow squeak.

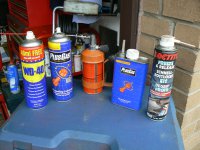
I thought it might be useful to show you my current choice of "little helpers" in the battle against corroded fittings?

Here's a selection of the ones I find most effective:
P1080250.JPG

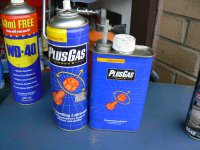
Plus Gas is my first choice and I find gets most things free. It works best if allowed to soak in before you try to undo - say half an hour if moderately seized but could benefit from overnight in severe cases. I keep both aerosol and liquid.
P1080251.JPG

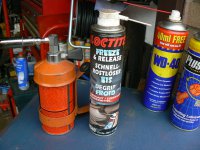
About two years ago I had a really stubborn brake caliper slide pin which was not responding to moderate heat (I don't like using excessive heat on brakes in case I damage seals or bushings). I had seen adverts for these "wonderful" freezer sprays so decided to try one:
P1080252.JPG

It works by rapidly cooling whatever it's sprayed on and also contains a releasing agent. I find it works best if you get the component moderately hot first (but nothing like red hot. Maybe spraying a very hot component would crack it?) and then spray. A quick squirt, like using WD40 or Plus Gas, won't do any good, you need a continuous 15 or 20 seconds - depending on the mass of what you are trying to cool - to get a good cooling effect. So I find you get maybe 6 good applications per tin. It works out quite expensive at £7 to £10 per tin but I find I don't need it often (I'm still on my first tin).

Then once you've got it in pieces and want to build it up again there are many situations where a bit of protection will help subsequent dismantling. Here are my main "little helpers" in this battle:
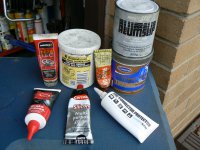
P1080253.JPG

My main default used to be Copper Grease (the one on the right in the picture below) and I still use it in many situations but not on brakes because of the possibility of interference with ABS function.
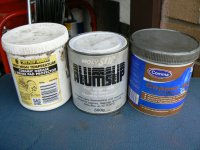
P1080254.JPG

Then there's Aluminium Grease (the one in the middle) which has very much the same function as copper grease but I use it where aluminium parts are present. For instance on spark plug threads, heater plugs and injector bodies in ally heads (yes I know there are arguments against it, but I've been doing it for years and this old dog can't change his spots - I say "dog" because I'm too old and incapable to be a Leopard!)

The white tub on the left is Ceramic Grease which I use mainly on exhaust fitting. When I first bought it I was disappointed to find it is really runny! A bit like the consistency of honey - much thinner than the Copper or Aluminium stuff. However in use what happens is the oily component burns off the first time things get really hot leaving a white deposit, presumably the ceramic content, coating the fixing. I haven't taken much to pieces yet which I've treated with this stuff but I did have to realign the exhaust center pipe on the Jazz (fitted about 2 years ago) after renewing the rear silencer/tailpipe section and the fixings came apart like they'd just been done up yesterday!

Finally here are a few of the more useful other products I use regularly:
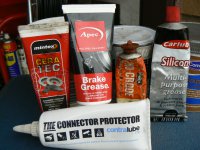
P1080255.JPG

On the left is the Ceratec brake lube which I now use on brakes instead of the copper grease (Copaslip) which I previously used for years. If you google "copper slip vs ceratec you'll find a very interesting feature by the Mintex brake people on why not to use copper greases on brakes. Next to it is a new tube of the same stuff but by a different manufacturer - my ceratec is about to run out and that new one is what my factor is now stocking.

The 2 tubes on the right are Holts No crode which protects battery terminals (vaseline or even grease does the same but this product has a corrosion inhibitor? maybe it's better?) and on the right is a tube of silicone grease, good for rubber bushings and the like - anywhere that a petroleum based product is going to cause a problem.

Right at the front - the white tube - is an electrical connector protector - Contralube 770. You put a small amount on electrical connectors when reassembling them. You don't need a lot, I've had this tube for at least 3 years and not even used half of it yet. Since I started using it I've not had a failure due to terminal corrosion or poor electrical pathway. Coincidence maybe? but I'm convinced and will continue to use it.

So there you are. I've got a lot of other useful sprays etc (O2 sensor cleaner, silicon spray, graphite oil, etc) but these ones mentioned above are specifically "anti corrosion" Which is what this was all about -I think? Hope it's of some help.
Kind regards
Jock
 
One of THE most useful tools I have is the breaker bar which cost me just £15. In a tight space you might have to swap the socket one flat to get a usable angle but it means far fewer bashed knuckles. Use that to loosen the &%(* and then the ratchet to wind-off the bolt/nut.

When I did the inner track rod ends, the ordinary 1/2" T bar or ratchet were just not enough and risked injury (its well tucked in). The breaker bar with extension rod had them loose easy peasy.
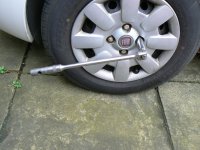
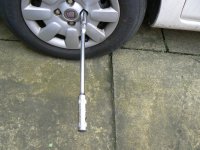
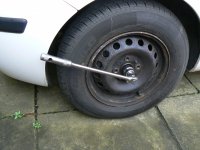
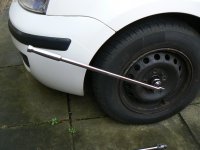
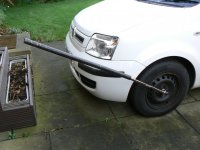
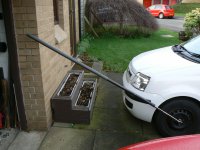
Breaker bars - absolutely indispensable tools. I particularly like my shorter 1/2" drive bar for doing wheel nuts as you can use it "bent" to slacken the bolt/nut:

P1080262.JPG

and then "straighten" it to spin it off:

P1080263.JPG

almost as quick as using the rattle gun.

And

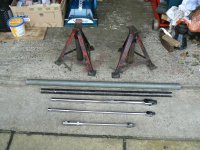
For comparison purposes here's my old, favorite, (bought mid '60's) half inch drive Britool 15" long bar with a 32mm socket on Becky's front hub nut. It would probably be quite a struggle to shift it with this:

P1080256.JPG

When you've got something tight you can always use a longer one, here's my 2 ft Clarke bar - still half inch drive. This will often shift the likes of one of these:

P1080257.JPG

If that doesn't shift it you can start with lengths of tubing (scaffold pole is pretty unbendable). At this point, as I have a three quarter inch drive bar I would change to it to avoid possibly shearing the half inch bar:

P1080258.JPG

If it still won't shift with this then some heat and an even longer bar will either move it or break it!

P1080260.JPG

Now that I have my humongously powerful rattle gun I find this works better with much less likelihood of something breaking/snapping off - It must be the hammer action - But there are still times when the breaker bars come in very handy. For instance if I have to go to sort something round at one of the kids houses - can't take the compressor with me!

So here are "the boys" enjoying a quiet moment together - you know I really am loosing it aren't I?

P1080261.JPG

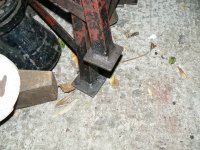
I included one of my sets of my axle stands because, many moons ago, I modified them all with load spreading pads on the end of each leg to stop them sinking into the tarmac. Here's a clearer view. Welds all done with my "trusty" SIP 140 Topweld stick welder:

P1080264.JPG

Not such a problem now I work mostly on the concrete slabs which make up my short driveway. but very worth while doing if you are working at the kerbside as I used to do in earlier times.
 
(Copaslip)

Always thought that was a vehicle so fast that, when driven right, could outrun every Policecar?

But then again... For years I thought that the Large Headon Collider was a big truck going in the wrong direction on the motorway instead of a 27 Km tunnel in Switzerland:eek:

gr J:D
 
Always thought that was a vehicle so fast that, when driven right, could outrun every Policecar?

But then again... For years I thought that the Large Headon Collider was a big truck going in the wrong direction on the motorway instead of a 27 Km tunnel in Switzerland:eek:

gr J:D
Thanks. The Copaslip comment really made me smile! Thought I'd heard all the "motor trade" jokes, but not that one!
 
CERN. Sorry we're going a bit off topic here. But these sort of cutting edge things fascinate the pants off me! I'm an avid Sci-Fi reader. Do you remember all the panic about how it might create a mini black hole? What about this new Super collider the Chinese are talking of building? 100 Kilometer circumference? Phew! Gives new meaning to the phrase "Disappearing up your own a**e"
 
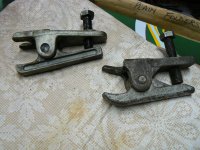
Ah, good to hear. I was going to go for a fairly cheap & cheerful scissors one like this

Worked well when I borrowed one before, and I won't be using it very often. How often is too often when it comes to borrowing tools?:rolleyes:

I used to have one like that it did the job just fine. The trick is to tighten the bolt up hard, then tap the top of the business end with a hammer to shock the taper loose. Mine got lost somewhere over the years so I now have a forked wedge type that also does the job. You just have to grease the rubber boot to reduce the risk of splitting it.
 
This post contains affiliate links which may earn a commission at no additional cost to you.
Wow great info and posts again. Thanks.
Yes very helpful and learning a lot.

I managed to get a Sealey breaker wrench bar for £12 from Amazon, and it is really good to hold (haven't used it yet). It is about 75cm long, and will do the job nicely I feel.

Balljoint splitter is unfamiliar to me. But maybe one day I will need it? I will get it when it comes time needing it.

But recently I was also looking at compression gauges. There seem quite a few different types and kinds. Ones I saw so far are,

engine compression gauge
cylinder leak check gauge
oil pressure gauge
fuel pump pressure gauge

I wonder if these gauges are useful and practical and must have tools, or are they just something extra. I mean if something is wrong with engine, the car would let you know straight away? by not starting, running rough and misfiring and high mpgs ...etc. Why would I need gauges to check the pressures? I thought that, but I might be wrong.
 
Ah, good to hear. I was going to go for a fairly cheap & cheerful scissors one like this

Worked well when I borrowed one before, and I won't be using it very often. How often is too often when it comes to borrowing tools?:rolleyes:

Yes I'm sure that'll do the job for you. Sealey is a common brand to find in motor factors up here. Here's mine: (2 off - story to follow)

P1080270.JPG

The one on the left is my current one which I bought about 5 years ago after being very silly with the other one trying to free a bottom ball joint which was not letting me properly engage the tool and was obviously not going to free off!

Actually you can free even quite tight taper joints with just a hammer! I favour a 1lb ball pein. But you have to know exactly where to hit and have good control over the tool. It's best if someone who knows how to do it shows you.

I was shocked when I was first shown this way of doing it. It was after my time in racing tyres when I started earning my living repairing cars. Whilst at college we were shown to use ball joint splitters (several different types) to slacken track rod ends, bottom ball joints etc. Although I had all my City and Guilds and some other "bits of paper" when I went full time into the workshop I was put under the wing of a more experienced man for the first few weeks (sensible I think) and one of the first jobs I had was to put a new steering rack on a car whilst my mentor was doing the rear brakes. He put the new rack on the floor beside me and said "on you go son" I started off towards the stores to get the ball joint splitter tool and had only taken a couple of steps before he roared after me "and where do you think you're going then?" "To get the ball joint splitter" said I. "Come here son" said he and lifting my own 1 lb ball pein hammer from my tool box said "No time for that, this's all you need, get on with it" I'd no idea what he wanted me to do and said so. "Hit it son, just hit it!" After I'd stood looking "glaikit" (scottish word - google it) for a couple of minutes he said "here, give it to me". The car was already up on a wheel free lift with all the wheels off (that had been my first task of the day) and he took aim at the track rod end and whacked it a mighty blow with the hammer. I was appalled! but the taper jumped out of the steering arm and hung free!

Over the next 5 minutes he showed me how to do it. It's quite precise and technical, you can't just whack it any old way or you'll break it. First the nut on the screw thread is undone about 2 or 3 turns but not removed (that way it protects the thread). Now look at the steering arm - I'm not talking about the track rod which is connected to the rack but the steering arm which is part of the hub carrier. You need to strike the end of this (not the ball joint) so that the force is being applied in line with this arm. That is to say on the end of the arm so that a compressive force is applied along the arm. That way you won't snap it. The shock applied to the end of the arm acts on the taper pin much like squeezing a bar of soap with your fingers - it pops out! Brutal as this may sound I've seen it done many many times and never seen any damage done (bar a slight flattening of metal where the hammer blow lands) I found controlling the hammer accurately enough not to damage the track rod end (because sometimes you will be wanting to reuse it) was very difficult. Eventually I evolved a way of keeping my arm straight as I delivered the blow and find it no problem now.

I've never been entirely at ease with this way of doing it, although I see it all the time in the workshops I still wander around in and I suppose when you're working on bonus to "book" times it does save time. I do much prefer to use a splitter and I'm sure it's better for the components involved. However, if I come across a very very tight one where I'm tightening the tool to the extent that damage to the tool is becoming a possibility I find that delivering a hefty "tap" in the way described above, not to the "business" end of the tool, invariably results in it jumping apart with minimal distortion to the threads.
 
This post contains affiliate links which may earn a commission at no additional cost to you.
Ones I saw so far are,

engine compression gauge
cylinder leak check gauge
oil pressure gauge
fuel pump pressure gauge

I wonder if these gauges are useful and practical and must have tools, or are they just something extra.

A standard compression tester is very useful if you think perhaps a cylinder is not "pumping" properly. Easy enough to use, disable the ignition, whip the plugs out, screw the gauge into the plug hole and spin the engine over with the throttle wide open (holding the throttle wide open on a "fly by wire" could be a challenge though? How often might you use one on a DIY basis? Once in a blue moon I would guess.

Oil pressure gauge perhaps you'd use a little more often? (I'd like one but tend to borrow one if I need it - which is almost never)

Fuel pump pressure gauge. Yes. I don't own one but have borrowed one a few times lately and I'm getting embarrassed now so must buy one.

Cylinder leak tester. Hmm? I'd love one but can't justify it for the few times I might use it. To use it you set the cylinder you want to check on TDC compression (that is the top of it's stroke with inlet and exhaust valves closed - top of the compression stroke would be another way to describe it.) Then the tester's pipe is screwed into the spark plug hole and compressed air injected through the measuring gauges of the tool. If you don't have the piston exactly at TDC it will be forced back down the cylinder and you'll have to set it all up again. If you do have it all set up properly then the piston won't move because the connecting rod is exactly straight above it's big end bearing and the gauge will indicate how much air is flowing. There's bound to be a bit of air going past the piston rings but there should be none leaking out of the valves. I put a length of tubing in my ear and stick the other end up the exhaust pipe and down the inlet/throttle body. Hear a Hiss? you've got a leaky valve. If there's no hiss look at the gauge to see how much air is going past the rings/pistons I can't remember what the recommend leak rates are but the tool will come with instructions. I made my own very basic version, which actually works well enough. I broke the ceramic out of an old plug (actually I have 3 sizes) and welded/brazed a screwed pipe fixing to the top. This lets me connect my airline for my compressor (I did say you need a compressed air supply to do this didn't I) so I can introduce compressed air into the cylinder. I can check really well for inlet and exhaust leaks with my listening tube but as I have no flow gauge I have to listen in the oil filler to judge if too much air is leaking past the piston. It's difficult to judge but I have never found an engine with all the rings/pistons worn out together. More often you are chasing one cylinder which has a broken ring - or other problem. So as you are listening you typically find, maybe, say for example, No 1 has a hiss. No 2 has a similar hiss, No 3 by jings that's like an express train in a tunnel! No 4 hissing like Nos 1 and 2. Ok No 3's the one with the problem. It can show up other things like blown head gaskets where you'll see air bubbles in the radiator header tank if you take the cap off. So you can see that to really benefit from one of these you have to have a real understanding of what's going on inside the engine and a good idea of what might produce the result you're observing. How often are you going to use one? Very seldom I've found.
 
Last edited:
How often are you going to use one? Very seldom I've found.

I was under the impression too that these gauges are for really when engine is performing in abnormal ways - loss of power, not starting, misfiring, blue smokes or black smokes ... etc.

Not really something that needs to be done every 6 months or year even when engine is performing fine.

So, yes they are good thing to have, but not something to buy and keep them for years to use once when engine goes bad.

If you are a mechanic or run garage business, then maybe essential tools for checking out the cars for diagnosis?

I replaced spark plugs on my Panda, and it seems OK. Was a bit difficult taking out the HT leads, because they were not coming out easy. I had to use long nose pliers grabbing the base of the HT lead, then pulled out OK. These spark plugs are located awkwardly and very difficult to get to.

Will go for a wee drive today see how the car runs.
 
Last edited:
Took out the Panda with new air filter and spark plugs, and it drove very well. Done about 70 miles, and it ran OK. Never misfired or ran rough. Idles quiet and great drive on motorway 70 mph.

But the EML is still on. I need to look at the Lambda sensors now.
 
I was under the impression too that these gauges are for really when engine is performing in abnormal ways - loss of power, not starting, misfiring, blue smokes or black smokes ... etc.

Not really something that needs to be done every 6 months or year even when engine is performing fine.

So, yes they are good thing to have, but not something to buy and keep them for years to use once when engine goes bad.

If you are a mechanic or run garage business, then maybe essential tools for checking out the cars for diagnosis?

I replaced spark plugs on my Panda, and it seems OK. Was a bit difficult taking out the HT leads, because they were not coming out easy. I had to use long nose pliers grabbing the base of the HT lead, then pulled out OK. These spark plugs are located awkwardly and very difficult to get to.

Will go for a wee drive today see how the car runs.
Yes you're right. Not general service tools.

The plug leads and plugs themselves can be quite awkward can't they. The leads on our Panda came off quite easily last time i worked on them but one lead in particular on my boy's Punto put up a hell of a fight. Unfortunately I ended up cracking some of the hard plastic on it. It runs without any miss firing but I'll be ordering a new set of leads next time I have an order going in to Mick at shop4parts.

You say the EML is still lit on the dashboard. just for my own interest, do you have any codes showing on your nice new code reader?
 
Back
Top