General Complete Dash Removal

Currently reading:
General Complete Dash Removal

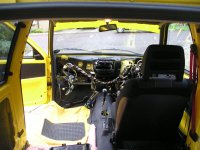
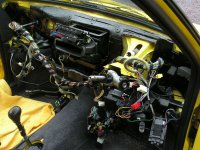
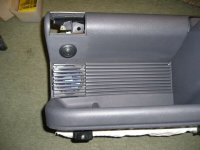
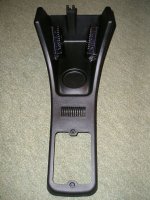
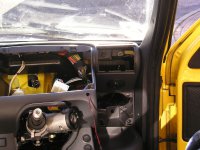
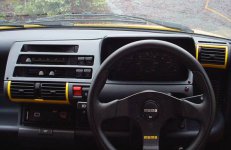
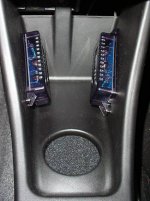
Todays job = Fitting the Kenwood Crossovers into the centre console.

Time taken = 6 hours although this did include the mandotory pit stop to watch Top Gear :) and get something to eat, (Most important mentioned first)

The crossover are now install inside the centre console facing each other and the wires fed through small hole meaning they are unseen.

I would have pictures of this but they were all taken on Daves (Peaster2k)camera so you will have to wait until tomorrow in order to see them.

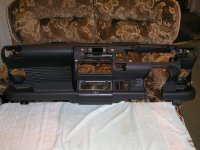
More details will follow, as tomorrow is the big day when the dash has to go back in :(

Wish me luck.

Brian
 
Last edited:
Well after what seemed like an eternity (well 8 hours anyway) the dash is finally back in Mr Cinq. Admittedly the steering wheel still needs to go back on, and also the stereo and 10cm speakers still need to be fitted.

The centre console is also not fitted as the connectors that I have used are being glued into position and are still drying, (Pictures of the centre console will be posted tomorrow).

The first and second photos show Mr Cinq with the whole dash completely removed. As can be seen there's a serious amount of wires hiding underneath the dash, and a large amount of them are actually attached to the dash by a variety of clips held in place with screws and cable ties.

The third photo shows the dash on the sofa (it’s a good job my mum was out that day :)) As can be seen from this picture everything from the dash has been removed except for the cage that holds the Head Unit.

The forth and fifth photos show the removed dash with the Kenwood Component Tweeters and 10cm speakers fitted in place. These photos show the speakers fitted with and without the speaker grills.

The Sixth and Seventh Photos show the dash refitted to Mr Cinq, from these picture you can see the exact location of the tweeters and how neatly they fit into their locations.

The last photo shows the centre console with the Kenwood crossovers I have installed, the wires for the crossovers are hidden inside the centre console so that it is as neat as possible.

Once everything has been fully installed more photos will follow.

A Total of about 20 hours has been put into installing these component speakers and some may argue "what a waste of time", but to be honest I'm REALLY pleased with the end result and I think the three days I've spent installing the speakers have been well worth it, and I can't wait to hear them.

Please let me know what you think, and post your comments.

Brian :)
 

Attachments

  • Incar 01.jpg
    Incar 01.jpg
    78.7 KB · Views: 72
  • Incar 02.jpg
    Incar 02.jpg
    109 KB · Views: 90
  • Removed01.jpg
    Removed01.jpg
    76.3 KB · Views: 61
  • Fitted01.jpg
    Fitted01.jpg
    76 KB · Views: 54
  • Fitted02.jpg
    Fitted02.jpg
    69.9 KB · Views: 41
  • Console.jpg
    Console.jpg
    105.6 KB · Views: 67
  • BackIn02.jpg
    BackIn02.jpg
    66.2 KB · Views: 51
  • BackIn01.jpg
    BackIn01.jpg
    80 KB · Views: 55
Last edited:
Thanks mate, I never store anything in there anyway, so I thought I might as well put the crossovers in there as it keeps them out of the way and is something I haven't seen before.
 
I have to say that looking at those pictures that is one serious job you have undertaken, especially when I look at the photo taken through the driver's door. Makes you realise just how much wiring there is in a Cinq. Not a job for the faint-hearted.

Did you find any obvious things you would want to improve while it was out? I can see there could be some opportunities to reroute wiring in a couple of places but it looks like it would be quite a job to do it properly (and for you, of course, neatly).

Knowing you it will be a perfect job when it's done, and well worth all the time and effort. I look forward to not only seeing it finished, but also the interim pictures. Excellent job.

You continue to set the standard....

Tosh
 
When i was helping Brian remove the dash he said that he does not want to have any bits left over after he has finished as there was loads of screws and bits that needed to go back in. Thank god he did not otherwise it could have been very interesting. :D:D:D
 
Very nice job there m8, only one small problem, tweeters shold always be facing you. But with the lack of space and mounting places that is a really good idea.

Just started taking the dash out of my sporting to put it in my 899cc does really start to look like a bad idea once you see all the wires

GhostWKD- did you get my pm about the anti roll bar?

Adrenaline Junkie- before you go stripping the dash, have a look at the fan motor under the bonnet. had the same problem with nothing working and it was the fan seized.
 
Adrenaline Junkie- before you go stripping the dash, have a look at the fan motor under the bonnet. had the same problem with nothing working and it was the fan seized.

Where abouts is the fan motor located?

I need to go and get myself a Haynes manual... cant keep asking you all.

Ive not touched the main dash yet, i removed the front housing to see if there was anything i could do from there, but nothing.

Adam
 
Pop the bonnet and behind the engine is a cloth wall at the back of the engine bay.
It is behind there, only a few screws to remove
Try spinning it 1st
then swich the fan on in the car and carefully spin it again
then look to disconect the wire for it and try them with a tester to see if there is any power getting there
 
Cheers.... i'll give it a try tomorrow when i get home (at a friends house at the moment) How freely should the slider switch on the dash move? it has virtually no friction and moves very freely, is this right?

Adam
 
OK, so i have some good news but mostly bad news.....Firstly, Ive taken the carpety bit out of the engine bay and discovered that the fan has seized... so i know the reason its not working.(or at least one of the reasons contributing to its un-willingness to work)

Secondly, i cant get the bloody fan out to do anything with it! (help please) I've unscrewed all the screws surrounding it which look like the'y're attatched and hold it in, but its still fixed solid... May be off for a trip down to Halfrauds to pick up a Haynes manual sooner than i had planned... unless someone would be kind enough to scan the relavant pages in for me?

And Finally, the 1-2-3 switch movement is none existant, it just slides freely.

Any help, advice much appreciated.. i have my head stuck under the bonnet and i may keep it there if i cant sort it!

Thanks
Adam :cool:

Oh, and just used some back to black stuff on my bumpers and wow.. they look so much better! a quid well spent i think. ;)
 
Last edited:
Even though it was good few weeks ago now, when I put my dash back into Mr Cinq. I never actually got round to posting some pictures of the finished artical, when everything else was installed and sorted out.

So hear it is, I've decided not to do anymore colour coding, as I think painting the heat vents gives just the right amount of yellow on the dash without looking over the top.

The pictures below show the drivers view, the passenger heater vent, the centre heater vent and the crossovers installed in the centre console.

I hope you like it.

Brian
 

Attachments

  • Dash.JPG
    Dash.JPG
    30.1 KB · Views: 48
  • Passenger Heater Vent.JPG
    Passenger Heater Vent.JPG
    24.3 KB · Views: 45
  • Centre Heater Vent.JPG
    Centre Heater Vent.JPG
    27.7 KB · Views: 48
  • Crossovers.JPG
    Crossovers.JPG
    38.7 KB · Views: 42
Back
Top