Yes, the pins are a nice simple way of doing it. My friend in America has the type with the integral locks and he tells me it's possible to catch the lock on clothing or knock it with the jack (or by accident) with a hammer and then they might collapse?
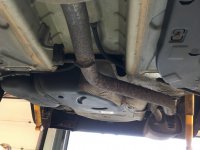
Regarding you thinking you're a coward - No! just remember "the brave and foolhardy die young". I know exactly how you felt. I've had a car come off one of those "suicide", as I call them, jacks that are supplied with the car. Quite frightening and very difficult then to get something under the car to get it back up off the ground. Most frightening though was when a lift failed, back in the '70's when I was working at the Tyre and Auto garage. It was a single pillar hydraulic ram type and the main ram seal (I think) failed. The whole lift, complete with car on top, descended very rapidly back to the floor, with gallons of hydraulic oil spraying spectacularly all over the place! Luckily the chap working under it had gone to his workbench moments before this happened but it could have been very nasty. (I was taught in college that ramps have safety interlocks but this one collapsed all the same) The workshop was a typical American "bay" type with each bay having one of these lifts (there were 4) and a 4 poster (MOT) bench in the last one. (you could see the interlocks on the 4 poster on each leg! I know I had a good look!) There was floor space for a couple of cars at the back but realistically you had to work on a lift. I felt very nervous after that and luckily was offered a job elsewhere (back in Scotland) so I left soon after. So I know the feeling you are describing. On a nice stable bit of ground with the stands holding it is pretty safe though! - 6 tonne? maybe a bit "oversafe" though?
Your creeper sounds wonderful - I think it should have a built in cup holder for your tea cup?
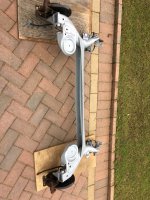
Trolley jacks and how many? Never enough is probably the answer! It was probably 45 years ago I bought this chap:
View attachment 198804
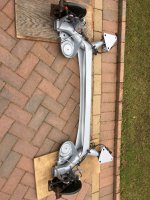
The chassis is roughly 2 ft long and he has a nice largish diameter saddle size. Maximum lift is 16 inches (410mm). It was Hilka branded but I've since discovered it's made in China, but thats OK it lasted well until several years ago when it started to come back down very very slowly. Still usable but maybe not to be relied on. So I treated myself to a "proper big jack":
View attachment 198806
He can lift to 19 inches (485 mm) - 21 Inches (535 mm) with the rubber jacking pad instead of the metal saddle. It's been a really great jack and nowadays is my first "go to". I still was using the smaller one for support jobs and if I had to rush off across town to "rescue" one of the family with a puncture or whatever. but it worried me that it wasn't "holding" properly.
Then I spotted an almost identical modern version of him on my local Gumtree. It's the one behind That is to say, the red one:
View attachment 198805
You'll notice it's got "bits" missing. This is because it didn't take long to find fault with it. It's slightly, but significantly, higher and more bulky. But worst of all it's got quite a small saddle - more obvious if you enlarge the image - I was beginning to regret buying it (although, on Gumtree I only paid about half price for it) When I noticed the ram assembly looked very similar. Measured it all up and to all intents and purposes it's identical. Only red, ha ha! Bet it's the same factory still churning out these hydraulic parts. Anyway I switched over the hydraulic unit as a whole and my "old friend" was back in business.
View attachment 198807.
Then, amazingly, about a month later, a chap who lives at the end of our street who I'm on "nodding" terms with, but don't "know", knocked on my door one night and said "I often see you working on your cars, would you like a jack" Not one to ever look gift horse in the mouth I said yes. Probably not going to be much use to me but I can always sell it on Gumtree or just get a couple of quid down at the scrappy. He turned up next day with this - the yellow and black one nearest the camera:
View attachment 198808
It's so near to being identical to my old Hilka that it must have been built in the same factory. A lot of the pins are welded in place whereas the old Hilka could come apart with circlips etc. It's like it came out the box yesterday! I felt so guilty I actually offered him money for it but he refused. He told me he'd bought it a few years ago for swapping round winter and summer tyres but the winter tyres had worn out quickly so he wasn't going to buy another set and had no more need for the jack.
So now I have 3 jacks and an almost new chassis sans hydraulics (don't know what to do with the chassis but it's got some nice thick plate and sturdy axles etc. Probably I'll cut it up to make brackets or something and maybe make punches out of the axles and pins? I hesitate to mention it, but I've also got a low entry 2 tonner - but I don't talk about that one in case Mrs Jock finds out I bought another jack!


")