Since the weather turned colder this year, I'd noticed that the Panda has been a bit slower to reach operating temperature, and that the temperature gauge was settling just a bit lower than was usual. We're not talking much here, perhaps a couple of times the thickness of the needle, but fuel economy was also down by at least 10% on my last long run, so this definitely warranted a closer look.
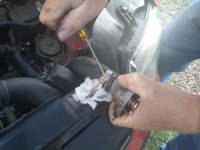
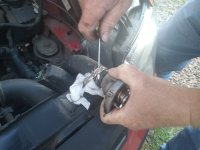
My first thought was that either the bypass on the thermostat housing, or the thermostat itself, was sticking slightly open, so I pulled out the thermostat for a closer look. I couldn't see anything wrong with it, and it also passed a hot water test, but having got this far, I thought I'd replace it anyway as they're cheap as chips (a whopping £7.79 from ECP).
Happily all is well again. The needle is now rock steady and exactly on the centre mark on the temperature gauge; initial indications are that fuel economy is also back to normal.
Clearly the old thermostat must have been letting colder water through, so if you do notice your Panda is running a bit colder than usual, be aware that these thermostats can fail and still appear on inspection to be working.
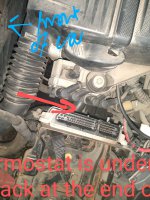
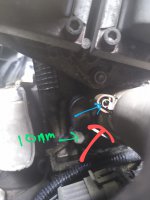
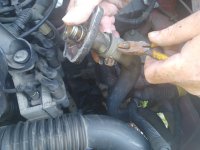
Replacing the thermostat is straightforward enough, but you'll need to remove a few ancillaries; what exactly probably depends on the specific model. On the Euro4 engine, both the coil packs and the engine ECU are directly in the way; the former are bolted to a carrier on the cylinder head (3 bolts) and the latter just sits loose in a carrier bolted to the battery tray (2 bolts and an earthing strap). If you're careful, you can unbolt this lot, swing the packs and ECU out of the way without disturbing any wiring, and remove the battery tray.
It also helps to remove the airbox; not strictly necessary, but it's only a couple of bolts and takes just a minute or two.
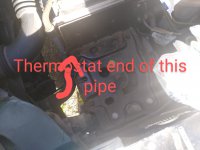
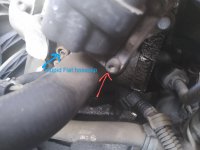
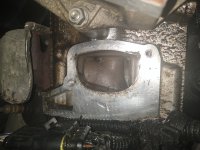
The easiest way to deal with the coolant is to syphon it out; that way, you've only the single coolant hose connection on the thermostat housing itself to deal with, and you can break that after the coolant is out, so no mess anywhere") . If the coolant is uncontaminated and within its service life, you can then just put it back at the end of the job. Expect to get about 3 - 3.5 litres out. Getting it back in might be harder than getting it out; the Panda is notoriously awkward to get coolant in. It helps to completely remove (don't just loosen it) the bleed on the heater hose before you start; this bleed is above the top of the header tank, so you won't lose any coolant (unless you forget to replace it before starting the engine :bang. The system self-bleeds after a few hot/cold cycles, so keep a close eye on the level during this period, as it will likely drop a little.
. If the coolant is uncontaminated and within its service life, you can then just put it back at the end of the job. Expect to get about 3 - 3.5 litres out. Getting it back in might be harder than getting it out; the Panda is notoriously awkward to get coolant in. It helps to completely remove (don't just loosen it) the bleed on the heater hose before you start; this bleed is above the top of the header tank, so you won't lose any coolant (unless you forget to replace it before starting the engine :bang. The system self-bleeds after a few hot/cold cycles, so keep a close eye on the level during this period, as it will likely drop a little.
The car is now almost 10 yrs old and has done about 95k; this is only the second non-routine parts replacement (the first was the battery earlier this year), so it's proving to be a reliable car.
That said, since all the suspension and other commonly wearing stuff is still original, I may have to make a decision next year about whether to give it an extra heavy overhaul, or to replace it.
My first thought was that either the bypass on the thermostat housing, or the thermostat itself, was sticking slightly open, so I pulled out the thermostat for a closer look. I couldn't see anything wrong with it, and it also passed a hot water test, but having got this far, I thought I'd replace it anyway as they're cheap as chips (a whopping £7.79 from ECP).
Happily all is well again. The needle is now rock steady and exactly on the centre mark on the temperature gauge; initial indications are that fuel economy is also back to normal.
Clearly the old thermostat must have been letting colder water through, so if you do notice your Panda is running a bit colder than usual, be aware that these thermostats can fail and still appear on inspection to be working.
Replacing the thermostat is straightforward enough, but you'll need to remove a few ancillaries; what exactly probably depends on the specific model. On the Euro4 engine, both the coil packs and the engine ECU are directly in the way; the former are bolted to a carrier on the cylinder head (3 bolts) and the latter just sits loose in a carrier bolted to the battery tray (2 bolts and an earthing strap). If you're careful, you can unbolt this lot, swing the packs and ECU out of the way without disturbing any wiring, and remove the battery tray.
It also helps to remove the airbox; not strictly necessary, but it's only a couple of bolts and takes just a minute or two.
The easiest way to deal with the coolant is to syphon it out; that way, you've only the single coolant hose connection on the thermostat housing itself to deal with, and you can break that after the coolant is out, so no mess anywhere
. If the coolant is uncontaminated and within its service life, you can then just put it back at the end of the job. Expect to get about 3 - 3.5 litres out. Getting it back in might be harder than getting it out; the Panda is notoriously awkward to get coolant in. It helps to completely remove (don't just loosen it) the bleed on the heater hose before you start; this bleed is above the top of the header tank, so you won't lose any coolant (unless you forget to replace it before starting the engine :bang. The system self-bleeds after a few hot/cold cycles, so keep a close eye on the level during this period, as it will likely drop a little.The car is now almost 10 yrs old and has done about 95k; this is only the second non-routine parts replacement (the first was the battery earlier this year), so it's proving to be a reliable car.
That said, since all the suspension and other commonly wearing stuff is still original, I may have to make a decision next year about whether to give it an extra heavy overhaul, or to replace it.
Last edited: