Technical Just started and could do with some 4x4 help.

Currently reading:
Technical Just started and could do with some 4x4 help.

While that’s all drying refitted the rear brakes.
New shoes, pins, springs, slave cylinders and the repainted handbrake actuators.


Then new hubs fitted.

Looking cool with the wheels and tyres? Its certainly a lift kit!


Manifolds and starter motor get a clean up and a bit of paint.


Exhaust manifold broken stud fought hard but lost to large tools!

Finally cut the aluminium sheet to the old disc shield pattern. Not a work of art really just a jig saw and a file followed by a gentle bit of light forming with a toffee hammer.


Pretty happy with the results even if there slightly smaller than the original.
Thanks for looking…lots more soon..
Oh and Steve the 3Pk668 seems to be ideal!
 
Long time since my last visit here- Massive progress Derek - keep the good work.

Ps. have you modified the flexi brake hose bracket at the tank to give more slack due to lift?
 
Long time since my last visit here- Massive progress Derek - keep the good work.

Ps. have you modified the flexi brake hose bracket at the tank to give more slack due to lift?

Thanks Jacob!

Just reminded me I also have to work on that tow bar you donated soon!:)

Just made up the brake hoses so will be looking at that next weekend.
Really want to get the motor in this weekend so I can get the front on wheels and off the pallets!(y)

Derek
 
Thanks Jacob!

Just reminded me I also have to work on that tow bar you donated soon!:)

Just made up the brake hoses so will be looking at that next weekend.
Really want to get the motor in this weekend so I can get the front on wheels and off the pallets!(y)

Derek


Ok. Brilliant. Progress. Here. Love all the Italian flags Do you fancy the road trip to Italy next. June 2019. It’s an off road event for the 2 nd weekend I think.
Not posted yet but plenty of chat about it . When you get the engine in place. Check how the drive shafts are regarding flanges. Without the gaiters. Fully hanging down body supported. Into the hubs but no 30 mm nuts (No contact below the flange and the shaft should be able to move in / out a little also that the tripods are fully engaged in there diameter ) if this isn’t the case. Lower the engine a little using the 3 points off support with packers. 10- 20 mm may be required. Until The wheels should turn freely “or just on the box side “ may have the same effect. “ any probs direct message. Or direct message on stevejvarley instergram. Do do farcebook but that may have to change soon
 
Not much done for the last 4 weeks and untouched for 3 of them. Getting that 'will it ever be done feeling' especially as nice family stuff for the next 6 weeks. Anyhow here’s the update and as football impresses me as much as paying tax I plan some more by the weekend.

Rear shocks fitted all new bolts and new lower sleeves as there was little left on the old shocks.


Front shocks assembled and fitted. The springs need a fair bit of compression. New boots and all new bolts.

Had these rather useless compressors and they did more damage than any help in fitting

So borrowed the proper jobs.


Fitted with the lift kit spacers

Both front and rear had an additional coat of paint and lacquer.


Few smaller items next
Rotted gear linkage rubber cover ditched for a new one.

Arms and clamping plate cleaned up and painted. New bushes to fit.


Pedal box fitted.

And then the steering with the new hex heads.

Gold trim looked crap so went back to black satin.


Wipe assembly stripped, cleaned, lubed and reassembled.


Now for the motor!
Clutch fitted!

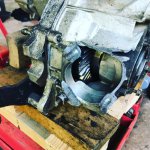
And then the box and engine mated again.
Twice in fact as the ruddy clutch bearing fell out!


Engine mounts refitted as motor moved into place.


Nervous moments and careful jacking and pushing to avoid any paint damage.

Yours truly doing a fit on the rear box mount.

In and firm.

Just waiting for the longer mounting bolts to give me 10-20mm possible engine drop (thanks Steve) have a selection of 3mm and 1.5mm 50mm washers ready to fit. Plan is 10.5mm as a starting drop.
Next is the hubs and front shafts. Then gear levers as I seem to have got it into gear, fuel and engine wiring I think?

Fathers Day delivered these from Daughter No 1

More soon.
 
Great stuff good work. You’ve got to attend the Peakender hopefully Rich and Woody will attend. So you could have a pandavoy from the south with Vern. My routes are fully timed and tested. Even some more of real Green lanes.just panda size. Sorry but a scratch or two may happen
 
Myself and Adam have already cut a mile of hedge back in Priestcliffe
 
Engine drop we see this as crucial it means that larger diameter tyres give a lift too and prevents arch rubbing flange smashing. But not gear box shearing. Ha ha lessons have been learned onward and forward
 
Great stuff good work. You’ve got to attend the Peakender hopefully Rich and Woody will attend. So you could have a pandavoy from the south with Vern. My routes are fully timed and tested. Even some more of real Green lanes.just panda size. Sorry but a scratch or two may happen

Better the Panda scratch than my big bus (haven't paid for that yet)!(n)
 
Engine drop we see this as crucial it means that larger diameter tyres give a lift too and prevents arch rubbing flange smashing. But not gear box shearing. Ha ha lessons have been learned onward and forward

Shearing......oh well....in for....HOW BLOODY MUCH HAS THAT COST!:devil:
 
My paint job, great and worth every penny too!!! Just need to get mobile now.
 
Shearing......oh well....in for....HOW BLOODY MUCH HAS THAT COST!:devil:


Ah shearing off a rear gear box take off fully on video attempting rock crawl.
IMG_1468.JPG the result of big wheels ang very agresssive Rocks
 
Just a small update. There’s still lots of bits arriving ready for the finishing and I totally forgot an exhaust!
Anyway the gold trim has all gone and we are back to satin black.


Had friends and family round at the weekend so a quick wipe with detail spray to show off the progress.
Kept being asked what I will call it. Never given a car a name (except for giant PoS and similar).
Answers on a postcard?

Minor panic with the steering arms but luckily the stock of photos paid off and noted the dimple that sorts LH to RH.


New control arms and bolts fitted.


Camber arms assembled with new bushes and bolts.


Not a lot of clearance for the camber arm bolt and the shaft boot. This should improve as the engine drop goes in. Thinking 15mm now?


Cleaned up and refitted the nearside flange shims

The slipped the nearside shaft in and fitted the ‘Zenone’ flange with some nice colour coded hex sockets.

Hub assembly fitted.


Checked for bolt and shield clearance.


Then did a quick glamour wheel fit!


Same on the offside.
Red flange is the standard one but again a new set of coded hex sockets.


New arms fitted.


You might spot a 10mm bolt on the offside. Don’t worry its 12mm now just lost the bolts in the chaos that is my mini garage.
Slight damage to the hub shield (yup dropped it) it will see worse I am sure but alloy is pretty easy to reshape later.


Final assembly and now we have both shafts fitted. Similar clearance concern on the control arm.


So we are now here and next the engine drop and all the stuff needed for the engine run!


Just a bit of shameless promotion:
Panda Pillows - https://www.facebook.com/HolsHampers/
 
Last edited:
Nice. Work. NB. It also may be beneficial to pack down the front control arm the same as your proposed engine drop or somewhere close as this will allow the wheel centre to move back to its intended position Leaving less stress on the connection point. If you see what I mean. If you need a modified swing arm. Cranked lower to give the 15mm I have a pair you can have. All the best S v
 
Nice. Work. NB. It also may be beneficial to pack down the front control arm the same as your proposed engine drop or somewhere close as this will allow the wheel centre to move back to its intended position Leaving less stress on the connection point. If you see what I mean. If you need a modified swing arm. Cranked lower to give the 15mm I have a pair you can have. All the best S v

Thanks!
Drop came in at 15mm.
Making up some spacers for the front mount at 15mm
Interested in what the modified arms look like.
No real progress this weekend but a big box of bits on its way.
Derek
 
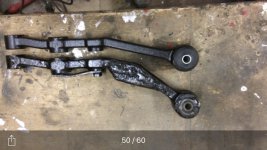
Here we go. My home made modified arm Mk 1. The idea is to keep the shocks at there intended angle obviously if a lift takes place the arms are drawn in and the track is slightly narrowed the modified arm counter acts this.Image1532284451.074146.jpg also ensuring that the lower ball joint is kept more vertical. 2 old and 2 new cut and spliced then vee butt welded
 
Last edited:
Then add a 12 mm steel bar as a knee brace vee butt welded to all faces works well. Went through mot no problems and no failures have occurred. Sv
 
With apologies for the lack of updates especially to you Steve!

A lot of family (big wedding) and work stuff (still love jet noise) getting in the way. As previously advertised way behind any schedule that I may have had.

Progress last month.

The engine drop was performed with a selection of shims and ended up at 18mm.

P1090724.jpg

P1090723.jpg

Had to mess around with bolt lengths to avoid a clash with the engine mount.

P1090726.jpg

P1090727.jpg

15mm spacers on the front camber arm mounts.
P1090737.jpg

P1090739.jpg

P1090740.jpg

P1090743.jpg


Given there is no load on the suspension at the moment the clearance is a bit better.

P1090730.jpg


Brand new extended handbrake cable from Speedy Cables. Yes I could of moved the bracket but I wanted something more in terms of strength and play so had it made with beefed up cables and tings and extended 150mm.

P1090745.jpg

New gear shift gaiter. Not impressed as this has a small tear already so may have to do a bit of sealing later. First real Fiat quality issue.

P1090731.jpg


New shift arm bushes. Popped in with a bit of heat grease and two sockets.

P1090734.jpg

P1090735.jpg

New fuel lines. Really feels like engine start is close now.

P1090736.jpg

P1090746.jpg

P1090747.jpg

Some trim stuff with Classic Fiat badges found in India.
P1010214.jpg


Front Loom about to get a quick clean up.

P1010218.jpg


Now sitting as high as its big sister.

P1010219.jpg

Rear Loom being fitted.

P1010220.jpg

And yes the bonnet release is going back in!

P1010222.jpg

Fuel tank partway through fitting. I had no images of the breather tube route but it only seems to go through the hole in the chassis. Looks OK?

P1010225.jpg

P1010226.jpg

P1010227.jpg

Fuel line knitting?

P1010230.jpg

P1010245.jpg

The other breather tube should have a non-return valve in it. Have a pit bike one that should fit.

P1010239.jpg

Fuel lines and gear shift arms all fitted away.

P1010253.jpg

P1010254.jpg

P1010255.jpg

Luckily it all seems to work once the internals fitted along with the new clutch!

P1010256.jpg

P1010259.jpg


I will drop the last few weeks stuff up later.
The wind last night took out my Gazebo and we acquired our first but small wounding.
Rotary polisher coming out!
 
Back
Top