Are they serious? Theres a lot more to it than that. I hope this guide helps out anyone in trouble or having difficulty
")
As I've done too many of these in the past, I've picked up a few ways to make it easier to do. The golden rule is to take off as little as possible.
But enough of that, to the next page to see what you'll need
Tools needed
Not too many tools required:
- 3/8 set of sockets
- A phillips screw driver
- Torx bits
- Allen bits
- A set of flat head screwdrivers
- WD-40 (optional electrical contact cleaner)
I do recommend you take your time at this as this can be a pig if you're doing this for the first time, it can be tedious
Getting started
First, make sure your door opens. Wind the window up fully. The door trim must be removed, to take it off you need to remove:
- the elec window switch or wind up handle,
- the door handle (2x 4mm allen)
- 3x 5mm allen bolts in the centre of the trim,
- 4 phillips screws on the bottom and
- 3 at the side near the wing
The trim is held on at this stage with 3 clips at the end and the top piece. Prise off carefully, they tear easily at the top if taken off wrong

The door handle
This has to come off to take the mechanism out. If its old and rotten you may throw it away and get a new one.
First take off the T30 screw at the back of the door off, followed by the 10mm nut in the door


Send the handle foreward, pull as if you were opening the door and jiggle it out of position. There are now 2 rods holding it in place, prise them out wit a flat head screwdriver and out comes the handle.
Fitting alternative handles? Highly recomended. Marea handles are a straight swap but get ELX or HLX ones only as the SX has the rubber ones and your back to square one in a few years. Alfa 147 and Fiat 500 handles fit without too much work. As there are alot more Alfas in yards, thats what I'll be working with

Compare them first to see how much metal you'll have to take off (I've had these for years hence no pics before and after) but it should look something like this:

Once satisfied with the result, take out the barrell from your old handle. Its held in with a small clip


Do the same with the Alfa handle. Test the key in the lock before you put the clip in. Once satisfied, put the clip in

Refitting is by far the hardest part. It's much easier to get the rod for the lock from the mechanism and attach it to the handle first

The rod to open the door can be adjusted by twisting it. Attach this first, then test the handle (can it open, is it too hard to pull etc). Working on the inside attach the rod to the mechanism and perform a similar test.

Satisfied? Bolt it all up. Job done

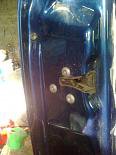
Removing the mechanism
Once the handle is off, your free to take the mechanism out. Start by peeling back the protective cover so you can see the access holes and bolts (mines totally gone for convenience)
There are 2 plastic brackets that need moving and removing. Take the top one off first, held in with a clip and 2 10mm nuts. On the 2nd bracket, loosen the bottom nut/screw first (carefully) and remove the top nut, also 10mm. Remove the clip holding he wires nearest to the brackets


Now remove the handle. Unclip the rod and move it. The handle is held with 2 10mm nuts and a 10mm bolt

Remove the 3 T40 bolts on the door for the mechanism

Now the unit should be loose and free. Disconnect the door button rod using a screwdriver

Withdraw the unit and disconnect the 3 plugs. Its out now

Refitting
First things first, clean up the unit as dirt kills these units. Also dont forget the contacts

Now reverse the above guide, its that straight foreward. Don't over tighten anything or it will ring

When all bolted up (not finished yet) oil the locks. This isn't a cheap advertisement by the way

Connect the electric window switch where applicable and test the door, both inside and out (does it open correctly, does the mechanism need adjusting etc)


Satisfied? Fit the handle and trim as in the previous chapters
And thats it! This guide took longer to write than it did to to that job in the photos
If you feel I've missed something, theres a typo or want to add your input, feel free to do so in the comments