My Selespeed shift lever was loose and wobbly, making it rather unpleasant to use.
I had an Alfa 156 with a similar condition and I solved it by modifying the lever housing. That was years ago but I decided to try the same on my Stilo.
Actually I had recently removed the shift lever from a 156 Selespeed. This lever was in good, non-sloppy condition - I expected that it would fit straight into the Stilo (it doesn't). Removing the lever from the 156 was a nuisance - the exhaust system had to come off, then a number of bolts and two brackets to the subframe. This allowed the centre tunnel to come down, which provides access to the lever bolts.
Next I had a look in eLearn, to see what was involved in removing/replacing the Stilo's lever. The instructions start with removal of the exhaust, drilling out of the heat shield rivets, and removing of the centre tunnel. What a joke it's like removing the sump and pistons to get at the spark plugs...
Today I saw inside a wrecked Stilo. Lo and behold, the Selespeed lever had simply been unscrewed from its plinth inside the car! Therefore, the eLearn instructions are WRONG - for the Stilo, unlike for the Alfa 156, there is no need to remove the tunnel under the floor.
All you have to do is remove the centre console. There are two screws near the cup holders at the front. The armrest comes off (three bolts under a plastic plate). Behind the rear ashtray, there are two more screws, and then the rear air vent comes out. Two screws are then exposed with the rear air vent off. There are another two screws at carpet level, one screw each side, just behind the fully-forward seats.
The front side panels need to be unclipped where they meet the centre console.
The shift lever trim has real Allen bolts (well, cap screws) and with the gaiter turned up, there is a black plastic frame exposed which prises out.
Pull the handbrake on hard - then get the handbrake lever gaiter over the lever knob. As you lift the console, unplug the lighter socket.
Remove the special forked air duct from around the gear lever -there are a couple more screws to find and renove.
The foam around the lever lifts away, and then it is easy to unscrew the lever and take it inside to work on it.
I had an Alfa 156 with a similar condition and I solved it by modifying the lever housing. That was years ago but I decided to try the same on my Stilo.
Actually I had recently removed the shift lever from a 156 Selespeed. This lever was in good, non-sloppy condition - I expected that it would fit straight into the Stilo (it doesn't). Removing the lever from the 156 was a nuisance - the exhaust system had to come off, then a number of bolts and two brackets to the subframe. This allowed the centre tunnel to come down, which provides access to the lever bolts.
Next I had a look in eLearn, to see what was involved in removing/replacing the Stilo's lever. The instructions start with removal of the exhaust, drilling out of the heat shield rivets, and removing of the centre tunnel. What a joke
it's like removing the sump and pistons to get at the spark plugs...Today I saw inside a wrecked Stilo. Lo and behold, the Selespeed lever had simply been unscrewed from its plinth inside the car! Therefore, the eLearn instructions are WRONG - for the Stilo, unlike for the Alfa 156, there is no need to remove the tunnel under the floor.
All you have to do is remove the centre console. There are two screws near the cup holders at the front. The armrest comes off (three bolts under a plastic plate). Behind the rear ashtray, there are two more screws, and then the rear air vent comes out. Two screws are then exposed with the rear air vent off. There are another two screws at carpet level, one screw each side, just behind the fully-forward seats.
The front side panels need to be unclipped where they meet the centre console.
The shift lever trim has real Allen bolts (well, cap screws) and with the gaiter turned up, there is a black plastic frame exposed which prises out.
Pull the handbrake on hard - then get the handbrake lever gaiter over the lever knob. As you lift the console, unplug the lighter socket.
Remove the special forked air duct from around the gear lever -there are a couple more screws to find and renove.
The foam around the lever lifts away, and then it is easy to unscrew the lever and take it inside to work on it.
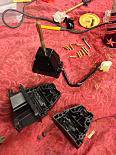
Taking the lever apart
The 156 lever is different as one half of the lever casing is the mounting plinth. Wiring looks the same. I discovered later that I needed a replacement casing - something the 156 unit couldn't provide - so unless you happen to need replacement switches or the lever itself, there is really no need to get a replacement lever. You can work with the one you have.
To get the lever apart, drill the back end of each brass rivet (there are four). I used a pin punch to knock the rivets out.
The trick is to sand down both casing halves (only half of each can be sanded, plus the rings around the screw holes) to tighten the casing's hold on the lever. I used 80-grit sandpaper on a concrete floor as you see in the pictures below.
Several test assemblies will be necessary - don't sand off too much, or you will later have to add washers/tape between the two halves.
Next you have to rummage in your spring collection (I'm sure everyone has a collection of assorted springs. If you want the lever to be easier to push, replace the stiff standard springs - but check that the lever still returns to the centre.
To keep the casing together, you will need to find your own nuts and bolts rather than attenThe ones I found were much too long, so in