Gonna keep it short sweet and simple
Me or Fiat-forum do not take responsibility for any damage that is caused from fitting this kit, any damage or injuries that occur to you, your property, the surroundings areas.
The work you carry out is your own work, i will not take any responsibility for it
You are working with electronics and tools, so always follow the directions set by the manufacturers of the tools and equipment.
If any point of this guide you feel this is above your skill level, you should ask for help from a professional or anybody who works on cars
----
The reversing kit is an aid, not a 100% system. If you hit something thats your problem. As a driver you should know your cars boundaries.
Whats in the box / The Kit
Hawk products have been used on the punto's, many members have been successful in fitting central locking kits so i thought this product is worth a punt. There website is pretty good and the helpline seemed okay as well
So here are the links
Hawk Alarms Website
The Kit i'm fitting - The version with a little LED display
Version of the kit without the display
This guide will work partially for the non display edition, some steps you wont need, some that wont be covered
Since i have a 3door punto, its for a 3door punto. Adapting it for a 5door just a little more trim removal and wire feeding
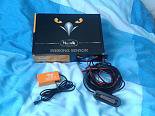
So whats in the box

1x Control Box
1x Antenna
1x Wiring loom with display
1x Manual
1x Bits and bobs (scotch locks, cable ties, sticky pads)
1x Nice Presentation box
Tools and equipment required
17mm Socket and Ratchet OR special boot tool
Multimeter
Screw Driver
Pliers
Straightened out wire coat hanger
Tape / Electrical tape
Wire cutters/Strippers
Sharp Knife
Soldering iron + Stand
Solder
Cleaning bits (see manual)
Torx tips + Ratchet
Sockets and Extensions (i used 1/4 inch ratchet with 2x long wobble extensions)
Prep Work
Read the manual provided - its good enough to understand whats going on
")
Before we disconnect the battery, we need to locate the correct wires we are going to need
So leave the ignition off for now and remove the N/S/R (passenger) light cluster
there are 2x 17mm special nuts that hold the lights in place
There is a ""special"" tool in the spare wheel kit for removing these, as well as a screwdriver, but a socket and ratchet is 10x easier
So open the boot
There is 1 of the nuts behind the little plastic cover here

The lower down in the carpet of the boot is a 2nd nut this one is quiet obvious
You can always look in the cars manual as it also describes how to remove it
As you pull the light cluster out - you need to disconnect the wiring connector
So you are left with This

Finding the 12v Feed to the rear light
So turn on the ignition (DO NOT START THE ENGINE)
Ensure the car doesn't roll if your on a slope
Engage the reverse gear only (Ensure all the other sidelights/hazards/headlights are off)
With your multimeter - Set to 20V DC
Locate the Black wire - this is the earthing pin
Using the positive probe locate your reverse light wire
They all should read 0v until you hit the reverse light and you should have a 12v (ish) feed.
If you have more then 1 pin reading 12v, double check all the lights are off and try again
NOTE - be-careful as you probe the pins, i managed to short the reverse light pin and earth pin with the probe, resulting in the fuse blowing
So make a note of which wire is your 12v feed, this is what i had

Is it about time we started to fit the kit right?
I think so too!
Start at the easy end, with the wiring loom provided straighten it out
with the display place this in the location you want. I was happy for mine to sit under my tax disc

Run the wire down the side of the dashboard between this seal

Now you need to move the carpet out the way so
A - remove the plastic kick sill trim, there are 2 screws holding this in place. remove screws and pop up
B - There is a big plastic lug that holds the carpet up near the door seals and dashboard, carefully tease this out with pliers
With the carpet out the way i got the cable to hide in the big connector block there

Then along the sills wiring loom. I clipped mine in the cables, keeps it out of harms way

Right time to get the cable to hide and into the boot
Lift the rear seats up and to the right hand side feed a straightened out coat hanger down till it appears in the sill area
Once its found its way down - Tape the wire to the hanger

Dont tape the connector, we dont want to pull on the connector, just the wire
Gently wiggle and pull to retrieve the wiring to the under-seat position

Next to get it into the boot
Pop the boot lid
There are 2x plastic trim clips to remove to allow the carpet to be lifted with ease#
Tease these gently with pliers (i cheated and used wire cutters to tease them out)

Same story as the sill movement
Feed the wire hanger under the carpet into the rear seat area
Tape the wire to the hanger and gently pull through

At this point it'd be far and safe to say its okay to refit the front carpet and trim
And to put the rear seat back down - Ensure the anchor points don't get stuck under the seats tho
Time to Start Splicing and Wiring
Since we are going to be soldering bare wires, pop the bonnet and disconnect the battery negative terminal, last thing you want is a spark and potential fire risk
Remember which wire is which? Yes? Good
So take the wiring loom for the reversing kit and locate the 2 thin wires for power
Red = Positive - Attaches to the Reverse light
Black = Negative - Attaches to an earth
I pulled the connector inside the car - it just feeds back in without a hitch. Removed the plastic coated furry insulation to expose as much wire as possible
So carefully with some wire cutters - break the insulation down enough. You do not want to cut the wires.
make the 2 cuts about 7 to 10mm apart
Then with a very sharp knife run a line down between the 2 cuts
Allowing the copper wire to be exposed
Simply then strip about 15 to 20mm of the red positive wire and wrap this around the cars wiring loom
Using a soldering iron and solder - ensure the 2 wires are soldered nicely together.
Once Soldered, Wrap the join in electrical tape as tightly as you can.
Don't go mad, just cover it up nice and tight


You may now ask - why is mine yellow?
because i'm wired in a quick release connector instead, so should i wish to disconnect the kit - i can without leaving bare wires
Now depending what you do depends where you put the negative wire. If you are doing this on the cheap, repeat the step for the positive wire, except join the 2 black wires together
I didn't join mine to this wire. Why? Because i attached mine to the earthing point in the boot, which the black wire joins anyway. using a ring terminal simply crimp the wire to it - undo the nut and pop the ring terminal on and tighten.
The earthing point is in the bottom corner where you are working you cant miss it to be honest.
Push the wiring back into the protective sleeves so it looks a factory fresh look / professional look.
So the Unit Now has power!
Bumper removal
The antenna sticks to the bumper, there is no access to the bumper to fit the kit so it needs to be removed
There are 10 bolts/screws to remove
To Start there are 4x Torx bolts that are literally on the lip of the bumper as you open the boot.
There are 2x of the same torx bolts underneath anchoring the bottom down. easily seen when you look under the car
Each side then has a 8mm and 10mm nut/screw this can be seen here on the bumpers cut out holes


The hidden bumper versions i used a long extension which helped no end
On the mk2b there is no splash guards, where as the mk2 there is. Its not hard to remove a few extra screws and nuts to remove this cover.
Don't forget the numberplate light as well - it needs to be disconnected before pulling the bumper 100% free. A simple twist and pull
Now i like clean, when i pulled it off there was 9 years of road grime, since the bumper is not coming off again, i gave it a quick sponge wash
Mounting the antenna
Were nearly there folks!
The foil antenna wont stick to a dirty bumper, so ensure its perfectly clean
It says to wipe down with an alcohol based product, but i didn't have any
On my sporting bumper there were these convenient markings too!

Now to my understanding from the manual, you may wish to disagree or decide to run the full length up-to you
I ran the foil strip between the 2 lines across the length to and from the vertical creases. Simple peel and stick.
Since the wiring will be coming more from the O/S (driver side)

(The kits wires are long enough to sit the unit near the flap and run the antenna wire out)
I put the antenna spade terminal on the driver side too
So All the components are now fitted, just connect it all up
The refit!
Not quiet finished i'm afraid
refit your bumper - ensure to connect the antenna and the numberplate light
Ensure all the carpets that you've pull up are now nice and secure with the plastic trim pieces
Ensure the car is returned to the way it was before! Don't skimp on the bumper bolts, you don't want it flapping around while driving
Any showing cables - cable tie these to anything to ensure its tidy
Time to test!
Refit the battery! HORAY i hear you say
Ignition on - select reverse and you should hear 2 beeps
This means the unit has activated
Stand well back and slowly walk towards the bumper of the car, it should be silent when you are no where near
When it detects an object near it'll start to bleed
When you are very close it should turn into a consistent beep
Your little dash will go from green - amber - red and it works!
So All the tools are away - the car back together - the kit works - Happy days!
Enjoy!!
I hope this guide has been detailed, helpful and fun!
Comments - Feedback - Information you'd like to post stick below!
I will try and do a video at some point for all of you to see
Ziggy