Picture the scene - you get in, twist the key, and the instrument panel flickers and dies. Frustrated, you switch the key off, open the bonnet and you hear a gentle rustling - then a vroom vrOOOOoooom vrooooo... the radiator fan speeding up and slowing down over and over again - even though the key is off. You switch the key on and a relay behind the battery goes tickatickatickaticka... your Stilo is haunted! The door closes with a long drawn-out creeeeeak...
Ok, so the last bit isn't true, but if the rest sounds familiar, you might be facing a water-soaked fusebox. Fortunately, this wasn't my car!")
In this case it was due to someone cleaning up after a Selespeed 'accident' (overfilled? needs bleeding?) but it could easily happen if someone power-washes the engine bay - or the battery cover is missing and you drive through a flood.
Photos apply to an Abarth Selespeed model. The first step is to remove the battery, then undo the main ring terminal on the side of the fusebox. You'll need a 10mm deep socket for this. Then spread apart the side supports, and lift the fusebox to release the plugs. Two have coloured levers that must be raised and rotated. The other three have side clips to squeeze. The plugs are all 'keyed' so they can only go back on one way - they cannot be muddled up.
It's a good sign when water pours out of one corner as you remove the fusebox. Then you know you're onto something
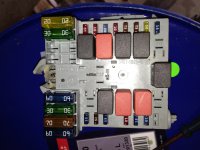
Next take a photo with all the fuses and relays in place. This is very important for later reference.
(Continued on next page...)
Ok, so the last bit isn't true, but if the rest sounds familiar, you might be facing a water-soaked fusebox. Fortunately, this wasn't my car!
In this case it was due to someone cleaning up after a Selespeed 'accident' (overfilled? needs bleeding?) but it could easily happen if someone power-washes the engine bay - or the battery cover is missing and you drive through a flood.
Photos apply to an Abarth Selespeed model. The first step is to remove the battery, then undo the main ring terminal on the side of the fusebox. You'll need a 10mm deep socket for this. Then spread apart the side supports, and lift the fusebox to release the plugs. Two have coloured levers that must be raised and rotated. The other three have side clips to squeeze. The plugs are all 'keyed' so they can only go back on one way - they cannot be muddled up.
It's a good sign when water pours out of one corner as you remove the fusebox. Then you know you're onto something
Next take a photo with all the fuses and relays in place. This is very important for later reference.
(Continued on next page...)
Disassembly
Work around the edges of the grey plastic frame, releasing the clips. Work on a table (or a clean surface - today I used the top of a new oil drum - it has a useful rim around the edge to catch any bits that might fall out).
Separate the front and back. Some small electrical terminals might fall out, or might be left in the front plastic. Do not be alarmed - it is easy to work out where they go later.
Most of the terminals will be attached to the 'cards' you find inside. It's now time to pull these terminals off, using an appropriate pair of pliers. There are four types:
- small, for the tiny fuses around the edges
- medium, double-ended spade socket - for some of the relay pins
- medium, one spade and one squared-off socket - for the rest of the relay pins
- large, copper, double-ended spade socket - for the large maxi-fuses
Again it helps to take a photo, to note later which way around the terminals go. I have a photo which I will try and attach (I can only attach one photo at a time - I'm writing this on an iPhone - so I will post photos as comments below).
With all the terminals pulled off, you're now ready to separate the layers. They come apart easily. Each has pins that extend through to the sockets on the back and also to the front where you pulled the terminals off.
Cleaning and reassembly
I used a scrubbing brush and hand cleaner, washed off with hot water, and then compressed air to dry each part.
You might alternatively use a brake cleaner spray can, particularly if you don't have compressed air handy. The brake cleaner will help to disperse and evaporate the water that you're trying to remove.
It is probably not a good idea to force-dry the cards by heating. If you do, be fairly gentle with a heat gun - no open flames! - and no, putting them in the dishwasher is probably not a good idea... well, all right, maybe the top rack - just as long as they can't fall on the element
But definitely don't dry the parts in the oven... and not in the microwave either. You will notice that each card has a number. There are four layers in total, including the grey back part.
Be careful that the bars at the edges of some cards are kept concentric (should not touch) - make sure each card is pressed down fully before adding the next.
Now it is time to refit the electrical terminals. This only takes a few minutes - but then you realise there aren't enough terminals to push onto all the spades
Don't worry, you haven't lost any (unless you actually have...!) - they weren't all there to begin with. You need to refer back to your first photo and only refit the terminals where there were actually fuses or relays fitted.Make sure the large copper terminals go on the same way as before - otherwise, the maxi-fuses won't engage with them (don't ask how I know this) :bang:
Each relay has one type of terminal for the pins that face one way, and the other type of terminal for the pins at 90 degrees. Please see the photos below (or the ones you took before you pulled off the terminals...)
The final step is to carefully refit the front - guiding the terminals into their slots - you might need a narrow screwdriver to gently help the smaller terminals into place.
Snap the two plastic halves together as tightly as you can.
Re-install the fuses and relays (easy when you have a photo; see photos below as well. What did we do before the days of digital cameras... wait an hour for the film to be processed?
)Re-install the fusebox in the car. Make sure the red wire hasn't come out of the middle plug on the back - its crimp wasn't the best on the subject car and it had to be re-done.
That's it - pretty simple, but satisfying when all of those confusing symptoms disappear - the Selespeed pump comes back to life - and no more flat battery overnight, I hope.