First thing I'll get out the way is that I'm not the first person to undertake this modification - Clock34 carried this out on his Stilo with success. Unfortunately when his Stilo died on him the opportunity arose for me to purchase what he had for the conversion and I have now successfuly done it to my 1.2!
Overall this conversion is not difficult at all to carry out, the "hard" part is having the patience to take the dashboard and dash frame out - the hardest part really is removing those pesky coolant hoses from the heater matrix in the engine bay!
The main part of this conversion is swapping the heater matrix and wiring loom behind the dashboard in your Stilo (hence removing the dashboard) for one off of a Stilo Selespeed Abarth. The reason, or rather the necessity for swapping the looms is that the SS loom contains the wiring for the Connect Nav headunit and the digital climate control, apart from these two things BOTH WIRING LOOMS ARE EXACTLY THE SAME. Although if your Stilo has ESP as standard - like the 1.8 for example - then the SS loom will also have this included for you in its wiring loom so you can connect them up. These wiring plugs can be ignored on models without ESP as standard - the car will just ignore them as well")
That's the background info on this conversion, now we're ready to go onto the next step...
Overall this conversion is not difficult at all to carry out, the "hard" part is having the patience to take the dashboard and dash frame out - the hardest part really is removing those pesky coolant hoses from the heater matrix in the engine bay!
The main part of this conversion is swapping the heater matrix and wiring loom behind the dashboard in your Stilo (hence removing the dashboard) for one off of a Stilo Selespeed Abarth. The reason, or rather the necessity for swapping the looms is that the SS loom contains the wiring for the Connect Nav headunit and the digital climate control, apart from these two things BOTH WIRING LOOMS ARE EXACTLY THE SAME. Although if your Stilo has ESP as standard - like the 1.8 for example - then the SS loom will also have this included for you in its wiring loom so you can connect them up. These wiring plugs can be ignored on models without ESP as standard - the car will just ignore them as well
That's the background info on this conversion, now we're ready to go onto the next step...
What You'll Need
First thing you'll need to do before tearing into that dash is search for a Selespeed Stilo breaking for spares, local to you preferred, probably
Got one close to you breaking? BINGO!
So this is what you'll need then:
- Digital heater matrix
- Dashboard wiring loom
- Digital climate controller
- Connect Nav unit
- White dash clocks (optional )
- Steering wheel with (11) buttons, clock spring as well
You could take the entire stalk assembly off the Selespeed Stilo if you want so that you have the cruise control stalk as well, this needs to be hardwired to your engine node seperately however and will not be covered in this guide.
As most of the work is in removing interior stuff, the tools required are not exhaustive:
- Torx keys
- Allen keys
- Screwdriver bits
- Ratchet - for dash frame and steering wheel only
One thing to do before I forget about it later one - drain your coolant out the system and unplug the two coolant pipes from the heater matrix. You will see these behind the ECU on the bulkhead, they're right next to each other. Don't want to yank these apart still attatched to the heater matrix when you try and remove it!
Right so with that out the way, let's get crackin' with this swap then eh?
First Step: Remove the interior
All the dash interior needs to come out here
There are guides up here for removing the glovebox, steering collumn shroud and dash clocks - take a look at them for guidance. Have a look at some of these guides:- https://www.fiatforum.com/stilo-guides/118251-changing-heater-panel-light-bulbs.html
- https://www.fiatforum.com/stilo-gui...it-central-heater-vent-side-heater-vents.html
- https://www.fiatforum.com/stilo-guides/293133-retrofit-steering-wheel-buttons.html
- https://www.fiatforum.com/stilo-guides/96473-fitting-new-dials-cluster.html
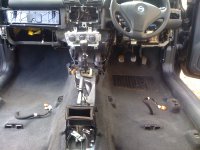
Right so once you've removed your interior bits leaving nothing but the dash frame you should have something like this:
.JPG")
Got your Stilo interior looking like this yet? EXCELLENT! Next please...
The Wiring Loom
Now you can see from the above attatchment the wiring loom that we;ve been trying to get to. Start from the passenger side and unplug everything from it necessary to get it out the car. There will be a couple of earthing points around the bottom of the heater matrix bolted in, simply unbolt these and they're free. One wiring plug comes out from the Airbag ECU as well so unplug that one! Got everything unplugged from it now? Pull it out and put it to one side, or spread it out on the floor and have a right good look at it. What you should have is something very similar, if not the exact same as this:

This is the entire dash loom. The next few pictures show - from passenger side to drivers side - what each plug is for.
This is the plug for the door speakers and other electrical things, the black plug you unplugged this from goes down under the kick panel. The one wrrapped in yellow is for thepassenger airbag switch, yep I ripped mine of (accidently).

These plugs sit above the glovebox and can be seen when you pull the little flap down inside it. The yellow one is for the passenger airbag and the white one is for the glovebox light.

These are the connections that go into the back of your (old) headunit.

This is the plug for the hazard warning light switch.

These are the earth points and the (green) wiring plug from the airbag ECU.

At the bottom of the picture are the wiring plugs for the stalk assembly and ignition barrell. The one at the top of the picture goes into the back of the dash clocks. The Selespeed wiring loom will have an extra (grey) wiring plug as its dash clocks take two wiring plugs, so just ignore that one

These three all connect into the fusebox by the drivers right knee.

Now the last collection of wiring plugs. The small grey one is for the light and menu button switches, the small black one is the radio antenna. Not sure what the other two white ones are, but the Selespeed wiring loom replaces them anyway so no need to worry

Right so that's a breakdown of the dash wiring loom in your Stilo, well it's now out your Stilo so let's do the next thing and get the dash frame out!
Firstly you'll need to unbolt the steering collumn from the frame. It is held on by four allen bolts from underneath it. Be careful when the last one comes undone as the steering collumn is bloody heavy! It's also wise to remove the interior fusebox and wiring plugs from it to give yourself more room, it needs to be removed from the dash frame anyway so it cane come out.
Now, you will have a silver bolt like this at either end:

Unbolt these with your ratchet, lastly there will be metal supports attatched to it either side of the heater matrix at the front. These are held in with allen bolts and come out easily. Once the supports are free from the dash frame it is ready to come out! It's pretty light so it's not too difficult to remove, I'd suggest putting the car in second gear so that there is enough room to move the heater matrix out with the dash frame.
Once the dash frame is outside the car, unbolt the heater matrix from it. It is held to it by three allen bolts from INSIDE the dash frame. The matrix should come out without a fuss.
Now your interior should look like this:

Now you should give yourself a big pat on the back for getting to this point :slayer: I'm sure you've probably swore a few times getting here but all we got to do now is refit everything in reverse, but with new goodies included
Go make yourself a cup of tea, or as I would do - have a vodka Red Bull - and I'll join you on the next page Fitting the new loom and connecting everything up
Right so dash/ dash frame is out along with that stinking old analog heater matrix. Now it's time to fit the digital one in its place! Fitment is the exact same as removal except without the dash frame attatched to it. Firstly make sure the two metal pipes at the back of the matrix line up with the grommets in the bulkhead and then push the matrix in and line it up! Don't worry about fitting it to the dash frame form the inside - once it's all back in place it's more than secure in the frame.
Now you will see in the passenger footwell a white wiring plug coming from the bulkhead near the brake servo, this connects to the white plug on the heater matrix a shown:
.jpg")
The blue circled wiring plug is for the heat sensor mentioned earlier in the guide.
Now it's time to fit the dash frame back in over the top! Same procedure as before, I started with the two bolts at either side and then bolted up the supports either side of the heater matrix. It's a good idea now as well to connect in the heat sensor and feed it up to the top of the dash frame before you lose it when the dash goes back on top!
So now the dash frame is back in, time to get the Selespeed wiring loom out! Start from the passenger side as it's a bit less chaotic there. Feed the yellow passenger airbag plug and the glove box light down the little hole where the upper glovebox would be. It's a good idea to use the hose where the black wiring loom clips go as a guide, if your Selespeed loom still has them on it then these will clip in exactly where your old wiring loom went! If you've clipped everything in the right place and fed the loom to the right locations then this is how it should look:
.JPG")
I've already connected up the stalks, dash clocks, and steering wheel, just to guage how it all connects up. But make sure the dash loom is clipped in place. Next thing to do is connect everything back onto the interior fusebox and refit it to the dash frame. Now you can also reconnect the radio antenna at the drivers side and the two white plugs that are there also - there are white slide-on clips on the dash frame for them to sit on.
You will see you have these two extra wiring connections in this area also:
.JPG")
The grey one is for the sat nav's GPS reciever and the green one is for the sat nav microphone - for using it's phone function :slayer: We can ignore these for the moment. Once the fusebox and connections for it are back in we can fit the dashboard over the top! Dashboard fitting is the reverse of before - slide it in so the windscreen part clips in then drop it into place at the front and line it up! Then just bolt in the rubber padded allen bolts for it and job done
Right so now all the hard stuff is out the way - we've had the full dash out and put the digital heater matrix and Selespeed dash loom inplace of the old one and refitted the dash frame and dashboard. Now we are on the home stretch! Have another cuppa and go to the next page to finish of this bad ass conversion! :slayer:
Final Part: Refitting the interior and digital climate controller and Connect Nav
So if you've done everyting right so far and have the loom in the right place then this part is going to be a walk in the park! All you have to do now is fit in your Connect Nav and digital heater controller. The new stalk assembly (or old one if you didn't bother
) can slide on along with the clock spring/ steering wheel.There are four wiring plugs for the digital heater controler - black, blue, brown and white. All of them plug into the back of the controller and it is pretty obvious where they go on it, the white plug plugs in here on the dash loom:
.JPG")
This is the power feed for the climate controller, you don't plug this in it won't power up!
All the connections for the Connect Nav are in a bundle and they all connect up as they should no problem, once they are connected just slide the Nav into the cage in the dash.
Refitting the stalks is the reverse of removal, just tighten up the jubilee.
Clip the new clock spring to the new steering wheel and slide it onto the steering collumn, plug in the wiring plug on the bottom of the clock spring (for steering wheel buttons to work!). Connect everything back up to the stalks and ignition barrell, not forgetting the ignition barrell antenna!
Then refit the airbag into the steering wheel, not forgetting the yellow and green connectors for it.
That should be you pretty much ready to try it out! Connect up your battery and then switch on the ignition. What happens?? Does the Connect Nav boot up? Does the digital climate controller light up too? If so then you have done it!! You should have something like this:
.JPG")
Well done to you if you have!
:slayer:Have a play with the climate controll, adjust the fan speed and see if it responds, it should all be working as it should. Last thing to do before starting your Stilo up again is to clip the hoses back into the heater matrix in the engine bay and fill up with coolant. Now try and get some hot air in there!
There will be one wiring plug left over from this though and that's the ESP - if your Stilo doesn't have it that is. Here's where the extra wiring plug is:
.JPG")
Last Words
That should round everything off for this conversion, I've tried to describeeverything as well as I could due to a lack of pictures, but as long as you take pictures of where everything goes for the dash loom then you'll be fine. It becomes obvious where everything goes once the loom is clipped into plce though. Also, if you don't have the four digit security number for your Stilo then you won't be able to use the Connect Nav. You can give me an PM and I could email you the firmware updrate 9.8 for it which if you install it will eradicate the need to enter the four digit code
One last thing you'll need to do if everything is powering up and working correctly is to plug in an ELM327 or KKL and carry out the "proxy allignment" procedure. This is needed so that the mileage stops flashing, but it is not necessary to make the Connect Nav or climate control work
Enjoy the new toys at your disposal in your lovely Abarth'd Stilo :slayer:
-Mark