1x feeler Gauge
1x 16mm Spark Plug Socket
1x Extension Bar (Longer the better 150mm is probably best)
1x Suitable Ratchet for the Extension bar / Socket
1x Wire Brush / Wire Wheel
1x 10mm Socket Set
Can be handy but not needed - HT lead pliers
Torque wrench
1x 16mm Spark Plug Socket
1x Extension Bar (Longer the better 150mm is probably best)
1x Suitable Ratchet for the Extension bar / Socket
1x Wire Brush / Wire Wheel
1x 10mm Socket Set
Can be handy but not needed - HT lead pliers
Torque wrench
Getting Started
1 - Secure Car, so handbrake on nice and tight
2 - Raise and secure bonnet
3 - Remove Air box, retaining Spring, Extension pipe
Now you should be able see alot clearer
Locate all 4 HT leads fro all 4 cylinders. (Struggling? look at your coil packs and follow the wires)
4 - Remove the HT leads
5 - Using the correct Socket - Remove the Spark plugs (No1 = cambelt Side)
They can be tight and be a swine to remove No1 and 4 are the easiest
cylinders 2 and 3 are at slight angles, note the slight marking on the inlet manifold
Keep these in order as they help provide a useful diagnostic
")
With them all removed and free - you should have all 4 in your hand

Diagnosing your plugs
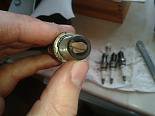
Look at the Hook on each plug and note the colour

The camera doesn't show it here - but my example here is a chocolate brown colour, which is a good sign
If its
White / Ash coloured - Its Burning lean - ie Not enough fuel, too much air
If its Just black / powder like / Dry - Its carbon, probably from short runs and not getting fully warm or you have a problem with fuel mixtures (usually carb engines)
If its Brown - Thats a good sign, A Chocolate like brown indicates a good running engine
If its Caked in black sludge / wet - Thats Oil been burnt, Not a good sign im afraid, you will need to consider further diagnostics
oil been burnt is - Worn Piston rings or bores - Worn valve guides or seals - Turbo seals blowing oil in
If the points are damaged or broken then there is lots of questions to be asked
I found this Handy little illustration off the good old web
it helps diagnose what you need to see - or not seing
The rights of the Attached link - remain with the original owner
http://www.ntractorclub.com/howtos/pdfs/Spark-Plug-Diagnostic-Chart.pdf
If you have different plugs - its advised to replace and have the same plug style and type, but if it works - the motto dont fix what aint broke comes to mind
All 4 of mine were a nice brown colour - so i checked the gap
Even if you are replacing the spark plugs - you still need to check the gap, they say they come pre-set
but dont hold your breathe, it can come a little out still
Checking the Gap Setting
For the 8v
Ye olde Haynes to the rescue
NGK / Fiat Plugs are 0.9mm Gap
Bosch are 0.8mm
I believe Champion plugs are same as Bosch - but i have no reference to confirm that, so a little Google you must
Mine had some okay looking NGK plugs
So i need a 0.9mm gap
So Selecting a 0.5mm and 0.4mm i get 0.9mm from the feeler gauge

place the feeler gauge between the point and hook on the spark plug - feeling for any resistance


If there is none - the gap is too big
if its resistive, the gap is too small
You want to feel a slither of resistance, ie some resistance but still free to move
If you need to close the gap - then i normally push on a flat solid surface
to extend i bend the hook against itself, not easily done
Avoid making contact with the tip - if you break a tip or a hook - bin it - get a new one
Cleaning
As you can see the threads weren't clean and No'1s body wasn't in good condition
Simple i use a thin wired - wire brush and cleaned any rust / dirt / grime and the spark plug to a new looking plug status, don't worry you don't have to get it all off
Anyway once its all nice and clean, your ready to refit
If you've got nice shiny new plugs - Then no cleaning is needed, but ensure you have checked the gap
Refitting
If your fitting new - doesn't matter what order they go back
For me - i refitted my plugs back where the came from
So no1 went back to no1's spot
DON'T drop the plugs into the holes, you risk damaging the thread and making a mess and trouble for yourself
Feel the plugs in by HAND ONLY with the extension bar, if you use a air powered or electric powered gun, you risk mashing the threads if it decides to cross thread
You should be able to get the plugs in nice and easily by hand till its nearly down
If you put it in - and get 1 turn and its stuck - DON'T FORCE IT
Remove and refit you should be able to get 75% the way down without a Ratchet
Once all plugs are in - Tighten the plugs down
IF you have a torque wrench, Haynes states 25nm
if you don't have a torque wrench, then when they hit tight - you put a little bit more pressure on to ensure its secure and wont come out
Once all plugs are fitted - refit the HT leads
If your doing the plugs because of a misfire, then its advised you replace the HT' leads, eliminate them as a possible cause with the new plugs
Finishing Up
Refit the Air box making sure the breather pipe is also refitted to the bottom of the air box
Start the engine, listen and feel for rough running, if it sounds rough / shakes a lot, your misfiring, check the HT leads are secure with the engine switched off
The coils fire at thousands of volts - it HURTS when one hits you
Hopefully you wont have a misfire and it purrs like it should
Disclaimer
This guide is marked as a 3 difficulty - why? the first time i did the plugs i struggled due to poor extensions and been my first time, i struggled to get the plugs back in
After doing it several times its a nice and easy 1 / 2 for me
This is a guide on what i did to Clean and gap my plugs
I will not take any responsibility for anything you do that results in any damage or injury
If you are unsure about your abilities seek professional help
Remember your work is your own work
This is just a guide on what ive done
I hope this guide has helped
Any questions - post in the relevant punto sections and hopefully we will be able to guide you best direction
Ziggy