Tools you will need
- 10mm socket and ratchet
- Long nose pliers
- Fuel filter. Although similar in shape and size there are specific ones to your model. Order through a Fiat garage or a trusted Specialist.
- You are going to be uncovering the top of your engine. Be careful not to disturb any wires or pipes otherwise you may have more issues than you started with!
- Always be careful not to drop any nuts/washers/tools into the engine bay. There are uncovered belts and pulleys, plus if you have an undertray you may not be able to get whatever you dropped back!
- You will be working with diesel fuel. It's pretty horrible stuff. Wear latex gloves and barrier cream unless your wife or husband enjoy the smell of diesel... for the next week.
Getting Access

Well from here it's difficult to even see where the fuel filter is. First things first. Lets get clear of that plastic cover. 4x nuts to undo with your 10mm socket. Put the nuts somewhere safe and if you can remove the washers too.

Around the oil filler cap is a rubber drip catcher. It's best to remove this if you haven't removed all the washers otherwise when the engine cover pops off it will send the washers all over.
Put the oil filler cap back on to stop debris getting into the engine.

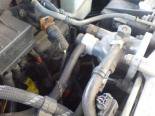
Pipes and Wires
You now need to remove the pipes and wires blocking access to the fuel filter. Make sure you record which wire and pipe goes where.
The 2 wires connecting to the fuel heater housing are simple cliped connectors. The orange connector requires the metal clip to be removed. A pair of long nose pliers is ideal. The two pipes marked simply slide off.

Removing the filter
Ok now for the hard part. Get your hands in there and unscrew the filter. Remember to turn it clockwise to remove it. I got confused which way to turn it and managed to tighten it about 16th turn.. Which made things just that bit harder to remove. You may want to put some rags or kitchen roll down the back of the engine to catch any spilt diesel.

Once it's removed. Feed the filter along under the fuel feed/return pipes and out next to the brake reservoir.
You should now have the filter out to compare with the one you have bought. Make sure all the rubber seals (2) are there on both. If the one you removed is missing one check inside the filter housing.

Refitting
Smear a bit of diesel (can get some from the old fuel filter) around the 2 rubber washers. This allows you to tighten the seals up properly. Check the drain plug is fully tightened into the bottom of the filter.
Feed the filter bottom first the same way you removed the old filter. Screw the filter into its housing being very careful not to cross thread. I suggest spinning it a few times clockwise to find the start of the thread before tightening anti-clockwise. The filter should be tight upto the housing. If you have a good grip as tight as you can. If not use a filter wrench or 'boa' type fastener.
Re-connect the wires and pipes. You did mark where each one goes now didn't you?

The filter is now ready to go.
Priming
The JTD130 is fitted with 2 fuel pumps, one low pressure in the fuel tank and one high pressure on the back of the engine. This means you don't have to mess around pre-filling the filter. Turn the ignition on and listen to the filter. You should hear bubbling as fuel is fed into the filter and air returns to the tank. After a few seconds turn off the ignition. Repeat until the bubbling is gone or much reduced. This took me 5 turns of the key.
You should now be able to start the engine without issue. Let it tick over for a few minutes.
Finishing off
Turn off the engine. Have a wipe around the filter with some kitchen roll to check for leaks. If there are you need to tighten the filter more. If not you are ready to refit the engine cover. Don't forget the drip tray and washers if you removed them.
So that's the fuel filter changed. Good for another 24k!