Technical Project Little Blue - an introduction (and cry for help)

Currently reading:
Technical Project Little Blue - an introduction (and cry for help)

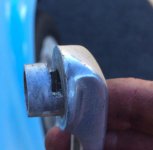
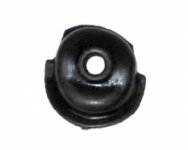
Back out fiddling with doors and windows today. I pulled off the door cards, after first removing an omega/U shaped pin from the window winder handle. Oddly enough when I look at the replacement pins for a D, they're more of a solid U shaped piece than a pin
http://www.passione500.it/chiavetta...n-d-giard?keyword=window spring&category_id=0

I cannot for the life of me see how that would work in my winder handle.
Also how does one squeeze a new Pin in there if you go the conventional 'modern' system!? it's a tiny space...

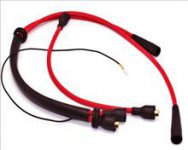
The driver's door handle is very wobbly, and turns out there's a spring on the inside of the external handle that has broken. Another thing on the fix list.

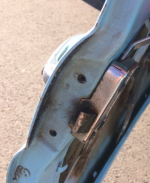
While playing around I noticed two holes on the inside of the door, obviously screw holes, but I can't work out what goes in there. I'm pondering some kind of strike plate, but whatever it is, isn't there now, hasn't been for a while and so I'm wondering what the use is?

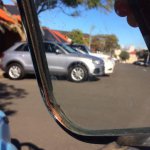
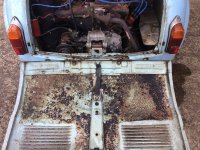
Sadly my quarter window is a bit of a disaster on the driver's side. I've been reading a bit about them and corrosion in that front corner seems common. It seems to have pushed the glass out, to the point that the glass actually strikes the upright between the 1/4 and full windows, and won't shut properly.

My plan is to slide the glass out and remove the corrosion, then see if I can reinsert the glass with a sealer of some kind. I know new frames are available but it seems the quality/fit is potentially a bit rubbish. Unfortunately I can't for the life of me get the glass out! It hasn't been sealed in as the cloth style gaskets are still in there - is there anything I should be loosening to remove it?


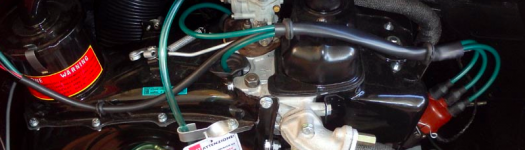
Playing around I also removed the rocker cover. Going to have to work out this valve clearance thing, but will await my new exhaust gear and rocker gasket too... it looks like I'll need a special tool to get that precise tiny measurement correct?
 

Attachments

  • Screen Shot 2017-08-09 at 15.46.22.jpg
    Screen Shot 2017-08-09 at 15.46.22.jpg
    25.3 KB · Views: 19
  • Screen Shot 2017-08-09 at 15.46.31.png
    Screen Shot 2017-08-09 at 15.46.31.png
    305.5 KB · Views: 25
  • Screen Shot 2017-08-09 at 15.46.40.jpg
    Screen Shot 2017-08-09 at 15.46.40.jpg
    34.3 KB · Views: 22
The only things I can comment on from experience are that you simply fit the omega clip to the handle fully then push the handle firmly back on the spline until it clicks. The clearance on the tappets is measured using a set of feeler gauges, which can be bought cheaply on eBay or any car accessory shop. You can buy an adjustment tool for the nuts but I use an 11mm ring spanner and a tiny adjustable. The quarter lights scare me. ?
 
the holes in the doors are for strike plates.. they stop the door smashing into the opening when you close them....

http://www.passione500.it/maniglier...of-strike-plate-fiat-500-n-d-giardiniera.html

1/4 frames..... yes replacements are dubious quality....
but messing around with corroded ones... you may break the glass trying to get the glass out the frame...
I'd buy the best you can... compare them with the originals before gently grinding the old frame to remove it,
are you taking the whole 1/4 window out with the outer frame or just the 1/4 glass and surround?
you may be better to remove the whole frame...
the seals are a fabric type and a pain to put in.. i think people on here have tried may different ways... they are pressed back in.... you can make a sort of box frame to keep everything in place and use a B&D workmate to press them in. the frames can open up if not done right...
Some people i have heard use a silkaflex type sealer and put the glass in like that and trim the excess sealer off when cured... as no pressure needs to be applied.
 
Hi,
Going back a bit in the thread to your wobblydistributor cap issue. The caps normally have a lug moulded in the inside ifthe rim that engages with a notch in the top of the distributor to make sureit’s in the correct position. You rotated the cap to get correct ignition. It’spossible you have a double cross, both leads and cap reversed. Try rotating thecap back 180 degrees and see if it fits properly. If it does, swap the coilleads over and give it a try. I’ve never seen a gasket or o-ring under adistributor cap.
Robert G8RPI
 
Wow, Thanks guys.
I was fiddling with the distributor today. g8rpi your double cross comment makes sense! as the leads had popped off during shipping... I'll give that a go.


Ah and so window winder clips go in first! that's much easier, phew, an easy job!
Also found some feeler gauges on ebay for a bargain, and I'll see how I go with the valve clearances. Plan was to follow Toshi's guide here
https://www.fiatforum.com/500-classic/341467-valve-clearances.html?341467=#post3395963
And from memory in the guide it's 0.15mm
Though I'm not sure which bit I adjust with my spanner, I will find out.


The windows. Well I was just planning to tackle the 1/4 one.
The plan was to leave the frame in, and just slide the glass out...
With the glass out, address the rust that was in there, then slide the glass back in, and seal it
Unfortunately the glass seems pretty stuck, and I was wondering if it was fixed anywhere that I needed to pull out / unscrew or if it's just wedged in tight over time...
I feel like with some patience I can sort this out, but it also seems like a task that many avoid for as long as possible... :(
 
The 1/4 light windows were easily the most horrid job.
Glass is held in originally with a thin rubber gasket sandwiched around the glass. A brave man tries to pull them out expecting to be able to reinsert glass...
 
I think I got lucky today. Not meaning to tackle the window at all, I just couldn't help myself. Sprayed a little WD40 along the gasket/glass boundary and with a lot of patience managed to wiggle the glass out of place. The front corner was where all the damage was, but it was surprisingly not as corroded as I thought.

What had actually caused the trouble was the gasket swelling and corroding, and so with the glass out, I could get behind it with a small flat screwdriver and remove it all. What was left, after a bit of sanding, was a frame in reasonable condition. I was then able to slide back in the top and bottom portions of the gasket, and pop the glass back in. It's not fixed yet, I'll have to sand the inside of the frame a little more and do some rust converter, then either fit a new gasket or use a windscreen sealer.... undecided yet which I should do - any opinions?

I'll be hitting the engine bay soon, which is a mess. The ignition leads are all hanging loose and I think there was an oil explosion or something in the past!

I'm looking to bind the leads together with something like this picture - any thoughts on where I could find something like that?
I also note some sort of cover over the spark plug hole, which I'm lacking, and wonder if I should get one!
 

Attachments

  • Screen Shot 2017-08-10 at 19.24.51.png
    Screen Shot 2017-08-10 at 19.24.51.png
    341.2 KB · Views: 24
Last edited:
Thanks Hugh, sparky covers on my shopping list now.

Actually recall now seeing some cable shrink wraps in the auto store. They look like they'd do something similar though not sure they'd be up for a bit of 500 engine bay heat!
 
A good way of keeping the ignition leads neat and tidy is to use the type of cable sleeving that has a split down the middle. You open up the split to insert the cable and then it shuts and looks like it is a complete shield--if you understand what I mean. I would recommend that you fit the spark-plug collars, they stop cooling air leaking out prior to doing its job.
At the time I built up my 1/4 lights I was helping out a friend of mine who is the service-manager of a local M/Benz dealership (when we lived in Felixstowe) as a 'can you help me out--please' col/del driver--(supposed to be 'just a couple of weeks', lasted 9 months and only finished when Ann decided we were moving north!). As a result, I was allowed to use workshop facilities (well I did help set the branch up from scratch!) so used black wind-screen' goo to seal the glass into the frame. It was a bit of a faff making sure that the glass stayed in the middle of the frame as it went off overnight, but with a bit of careful cleaning up, well worth the effort. A tip---before you 'cast it in goo', make sure that the glass goes into the frame enough that you have no problem shutting the 1/4 light in the 1/4 light outside frame---it is not unknown for the top pivot retaining rivets to protrude too far into the frame, therefore preventing the glass from fitting correctly.
thumb.gif
smile.gif
 
It was a bit of a faff making sure that the glass stayed in the middle of the frame as it went off overnight, but with a bit of careful cleaning up, well worth the effort. A tip---before you 'cast it in goo', make sure that the glass goes into the frame enough that you have no problem shutting the 1/4 light in the 1/4 light outside frame---it is not unknown for the top pivot retaining rivets to protrude too far into the frame, therefore preventing the glass from fitting correctly.

Genius, I hadn't thought of that. Of course the glass will sink into the goo! Given that, I'm now wondering, as the existing gasket is actually in fair condition along the top and bottom, if I might just keep that, and goo the front corner and edges of the old gasket. The replacement gasket stuff looks pretty ordinary, comes in a roll (?!).

I can only seem to find corrugated split cable sleeves, in a plastic. Definitely something I need to be doing though, as I noticed one of the leads has the start of some melting around the edge!
 
Quick Q - does anyone have any experience with these rubber seals that run down the sides along the top, from the sunroof to boot? I've just realised someone has sadly done a poor spray job at some point in the past, and just gone straight over the top of these seals.

Thinking of removing them and stripping the paint off them chemically, then returning to the car, but they seem pretty stiff and I hesitate to commit myself to a load of unnecessary stress if they're known to be very difficult to get back in?

tettonta-500x500.jpg
 
Quick Q - does anyone have any experience with these rubber seals that run down the sides along the top, from the sunroof to boot?
tettonta-500x500.jpg

if i remember (not near a car....) they are nothing special, just a panel to panel piping (wing piping)... in the UK there are lots of suppliers "Woolies" for example.. not expensive beats faffing about..
http://www.woolies-trim.co.uk/c-348-wing-piping.aspx
if you decide to take it out.. find a shop selling it first so you can take a sample along or you may find it breaks up when you take it out.... i think it has been there a few years....

Be aware I think if you undo the bolts for loosening the hardtop if you don't use a magnetic socket you can lose the bolts..
and the bolts may go through the piping... so it may be a bigger job taking the roof almost off..
then you would probably need some sealer ......
a little job just gets bigger.....
 
Last edited:
:) still lobbying for the hard top to come of eh!

Passione sell the rubber strips, but the aim is to keep as much of the old stuff there as possible. It does look like a simple piping, but famous last words...
 
:) still lobbying for the hard top to come of eh!
...

nope... that's a way off.. just want you driving it... so only do what you need to do to get it going reliably and safely...
cosmetics you can do as and when...
Roof off 12 months away at least.. over the cold months when you have lots of time...
over painted roof piping is not going to make it go any better or stop any better...
does it leak... well I believe some on here advocate "If it ain't broke don't fix it", and I agree..
 
The delay on parts is bordering on ridiculous, so I'm left playing with cosmetics. There's plenty of it to do so I'm not complaining too much...

This engine lid is a disaster but I'm wondering if anyone has any ideas what has happened here. There's an almost tar like black substance around the paint, in a very clearly delineated 'T' shape pattern. I'm wondering if there was some sort of heat insulating panel there, and the engine has basically melted it - any thoughts?

Essentially I'm wondering if this inner part of the lid was originally just paint on primer, and that's what I should be working to get it back to, or if there was something else there that I should have in mind?
 

Attachments

  • IMG_1899.JPG
    IMG_1899.JPG
    547.2 KB · Views: 31
Could it be 'antirombo' ; sound deadening paint that they used to put on these cars?
 
ALmost wonder if it's something like that. Or a fire retardant spray. Having googled a bunch of pictures of 500 engine bays, it looks like taking it back and repriming it is going to be the first step :(
 
Sigh I hope someone can help.

Council has said they'll impound my little blue if I don't move it. I don't have a garage and do all my work on the street. Which means getting it registered asap, so I started it up, it idled beautifully for a good 10 mins then drove it 50m down the road then it spluttered and died. I thought it was out d fuel as the fuel light had been on a while.

Topped it up but now she won't start. All I have done since yesterday when it started was remove the ignition leads and put a sleeve over them then put them back. Is there any way to test where I've messed up, and if I'm getting a spark?

Doing all my testing connected to jumpers and other ar to rule out battery issue.

I've checked all leads are seated well and they seem fine.
Fuel is getting to the carb as it's coming out the overflow a bit.

Out of ideas :(
 
Back
Top