General Fiat 500D Engine 1962

Currently reading:
General Fiat 500D Engine 1962

One of the things my Dad first taught me in engineering was how to use a file. However now days we have air grinders, rotary sanders to play with as well. I was rather chuffed with the finished result?

When I started my apprenticeship in machanical engineering one of the training exercises in the fitting shop was to use a hacksaw to cut 1/4" from the end of an 8" diameter mild steel bar. You were only allowed one new hacksaw blade :)
 
I think you are correct about the change ability of these parts.
Mine clearly has the early flywheel, clutch plate and gearbox shaft and can only think it has been fitted with an after market diaphragm as it fits the flywheel & clutch.
The clutch plate is smaller than the later one, as is the surface area on the flywheel.
So the only way to upgrade to the later clutch is to fit the later 20 spline shafts, later flywheel & clutch assembly. As long as it all fits within the bell housing then it should provide a smoother clutch than the original.

Forgot to mention that if you need the finer spline shaft I have got a few 500 & 126 gearboxes plus a lot of parts.
 
When I started my apprenticeship in machanical engineering one of the training exercises in the fitting shop was to use a hacksaw to cut 1/4" from the end of an 8" diameter mild steel bar. You were only allowed one new hacksaw blade :)


That was cruel. A bit like being asked to go to the stores to ask for a left handed screwdriver or a long weight (wait).[emoji15]
 
You forgot to mention that other essential from the stores, the sky hooks. You are stirring memories from those days now as I realise that I have still got my 6 tokens that were stamped with my clocking in number 224 that you had to exchange for tools taken out from the stores at Wild Barfield. I went on to work at Watford Engineering where much of the machinery was still driven by overhead line shafts. My trouser belt broke one day so I went down to the stores and requisitioned a length of flat leather drive belt, swopped over the buckle and it lasted for many years. It had one interesting feature as it had "direction of rotation" embossed on the leather.
 
That was cruel. A bit like being asked to go to the stores to ask for a left handed screwdriver or a long weight (wait).[emoji15]

Late 1960's, as a 14 year old starting my first Saturday morning garage job I was sent to the stores to get new sparks for the plugs and was sent from storeman to storeman asking who was responsible for the lack of stock! Rotten bu**ers! Still, that was better than being sent for greased nuts :eek::eek:
 
My bored cylinders are back from the machine shop. The crankshaft journals have all been polished and are standard size. Unfortunately he didn't clean the block or the head - said he couldn't do it! so I need to find someone who can. The inside of the crankcase is in a right mess. The burnt oil has really stuck to every part of the block. So I think it may need vapour blasting to get clean. Has anyone ever removed the 2 end caps inside the flywheel end of the block, or the plug for the oil gallery? I'm thinking of removing them to make sure everything is clean but not sure how involved this is. Any suggestions please?
 
Cheers Peter but wrong part. It's the 2 covers for the oil galleries in the crankcase - flywheel end.

That would worry me:eek:
On the 650 I had in bits, there was a load of hardened, brown stuff on those discs that looked like it had been slopped over at the factory...drips everywhere.
At a guess I bet you could re-fit them with epoxy adhesive but won't they damage on the way out?
You can just make it out here:
MAL_1744 by Peter Thompson, on Flickr
 
That's the ones. Passione500 show them available along with the screw on plug that goes in the side of the block near the dizzy. They show them with "need welding" but presume they are glued in as mine also have sealer around them. Presumably they are an interference fit and then sealed for good measure?
 
Ehmmm I am of the opinion that removing them might give you more grief than it's worth Sean. What's behind them anyway, what's their purpose in life?
 
They are covers that block the ends of the galleries. The casing would have been drilled from this end and then they are capped off. I'm concerned that I may leave some swarf etc in the oil gallery. That won't help the engine much.
If I remove them I can make sure everything is clean before plugging them up again

Good point didn't think of that. Maybe it is good idea after all to take them off.
 
I would not remove any of the plugs in the case or crankshaft. You can flush the crank by filling from the front end of the crank.
There is no reason to remove the case plugs unless they are loose or leaking. In both the crank and engine case you would be creating more work than is necessary. Both can be flushed.
The only thing to use to blast the case is soda. Do not sandblast or bead blast. If even one piece of sand or bead is left behind it can really ruin your bearings.
After blasting with soda then thoroughly wash the case to get the soda out.

John
 
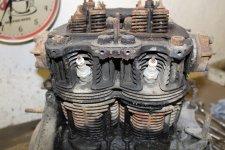
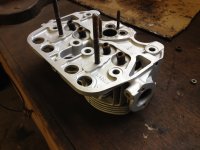
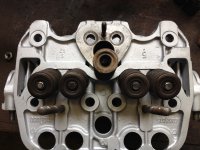
After getting my head back from the machine shop. It was time for a clean up. They had recut the valve seats, checked the guides were ok and gave the head a quick skim as it was not exactly flat. Ooh a couple of extra bhp
biggrin.gif

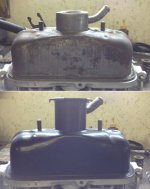
I was going to get it vapour blasted, but that was going to cost about £50 and they wanted all grease, paint and dirt removed first.
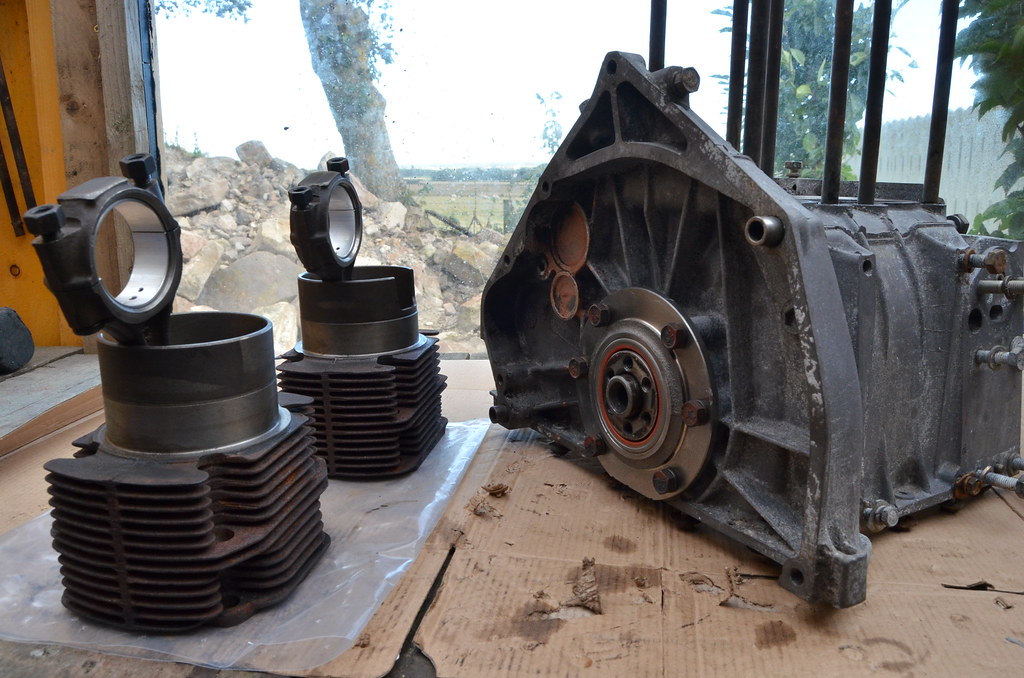
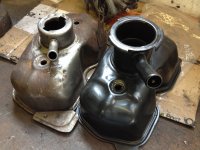
Now I like things clean but barely any of the head is on display.
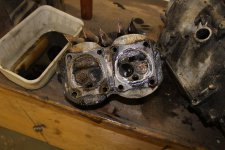
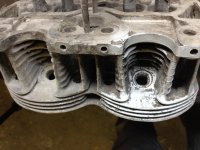
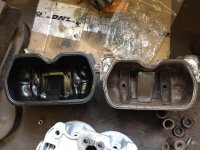
The head was in really bad condition in terms of dirt & grime. Even after a good wash in petrol/gunk remover the head had burnt on stuff of which I was not sure if it was paint, oil or dirt. All I know is it wasn't coming off.
I tried everything to remove it.
I even resorted to sandblasting. First off I covered all apertures and the valve guides with heavy duty tape so as to minimise any glass bead getting in unwanted places. It was tough going but it cleaned it quite well but really struggled in between the fins.
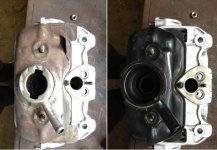
So I decided to go for using caustic soda.
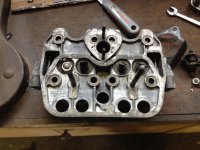
Now I know you aren't supposed to use this on aluminium, but it does work! I mixed a small amount with water and gently used it on the casing with a toothbrush. It started to dissolve the gunk, but it does cause some discolouration to the alloy surface. It basically goes a dull grey colour.
I washed it down with water. Checked it and then gave a few areas a scrape with a screwdriver to cut through the heavy stuff. Then repeated the process about 5 times. You can actually see the alloy surface fizzing away
eek.gif

Make sure you do this outside though as it does give off a harmful gas.
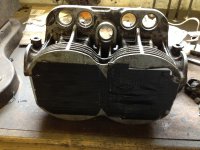
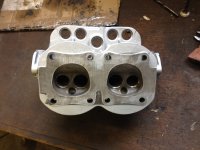
Anyway it removed 99% of the gunk and left the fins nice and clean which will help with the cooling.
I did read somewhere (maybe on this site) that it has been known to paint the heads matt black. Cant see why really.
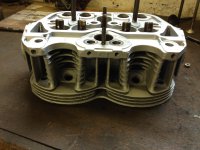
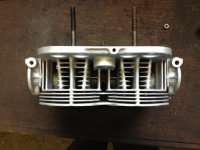
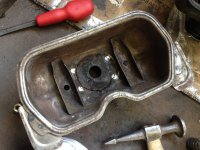
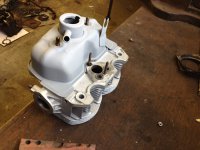
After a thorough clean with water, detergent, petrol and a good blow out with the air line it was now looking clean - a little grey but nothing a coat of high temp aluminium paint wont resolve.
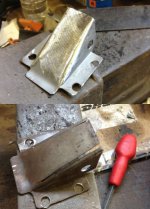
I had to remove one broken engine cowling bolt from the head, re-tap any bolt holes and run a die down the head studs for the carb and rocker shaft.
A final bit of decoking with a rotary wire brush and then a lick of paint.
I'm quite impressed with how it came out.
smile.gif

Now all I need is a couple of O-rings for the inlet valves and I can install the valves. I had 2 in bag of gaskets I had but they are too small.
 

Attachments

  • IMG_1427.JPG
    IMG_1427.JPG
    7 MB · Views: 58
  • IMG_1435.JPG
    IMG_1435.JPG
    7.6 MB · Views: 42
  • IMG_7238.JPG
    IMG_7238.JPG
    2.1 MB · Views: 61
  • IMG_7242.JPG
    IMG_7242.JPG
    2 MB · Views: 84
  • IMG_7245.JPG
    IMG_7245.JPG
    2.1 MB · Views: 81
  • IMG_7246.JPG
    IMG_7246.JPG
    2.3 MB · Views: 60
  • IMG_7250.JPG
    IMG_7250.JPG
    1.9 MB · Views: 52
  • IMG_7248.JPG
    IMG_7248.JPG
    1.9 MB · Views: 56
  • IMG_7249.JPG
    IMG_7249.JPG
    1.8 MB · Views: 37
  • IMG_7247.JPG
    IMG_7247.JPG
    1.8 MB · Views: 45
Another difference between the D and later models: the rocker cover & valve springs.
When I stripped the head it had single 26mm valve springs. I ended up using the twin 30.5mm springs from my L head. No problem there. A slight upgrade that nobody will see.
Then I came to fit the original D rocker cover. It wouldn't fit. It felt like it was hitting something. Now from the outside it looks almost identical except the filler neck is smaller in height and the cap fitting is different. I imagine this has been changed on the later ones to prevent oil leakage?
The vent pipe to the air filter is also smaller diameter.
So I checked against my original L cover.
As you can see in the inside there is a bracket that allows the oil to go in the top and restricts oil going back up to the filler neck. Very similar except the later one is fitted 180 degrees from the D model so instead of fitting between the inlet springs it sits over the rocker shaft.
Also the later one only has 38.5mm clearance between the valve springs. If I had fitted the D springs there would have been 44mm clearance. The bracket in the D was 40mm wide hence why it would not fit between the later springs. The later one was narrower and had a hole either side to allow oil through.
So out with the bracket, make 2 cuts, weld it up. A quick sand blast & thorough clean. I knocked a few dents out of the cover, and tidied up the seat of the rocker cover cap as it was a little dented. Run some weld over the surface and ground it back smooth so I would get a good seat for the cap.
Then welded the bracket back in the same way as the later one.
A coat of primer and hey presto it fits nicely.
A little more prep to do and it will be ready for painting with the rest of the parts.


Its amazing how much work goes into making things just right!
And yet it will be one of those things most people wouldn't give a second glance. But I will know!
wink.gif
 

Attachments

  • rocker cover 2.JPG
    rocker cover 2.JPG
    42.6 KB · Views: 39
  • rocker cover.JPG
    rocker cover.JPG
    61.2 KB · Views: 486
  • IMG_7257.JPG
    IMG_7257.JPG
    2 MB · Views: 31
  • IMG_7256.JPG
    IMG_7256.JPG
    2.1 MB · Views: 88
  • IMG_7251.JPG
    IMG_7251.JPG
    2.7 MB · Views: 56
  • IMG_7259.JPG
    IMG_7259.JPG
    2.2 MB · Views: 55
  • rocker cover vent.JPG
    rocker cover vent.JPG
    59 KB · Views: 107
  • IMG_7263.JPG
    IMG_7263.JPG
    2.1 MB · Views: 106
  • IMG_7266.JPG
    IMG_7266.JPG
    2 MB · Views: 80
Liking your work Sean. Wish I could weld, I will learn one day
 
Morning Sean;
Regarding 'Vapour Blasting' (aka 'Aqua-blasting), done properly, this is a very good way of cleaning parts. I have had various parts done on my engine, including a bell-housing that came up so well that my son thought I had found a new one! As far as I can see, the nearest 'vapour-blaster' to you are "TSR Vapour Blasting Services" in Sevenoaks--01732-462883 ([email protected]). They seem to specialise in engine restoration (bike and car). Another one, a bit further away in Copthorne, are:- CBX Vapour Blasting Services (01403-701111-- [email protected] ).
Hope this is of help to you.
thumb.gif
smile.gif
 
Thanks Tom,
I really did consider this after seeing some work completed by a company called Maxspeed Vapour Blasting which had a stand at the Excel Classic car show.
The downside to having the head done is that no one gets to see it.
I also read a number of posts on the internet that put me off as they say you need to protect the alloy after as it will go dull within a short space of time.
Usually I stick to the good old fashioned thorough clean and leave it in its natural finish.
smile.gif
 
Back
Top