General My next project

Currently reading:
General My next project

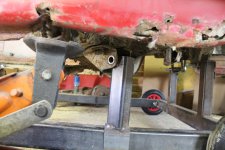
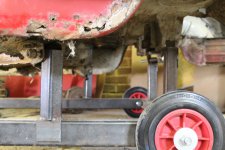
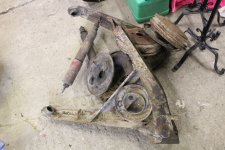
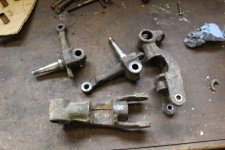
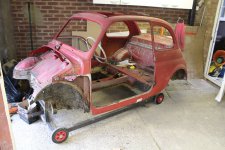
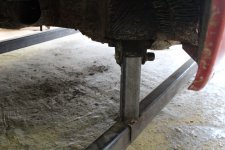
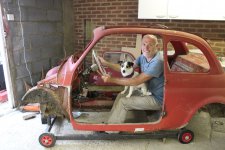
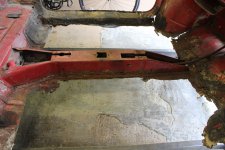
This morning I placed the D on the body jig I made for the L.
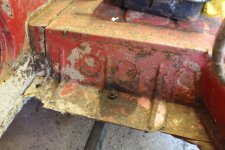
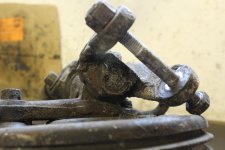
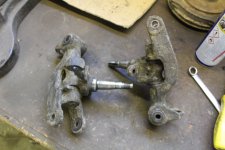
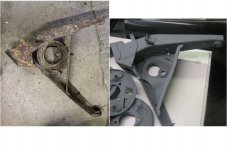
The rear suspension mounts fitted perfectly, as did the front which was really good.
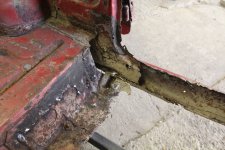
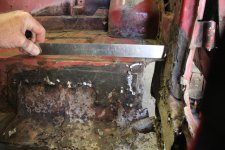
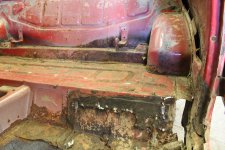
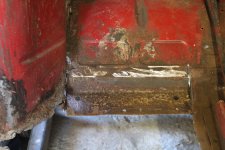
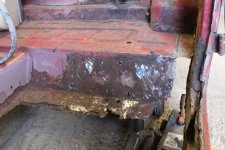
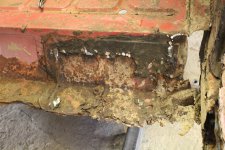
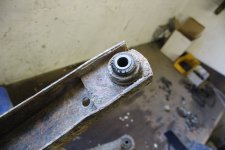
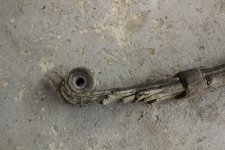
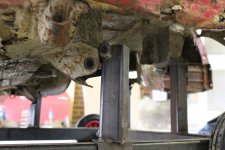
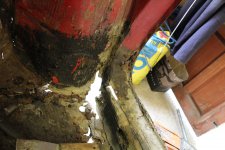
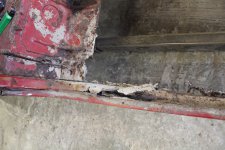
The right rear side suspension mount fitted once I slackened the retaining bolts slightly. But the left one clearly shows a problem. I could tell from looking at the rear seat floor panel that at some time the inner sills/floor had corroded so much that the floor had dropped including the suspension mount. About 1/2".Someone then plated all the inside to make it strong. Sadly they didn't jack the floor up first. Hopefully tomorrow I will take all the poor plating out which will then allow me to jack it up which should straighten the floor and let me fit the bracket in place that will hold the suspension mount in the correct place.
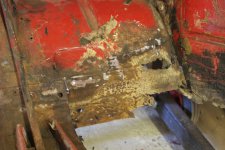
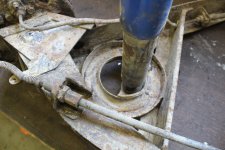
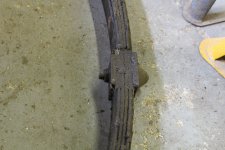
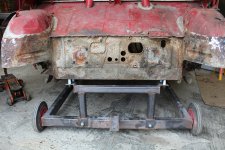
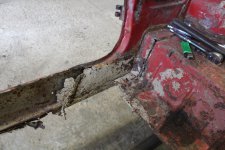
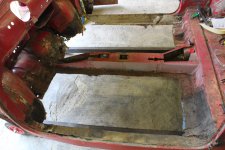
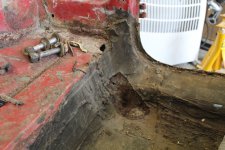
After closer examination, the floor and inner sills were so corroded they were not adding any support to the shell. So I have cut them out leaving just the outer panels in place so I can check the door alignment. Amazingly nothing seems to move with these removed thanks to my Jig holding the shell in place.:)
 

Attachments

  • IMG_1944.JPG
    IMG_1944.JPG
    2.6 MB · Views: 78
  • IMG_1994.JPG
    IMG_1994.JPG
    2.4 MB · Views: 75
  • IMG_1925.JPG
    IMG_1925.JPG
    1.8 MB · Views: 80
  • IMG_1928.JPG
    IMG_1928.JPG
    1.9 MB · Views: 49
  • IMG_1968.JPG
    IMG_1968.JPG
    2.1 MB · Views: 60
  • IMG_1964.JPG
    IMG_1964.JPG
    2.1 MB · Views: 71
  • IMG_1939.JPG
    IMG_1939.JPG
    2 MB · Views: 93
  • IMG_1932.JPG
    IMG_1932.JPG
    2.3 MB · Views: 49
  • IMG_1930.JPG
    IMG_1930.JPG
    2.2 MB · Views: 88
  • IMG_1984.JPG
    IMG_1984.JPG
    2.1 MB · Views: 122
  • IMG_1981.JPG
    IMG_1981.JPG
    2.5 MB · Views: 69
  • IMG_1980.JPG
    IMG_1980.JPG
    2.1 MB · Views: 84
  • IMG_1970.JPG
    IMG_1970.JPG
    2.2 MB · Views: 58
Hmmmm, more than a little tender in places! :eek::eek: that jig is brilliant tho (y)

Love the last picture, changing your forum personality to Fred Flintstone? :D:D
 
That jig/transport dolly is a wonderful thing. If you won't hire it out to me in the far distant future then you will have to give me the recipe so I can build one based on Murf and use it for Mitch.
I like the Dastardly and Muttley shot; Muttley's clearly wondering who's got the biggest brain of the two of you as he knows you clearly aren't going anywhere soon.:D
 
Once I removed the NS inner sill and all the additional plating, the rear floor became quite loose and with the trolley jack underneath it didn't take much to lift the left side until the bracket I made fitted nicely in place and the bolt just slid into its hole.:)
This means that the 4 key points in the rear are now all in the correct place, both height and distance apart. So knowing that the L lined up ok geometry wise, I have every confidence that this one will.
I also removed the reinforcement plate on the rear floor & also the jacking point as these were heavily corroded and if removed this will allow better access for the sand blasting.
The new floor panels sit at the bottom of the bulkhead. This area is rather corroded so I thought it would be best to remove as much of the existing floor as possible to allow sandblasting on the area I need to keep/repair.
Its pointless leaving all the panels in place that are going to be removed later, all it does is prevent the panels behind from getting blasted.
I'm very tempted to remove the right rear 1/4 panel as this is a bit too far gone to save - both corroded and accident damage. It also needs to be removed to gain proper access to the inner panels that are going to need repairing due to accident damage/corrosion.
 

Attachments

  • IMG_1997.JPG
    IMG_1997.JPG
    2 MB · Views: 100
  • IMG_1998.JPG
    IMG_1998.JPG
    2.1 MB · Views: 55
  • IMG_2000.JPG
    IMG_2000.JPG
    2 MB · Views: 63
  • IMG_2007.JPG
    IMG_2007.JPG
    2 MB · Views: 53
  • IMG_2002.JPG
    IMG_2002.JPG
    2.4 MB · Views: 56
  • IMG_2015.JPG
    IMG_2015.JPG
    2.2 MB · Views: 121
  • IMG_2014.JPG
    IMG_2014.JPG
    2.3 MB · Views: 53
  • IMG_2013.JPG
    IMG_2013.JPG
    2.1 MB · Views: 34
  • IMG_2011.JPG
    IMG_2011.JPG
    2.1 MB · Views: 68
  • IMG_1995.JPG
    IMG_1995.JPG
    2.5 MB · Views: 148
I must admit it is so good of Sean to provide this comprehensive guide to restoring an Early car.. means I have a guide to follow when I start....
Still a away off.. soooo many other priorities, but the pics do show some interesting differences between early and late cars.. other than simply the door hinge position...

The question I have for you Sean.. if you are taking the roof off permanently (given the steel one is a bit beyond help....) will you weld up the bolt holes???
 
Who says its not salvageable?

I haven't got that far to even worry about that yet.
If I was to make it a REAL ORIGINAL transformable with all the documentation to prove it :D then I guess I would need to weld them up and also do away with the original sun roof mounting holes.

But weren't they on the proper ones:D

I may have a go at repairing the roof before I get it to paint stage, just in case I want to keep it for some other time/project. I will need to place it back on the shell when welding. that's a no go on new paintwork & trim:eek:
 
"Who says its not salvageable?"

I've probably got one you have have in better nick...
don't want you working too hard and slowing things down...

And whilst most Ds were short sunroof, found some were long and I have a pic of one without the holes..
and If you want I can get a guy in Italy to produces some history and documentation for you...they are good at that... so I am told...
 
Rear suspension
These rear arms are a little different from the later F/L/R ones.
Mainly the box section in which the drive shafts / flexi joints sit is narrower as the flexi joints are not so wide.
They probably enlarged these to add more strength due to the larger diameter drive shafts & joints in preparation for the extra power on the later engines :D
The rubber bushes all need replacing, brake pipes & wheel cylinders. Apart from that the arms, brake back plates and hubs look ok. Obviously wheel bearings will be replaced.

Front steering
These look basically the same as my L ones. They also have the little dust cap that is screwed in rather than peened. These are far easier to remove and maintain.
Looks like this D had a new set of brake shoes a little while before it was taken off the road. Shame they didn't replace everything else.

Just need to strip the king pin joints and then strip the front leaf spring and then all the suspension and steering can go off to get blasted.(y)
 

Attachments

  • IMG_2035.JPG
    IMG_2035.JPG
    1.8 MB · Views: 56
  • IMG_2037.JPG
    IMG_2037.JPG
    1.9 MB · Views: 66
  • IMG_2040.JPG
    IMG_2040.JPG
    2.4 MB · Views: 65
  • IMG_2044.JPG
    IMG_2044.JPG
    2.2 MB · Views: 81
  • IMG_2048.JPG
    IMG_2048.JPG
    1.9 MB · Views: 31
  • IMG_2051.JPG
    IMG_2051.JPG
    1.7 MB · Views: 31
  • IMG_2050.JPG
    IMG_2050.JPG
    1.9 MB · Views: 51
  • IMG_2049.JPG
    IMG_2049.JPG
    2.1 MB · Views: 57
  • IMG_2067.JPG
    IMG_2067.JPG
    2 MB · Views: 150
  • IMG_2065.JPG
    IMG_2065.JPG
    2.3 MB · Views: 102
  • IMG_2056.JPG
    IMG_2056.JPG
    2.1 MB · Views: 31
  • IMG_2058.JPG
    IMG_2058.JPG
    1.8 MB · Views: 85
  • IMG_2061.JPG
    IMG_2061.JPG
    2.5 MB · Views: 72
  • IMG_2063.JPG
    IMG_2063.JPG
    1.9 MB · Views: 81
If you want to save money... as it seems someone did with one of my cars....
Simply take a huge hammer and you can open up the rear wish bones and fit the later rubber joints...
Problem is.... to find originals is not so easy when you realize it isn't the thing to do...
a Guy in Italy offered me two for £500 each... (I thought he wanted to deliver them personally)
I need to see if I can salvage mine...(it must have been a very big hammer that was used....)
While they are off (as you have the advantage of seeing a later car..) can you compare and note any other differences... I know the very first series are totally different even to a 1958 N (which I believe are the same as a D), and you can fit the later wishbones to accommodate the cheaper bigger joints..
You can get a 25mm shaft conversion kit for the narrow rears that still retain the smaller rubbers by the way...
 
Are you going to be overhauling the front 'king-pin' bushes? If you are, may I suggest that after you have fitted the new bushes (so you can drill though the bush) but before you ream them out, you fit a 2nd grease nipple in the hub unit. From past experience I have found that despite the 'grease groove' in the king-pin, very little grease gets to the end opposite the grease nipple. By inserting a 2nd grease nipple into the end of the king-pin carrier section of the hub unit you materially improve lubrication (and therefore the life of the bushes)
thumb.gif
smile.gif
 
Whilst I think that the top and bottom grease-nipple idea is good and follows the pattern of many older cars, in my experience it has to be done very carefully.
There are some original assemblies available with two nipples; I bought a brand new one some time ago. But the top nipple in that refuses to accept grease, That may be because the clearances are too tight and I expect it will get better. But I also think that there is an issue in that ideally you have to get the grease groove in the pin aligned with the nipple drilling when you are greasing, which is a trial of error! It is more conventional to have a plain kingpin and grooved bushes which ensure the grease can get in.
So it may be better to have the original style and make sure that it is setup really well. The original pin with its central drilling is a really clever solution and should work well as long as the bottom sealing disc is secure, the bushes are wearing equally and the weight is taken off the axle whilst greasing.
 
Always a difficult one.
In theory as long as you have a new set up ( preferably with the pin with the hole all the way through) if you regularly pump fresh grease through it so it comes out both joints it should be ok. The amount of mileage I do I don't think it will be too much of an issue.
There are a number of kits out there - some better than others.
I have a set of 126 hubs which I think have the 2 grease nipples on the hub shaft part. I will check that out and see if that's the way to go?
 
King pins came apart really easy compared with the L ones. At this stage I cant see any difference between the early and late ones.
Just require a little sandblasting then they can have new bushes fitted and look into an additional grease nipple - maybe.
I have added a picture of the early and late rear swinging arms.
As you can see apart from the width of the axle carrier, the spring/shock mounting is completely different. I would imagine they changed it as the old one involves more pieces to put together, also it is a bit of a dirt/water trap and could probably cause a lot more corrosion. These aren't too bad except for light surface corrosion. Mainly due to they were so clogged up with years of rock solid mud that the water couldn't get through.
I thought the front spring looked in reasonable condition. Rather dirty but the black paint was clearly visible through the dirt. Thought it maybe nearly new.
I removed the clamps and bolt and oops :eek: one of the leaves fell off.
Somewhere I have a 126 front spring, but think it was heavily corroded. So might have to go for a new one. Not sure if they are the same length but the webs sites list them the same.
So that's about everything stripped ready for the sand blasters. Just a matter of cutting off some/all of the 1/4 panels and then its ready.:)
 

Attachments

  • IMG_2073.JPG
    IMG_2073.JPG
    1.9 MB · Views: 24
  • IMG_2070.JPG
    IMG_2070.JPG
    2 MB · Views: 62
  • IMG_2069.JPG
    IMG_2069.JPG
    2.1 MB · Views: 26
  • rear arm.JPG
    rear arm.JPG
    79.1 KB · Views: 29
  • IMG_2084.JPG
    IMG_2084.JPG
    1.8 MB · Views: 24
  • IMG_2075.JPG
    IMG_2075.JPG
    2.1 MB · Views: 48
I thought the front spring looked in reasonable condition. Rather dirty but the black paint was clearly visible through the dirt. Thought it maybe nearly new.
I removed the clamps and bolt and oops :eek: one of the leaves fell off.

Find yourself a proper old blacksmith and he'll reband the spring for you. :D:)
 
I did consider welding it but I don't think it would last long. Plus knowing my luck another one would snap just after its on the road. Cant risk that happening.
I could always weld it, paint it and flog it on a well known site as a genuine NOS abarth one
 
lots of changes occurred with the D and onto the F
The Original cars were only 2 seaters and the bit of padding in the back for the kids...
once Fiat accepted that they had to allow for the family of 4 then the front leaf spring also changed, later with the F they changed to rear for strength and the extra power...
I have the date that I think the front spring changed from 5 -> 6 leaves will look that up...
 
I'm off to Lucca on friday night for a fortnight....do you want to pop over?
 
Back
Top