Technical Project Paolo

Currently reading:
Technical Project Paolo

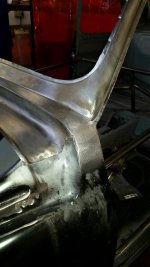
Damian, if you want to keep the line then the best way to reshape it is to mix enough filler to cover the whole joint, don't go too mad with the hardener as you want a bit more working time. Spread the filler from top to bottom and fill the joint. Then let the filler go a little firm but tacky and then run the corner of the spreader down the joint to put the line of the seam in it. You may want to run the spreader down a couple of times and make the line as deep as possible within the original joint.
Then let the filler cure. Sand the wing & f/ panel to get the correct contours.
Then with a piece of 120 grit start to create the radius either side of the joint line to recreate the edge of the panels. If you just fill the joint it will crack with stress later. By keeping a proper space between the panels and sealing it this will prevent cracking.
Tedious but worth it!
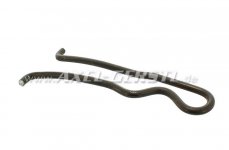
 
Thats the sort of thing I was going to do Sean. The thing that I'm struggling with at the moment is the filler. I start with bare metal and fill where needed. I get it all flat and nice, clean it all and apply my etch primer. When dry you can see where the filler is! How do you stop it showing through?
 
Guide coats? Dont forget this is the first time I've done any of this
 
A very simple technique which is a great help. Mainly used at the flatting primer stage but also good with filler.
Take that repair approach Sean suggested and imagine you've quickly and roughly given the filler some shape with coarsish sandpaper. Then spray lightly from a bit further away than normal with an aerosol of black paint to give a speckled finish. Shortly after, when dry, use a somewhat finer paper to more accurately create the contours. Don't hang about too long on one spot and change directions regularly. The paint will quickly rub off some areas and you will see it staying in others. Using judgement you decide when you aren't improving things and then it's time for more filler, aiming for the dark areas. Repeat until your happy that there are no lows and do the same, using 320 or 400 grit paper once the primer-surfacer is over the etch.
 
Just FYI.
 

Attachments

  • Lead loaded wing joint.jpg
    Lead loaded wing joint.jpg
    52.6 KB · Views: 33
I used loads of lead on a MGB roadster I repaired s couple of years ago. It's a great way to deal with any large repairs or in areas which are likely to get knocked as it is more resistant than filler.
It's an art in its own, that I was taught over 25years ago. Used it a lot on Rolls Royces and E-type Jags that we used to repair.
Word of warning though, make sure you remove any tallow used to flow the lead as this can cause paint reactions.
 
I can't master normal filler so I think I'll give lead a miss thanks. I'm getting better but only perfection will do and I'm far from perfect. Annoying because I can normally pick things up quickly. Not helped by the fact that all the repairs are in tricky areas
 
The good thing about filler is if you screw it up you can always put another thin spread on and do it again.
As advised by Peter, use the guide coat to help check your progress.
I usually give filler s quick rub with 40 grit to knock into the basic shape, then 80 grit to a closer shape then if it looks ok, guide coat and finish in 120 and even 240.
The more you do it the more you will get it right in 1 or 2 spreads depending on the type of repair.
It's a fine art, and if you do it right you can make a silk purse out of a pigs ear!
 
Last edited:
This post contains affiliate links which may earn a commission at no additional cost to you.
Sucess with the door hinges! Ground the pin flat at both ends, then used a 6mm spot weld drill. This took the first couple of mm off each end. The hinge bracket could then be pulled off. This then left the pin in the door. Tried hitting it out with a 6mm bolt, 1 came out. Drilled the others further and kept trying to hit them out. Only had to completely drill 1 out as it wouldn't budge. Then cleaned out the hinge mounts with a 8mm reamer. Not quite sure what I'm going to do with the end of the new pins, peen, weld etc.
 
At least you have the original hinges.
My new doors don't open as much as the old ones. There doesn't appear to be anything wrong with the hinges, but I think they just don't open as much.
When I fitted the check straps, they wont open enough to hold in the outer position. Its as if the check straps are too long.
 
Check straps? Thought the doors opened on a metal latch. I am trying to remember back 2 years when it was last back together
 
Bloody pattern parts! The holes in the new hinges are not aligned with the threads in the A pillar. I'm going to have to make some large holes in them and use penny washers. In fact just writing this an idea has popped into my head. Watch this space
 
Damian, have the doors not been trial fitted when the sills etc, were being fitted? My recommendation would have been to have had them on the shell as much as possible whilst the welding was being done.
Having said that, I'm doing exactly that but will probably end up at the same stage as you if (when) I discard the old ones used for all the alignments and try to fit repro ones which will no doubt have a different shape and profile.:bang:
 
Yes I did but then decided to renew the tired hinges. The new hinges don't change where the door ends up and the gaps still look good
 
Back
Top