General The $120 (£47.24) Uno 45 - updated for Aug 08-Jan 09...!

Currently reading:
General The $120 (£47.24) Uno 45 - updated for Aug 08-Jan 09...!

Looking forward to the next instalment Alex. (y) You're paint spraying looks good to me, way better than I could do. As for the runs, nothing a wet flat and polish won't sort out.

And hands up who's jealous of Ants workplace! :mad:

:p

After scrabbling around in a leaking, wet lock-up with no power last week I wondered why I bother getting involved with cars! :rolleyes:
 
After scrabbling around in a leaking, wet lock-up with no power last week I wondered why I bother getting involved with cars! :rolleyes:

After spending DAYS on wet-vacuuming, touching-up (with aerosol cans), tracing electrical faults, sanding/cleaning aged black plastic, cutting my hands on the door subframes while trying to get the central lock mechanism to just work, and all of this outside in the chilly fog, mostly in the dark, ... I wonder why I bother getting involved with the FIAT Tipo!

I hope to have the Tipo back to its owner tomorrow and then the work can resume on the Uno (after a three-day absence).

-Alex
 
... Thursday 17th - FINALLY back to work on the Uno!

Time to give the bumpers several coats of high-adhesion bumper coating from an aerosol can. This is supposed to be a finish product, but the slightly-brown colour doesn't seem right. Another aerosol provides a black, splattery coating that helps to hide various scratches and problems. However - it dried to a matt and patchy colour! (picture) It was as though it was never sprayed...

Just before I had breakfast, a couple of coats of standard satin black paint went on - at least the priming should ensure adhesion...

Time for my signature bumper-painting (this is the sixth Uno to receive this treatment :cool:) - the masking tape came out and many, many pieces dealt to the curvature of the moulded line (picture). Once the masking is complete, an important step is to spray with the primer (black bumper paint) again - on the side that has the masking ready for the colour paint. Why? It helps to seal the edges of the masking tape and ensures the colour doesn't bleed under the tape and around the plastic texture.

The main task for the day was to respray both front wings. The weather was surprisingly dry, even with some slightly-warm sunshine - so I went for it. Left-front wing had several wonderful defects - many fisheyes, runs and sags shaved with a razor blade, some ridges, orange peel - just doesn't get better than that (picture) The right-front wing was similar but buffed out beautifully the other day: trouble was, the paint was noticeably thin around the paint runs.

Both wings flatted back with a polystyrene block and 600 grit paper, wet - (picture shows one wing with just a little more left to do - the glossy bits stand out once the surface is dry.) Soapy water helps to de-grease and a wipe with special panel degreaser finishes the job. I needed a 20-minute lunch break.

Just as I'd mixed the paint - the rain arrived. Blast! :bang:

I rolled the shell most of the way back into the garage, counting on the tiny bit of shelter afforded by the roof edge - assuming there was no wind (picture) Another de-grease dried the moisture and the cardboard wheel masks were re-instated. I had no idea how I would spray the bumpers.

Paint went on pretty well, two coats ten minutes apart, though the humidity was sky-high (in the high 90s) and there was barely room to reach past the left wing. Sure enough that caused orange-peel banding as I didn't overlap the spray passes adequately (picture) - but some wet sanding tomorrow and my polisher will sort that out (y)

Finally I mixed in 10-30% flex additive (give or take) and sprayed those bumpers - in the outside garage near the other panels being prepared and the storage boxes... (picture) Most satisfying was to remove the masking tape and get a perfect clean edge (picture)

By this time (4PM) my next job had arrived - the owner took the photo of me - another Uno 45 that I sold four years ago, and the heater doesn't work - changed thermostat and removed/inspected heater valve... also repaired rear wiper.

A fairly productive day! :)

-Alex
 

Attachments

  • IMG_2407.JPG
    IMG_2407.JPG
    113.5 KB · Views: 45
  • IMG_2408.JPG
    IMG_2408.JPG
    68 KB · Views: 42
  • IMG_2410.JPG
    IMG_2410.JPG
    96.4 KB · Views: 57
  • IMG_2412.JPG
    IMG_2412.JPG
    66.9 KB · Views: 47
  • IMG_2416.JPG
    IMG_2416.JPG
    132.9 KB · Views: 55
  • IMG_2418.JPG
    IMG_2418.JPG
    125.8 KB · Views: 58
  • IMG_2423.JPG
    IMG_2423.JPG
    63 KB · Views: 39
  • IMG_2420.JPG
    IMG_2420.JPG
    69.8 KB · Views: 51
Last edited:
Good skills mate. Do you have any advice for repairing the roof at the corners of a sunroof? Any hazards?
 
OMG another kiwi on the forum :) where in NZ are you.

If you remove the headlining, you can remove the entire sunroof setup from the roof. This might give you better access to fix the roof around the sunroof.
 
Yep I think i'll take the sunroof out and do it properly. I'm in Auckland. Good cheap cars to run around in, I like height and driving position for a small car.
 
This is an interesting thread and in a section I don't normally venture to, Congratulations on the progress and pleased to see you have faith in turning that car into a spectacular one. Keep It Up and Well Done.
 
This is an interesting thread and in a section I don't normally venture to, Congratulations on the progress and pleased to see you have faith in turning that car into a spectacular one. Keep It Up and Well Done.

Thanks :)

After a few pointed discussions about relative availabilities of TIME (I think I over-committed myself), James and I have put the project on hold for a week or two :eek: Basically I've had other things to work on and do, and James is back at school (as a teacher, of course).

We intend to meet up in the weekend to put the interior together, and I may finish off the project next week, all being well.

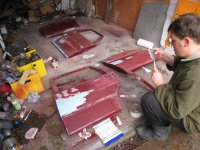
Nevertheless we had made some progress last week that I didn't report on, so here's a quick summary.

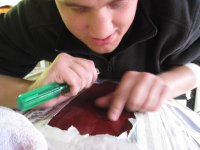
FRIDAY 18th - James discovered some rust (surprise surprise!) under the roof aerial (picture) - we had a new aerial to fit. I know these things are not the most exciting but they are the sort of minor things that you must attend to before they get worse, so I included it here as an example. We sanded the rust away and applied some suitable paint.

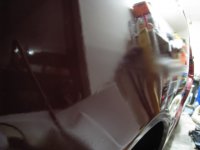
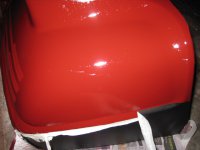
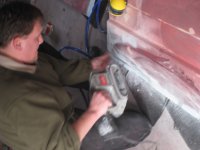
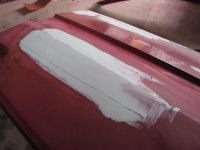
The front wings both had orange peel (picture) - this paint texture is caused by a number of factors (e.g. paint viscosity too thick/insufficient thinners, cold temperature) but in my case I used a mixing stick to get correct paint mix and temperature was reasonable, so it was completely the result of the application. In my experience of two-pack enamel, it means that the final coat was not thick enough to 'flow out' after application. However you tread a fine line because if the coat is too thick, it runs or sags (as I've had before). So on vertical surfaces, orange peel seems quite common and you even see it on new cars (though, it tends to be a bit coarser and flatter than this - painters say 'juicier'.)

The solution was to wet-sand with 1500 grit paper and polish with my paint buffer + suitable cutting compound. I'm happy to report that it came up fine :)

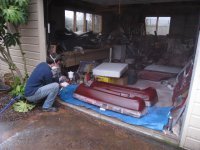
That meant I was able to start refitting the lights and bumpers (at last!) Headlights and tail-lights had been previously restored - headlights had the glass removed and cleaned, then stuck back together with black polyurethane (I was a bit generous with the sealant), while James restored the taillights by cleaning the black plastic and spraying with nicely-reflective silver paint.

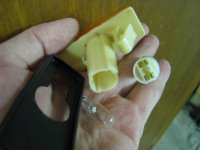
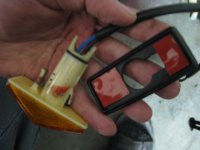
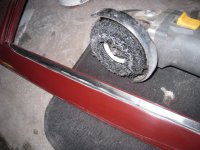
Side repeaters - sometimes they are in surprising condition (picture - I mean, it's nearly 20 years old but look at those bulb contacts) but other times, I use 3M double-sided trim tape to fasten the lens to the rubber and the rubber to the car (picture).

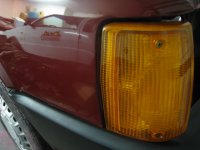
Front indicators - these take patience to fit properly, sometimes needing washers under the mounting studs to get the lens aligned with the front wing. Note that, to hold the lens on, I use plated steel countersunk screws rather than the 'proper' plastic-head screws - I've done this in the past as the plastic-head screws are a disaster zone when they break and can't be undone (or done-up) - also if they don't precisely align, the third-party lenses crack. Countersunk screws solve the problem by centralising themselves. They don't seem to let water in - but that would be something to watch for.

Headlights tend to be wonky unless the top mountings are fastened with screws (not all Unos seem to have the screws). It helps to have spare headlight mountings, as sometimes they are bent.

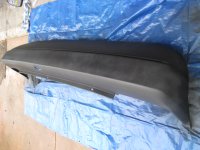
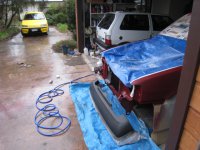
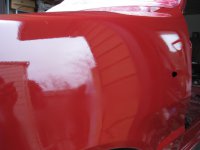
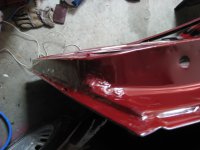
I've included a couple of sneaky preview pics to show how it's coming together. The front bumper fits pretty well - especially compared with how it was (see start of thread and the last picture added below! ;))

Most of the panelbeating was achieved with nothing more than lengths of wood (to massage the dent out), plus some filling and sanding as described earlier in the thread. Also the inner wing (beside the headlight) needed a few heavy hits (a big mallet and more bits of wood) to bring the wing mounting out to where it should be, so that the indicator fits properly. Nothing was very exact - it's like cooking, you try a bit of this and a bit of that. It's important to do a number of trial fits before the final filling/sanding/painting - I even checked that the bonnet now fits properly. More than any skills or tools, it helps to have a vision of the end result in your mind, even as you stare at the original mess. The vision keeps you motivated (y) That's my sage advice for the day ;)

Someone will point out that clear indicators look better. :) Well, we only had one (the right side), so we decided to use two great-condition orange lenses instead. If another clear indicator lens comes to hand, we'll happily change...

-Alex
 

Attachments

  • IMG_2430.JPG
    IMG_2430.JPG
    89.7 KB · Views: 47
  • IMG_2428.JPG
    IMG_2428.JPG
    71.3 KB · Views: 47
  • IMG_2437.JPG
    IMG_2437.JPG
    77.7 KB · Views: 37
  • IMG_2438.JPG
    IMG_2438.JPG
    76.8 KB · Views: 36
  • IMG_2443.JPG
    IMG_2443.JPG
    87.5 KB · Views: 53
  • IMG_2445.JPG
    IMG_2445.JPG
    72.3 KB · Views: 44
  • IMG_1837.JPG
    IMG_1837.JPG
    103.1 KB · Views: 49
Last edited:
SATURDAY 19th - I soldered rear light cluster bulb holders, installed with separate earth wire (see pics). A previous owner had done something similar but I find it best to solder all holders at their tabs to ensure a real earth connection. This prevents the brake lights blinking in time with the indicators (etc.) Note the 'Duzall' flux necessary for solder to 'take' to the galvanised steel. I think you can also see how the silver paint applied by James makes the lights brighter than the standard black-plastic housing (I'm absolutely convinced it does, anyway ;)).

James polished (with non-silicone cutting compound) and installed rear side windows - I was impressed - I love it when glass is properly clean (later on, when it rains, the water stays in small droplets and blows away so you can actually see while driving).

James also continued with filling/sanding door bottoms and we got the topcoats on. Neither of us enjoyed this job much, and it shows in the result. At the time of writing, we may yet get replacement doors.

The bonnet turned out quite nicely after I finished the wet-sanding and I applied three thick coats of colour (thick because the panel was horizontal) - though the painting location (on the floor) really wasn't the best for dust contamination. Never mind - I shall eventually give the bonnet a wet sand/polish but in the meantime there's no orange peel at all (possibly a first for me on a fair-sized panel!) so I'm pretty happy about it :)

-Alex
 

Attachments

  • IMG_2457.JPG
    IMG_2457.JPG
    88.2 KB · Views: 53
  • IMG_2448.JPG
    IMG_2448.JPG
    124.4 KB · Views: 65
  • IMG_2453.JPG
    IMG_2453.JPG
    85.1 KB · Views: 53
  • IMG_2455.JPG
    IMG_2455.JPG
    89.1 KB · Views: 52
  • IMG_2454.JPG
    IMG_2454.JPG
    114.4 KB · Views: 57
  • IMG_2460.JPG
    IMG_2460.JPG
    106.1 KB · Views: 58
Last edited:
SUNDAY 20th - We were very disciplined and spent most of our day working on the final panels to be painted - all four doors (picture).

To get the basic shape of the door bottoms (i.e. flat), James used a belt-sander - quick and effective (picture). Worth remembering that a belt sander is about 1/10th the price of a D/A air-powered sander, so a worthwhile purchase if you're doing this sort of work. There was some minor filling/hand sanding of the edge grooves.

The next three pictures show the typical sequence of identifying and filling the inevitable small carpark-battle-scars on one of the door skins (all four had similar treatment). Someone I mentioned this to said that I was doing this all wrong, and that I should have put more effort into beating out/shrinking the dents. However, the reinforcement bar makes access difficult in the front doors, and my feeling is that it's better to fill than risk a high spot. Your thoughts welcome :)

The following day, I discovered some rust :)rolleyes:) under where the window rubber goes at the top of one door. A quick blast with the strip disc gave shiny metal to treat with aerosol etch-prime (picture). I got several thick coats of primer onto the doors using the last of a tin of primer (and blocked my spraygun in the process, as I forgot to put the filter in the bottom of the paint cup :eek:)

On the Wednesday, James called around after school and we wet-sanded the doors - that went pretty well. Some minor filler touch-ups and a 'cheat' with some aerosol primer. I find if you leave that a long time to dry (solvents to evaporate) before the topcoat, it's OK (in small doses).

Explanation: Aerosol primer/paints have a lot more solvent than 'proper' paint because the mixture has to be thin enough to come out of a small spraycan nozzle with little 'spray strength' (small propellant volume, to be precise). If you top-coat too quick, aerosol primer can shrink as the solvents evaporate over about a week, and this causes nasty problems (micro bumps, recessed patches). But it's quicker to apply than mixing the proper primer, cleaning the spraygun, etc.

That's where it's been for a week now - I have been busy with other work, even though that other work is not done, and I put off this update...

-Alex
 

Attachments

  • IMG_2474.JPG
    IMG_2474.JPG
    82.6 KB · Views: 35
  • IMG_2463.JPG
    IMG_2463.JPG
    135.6 KB · Views: 45
  • IMG_2471.JPG
    IMG_2471.JPG
    80.3 KB · Views: 41
  • IMG_2467.JPG
    IMG_2467.JPG
    72 KB · Views: 40
  • IMG_2468.JPG
    IMG_2468.JPG
    78 KB · Views: 40
  • IMG_2475.JPG
    IMG_2475.JPG
    135.1 KB · Views: 40
Last edited:
Wow!

Alex! U really a genious man! I could hardly think of doing this much to an old car-- I see it's your love to uno's :p

Well I saw your thread today (wasnt been a regular visitor these days as I'm rather happy with my FIAT PALIO and My UNO jacked up in a workshop for major repairs after an accident) It took me almost 4 hrs to save all the pics and read every line of your experience - - It must be quiet an experience I'd love to share - But I know it cannot happen :(

Well All my best wishes for your precious efforts and let another Mint Uno roll...(y)

Rajeev
 
alex, you are offically my 2nd uno hero (behind the much closer to home chas:p)

would you like to come to london and rebuild both my turbos:D

My thoughts exactly, while you're over here do you fancy painting my strada?

Haha - thanks, could make a working holiday out of it :)
Bringing the equipment would be a killer though! Perhaps I could put my garage on a boat and sail into the Thames (as they did for the NZ pub).

-Alex
 
Well All my best wishes for your precious efforts and let another Mint Uno roll...(y)

Cheers Rajeev :)
Some people think it's nuts to put this effort into an Uno and many people say I should restore a Beetle or an Escort (RWD in NZ), or some such. But those cars don't mean anything to me, or James, and the end result of an Uno project is something probably more useful.

Not too many instalments to go now, I promise. I'm guessing three good days should nail it.

-Alex
 
Haha - thanks, could make a working holiday out of it :)
Bringing the equipment would be a killer though! Perhaps I could put my garage on a boat and sail into the Thames (as they did for the NZ pub).

-Alex

I'm pretty well stocked in the garage departement so I'll supply the gear - time to get that ticket booked :D:D:D
 
Back
Top