FRIDAY 15TH - THE PAINTING CONCLUDES!
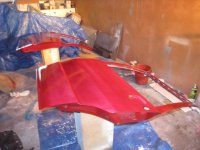
I'm delighted to report that the rear doors are painted - so that's it, all parts are painted now (including a couple of small touchups to the shell). At last! Only three days behind the schedule that I hoped for - next week will be the putting-together; plus special 'improvements'.
Pictures show:
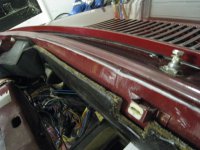
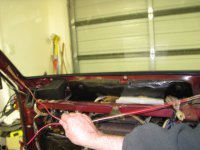
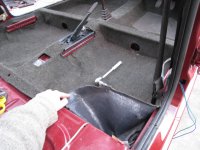
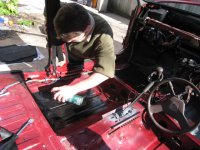
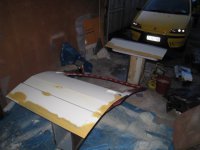
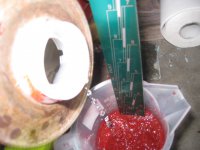
1., 2., and 3. - The final batch of paint being mixed for spraying - the zig-zag stick is easy when you know how
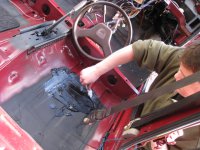
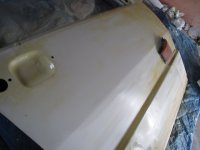
4. Degreasing the panels for the umpteenth time (note gorgeous weather and yellow Uno outside with flat battery and dead alternator)
5. Thin, light first coat - best for adhesion
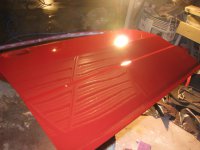
6. The permeability of aerosol primer (the patchy area in the topcoat compared with the proper primer nearby) - this must be allowed for with extra topcoats. Over time, the aerosol primer may shrink and give a similar patchy appearance all over again. That's why you use proper primer.
I think now might be an appropriate time for me to summarise what I've learned/evolved as painting technique, just in case anyone's contemplating similar painting jobs but running into the difficulties I'd had in the past (feel free to skip the rest of this post and just look at the pictures
")
EDIT NOTE: Grammar is a bit inconsistent with you/I, please treat the 'you' as figurative and not necessarily as a direct instuction!
I've found that consistent results start with consistent paint mixing. I used to wonder why sometimes everything went well, and other times I would get runs/sags and orange peel everywhere ('sags' are basically large, wide paint runs). One cause of these problems is when the paint is too thin. I used to mix the paint in the spraygun container, pouring in the paint, then about half the depth as hardener, and a slosh of thinners in the way a chef makes a sauce. On antsuno2's advice (
https://www.fiatforum.com/uno/145226-120-47-24-uno-45-a-2.html?p=1591329), I bought a mixing stick and a mixing jug. The first three pics show how this works.
There are numbered lines 1, 2, 3... You decide how much paint you need to mix - let's say you need enough for two doors plus the insides, and experience has shown that's a '3'. So, into the mixing cup (which has parallel sides), you pour paint up to the bottom line marked '3'. (picture)
Then, you add hardener to the next line up the zig-zag, also marked '3'. (picture)
Finally, you add thinners (reducer) to the first section up the next zig-zag - the three sections represent 10%, 20%, and 30%. The paint data sheet suggests either no thinners, or 10%. Using no thinners would reduce the chance of paint runs, but it would also reduce the 'flow-out' of the paint (a characteristic of enamels) and so there would be a greater chance of orange peel. I find that at 10% the paint covers well and flows-out very well.
The mixing stick doubles as a stirrer, and is easy to wipe clean. I wear latex gloves and use lots of paper towels to clean up any spills.
While the paint 'activates' (another piece of antsuno2 advice: that guy is a real painter so I listen
) I spend my time degreasing the panels (picture). I use a clean cotton teatowel for this, and PPG's panel degreaser. Usually I still have the gloves on - the solvents are hard on your skin. You can never do too much degreasing! Something I've found is that air-powered sanders tend to cause problems because they blow out air that has an oil mist - even though the primer may have gone on nicely, somehow the oil persists and wrecks havoc with the topcoat in ways that I'd never had before. I've found that wet-sanding with strongly-soapy water helps.
Next I have a little play with the spraygun, spraying various bits of nearby cardboard etc. just to check the spray pattern is what I expect - an oval. If the air pressure is too low, the oval will be a wide circle, the paint in the middle will be thick, and the edges will 'spatter'. If the air pressure is too high, there will be a lot more paint mist in the air around the spraying. About 30psi seems to give the finest spray pattern for my gravity-fed gun (with the old suction-type gun, it was about 50psi). I still paint with quite a small fan size, about half of what my new gun can do, mainly because I'm used to working with just a few inches of paint band at a time.
The very first part to spray is all the edges and holes/openings - go right around the panel (this also helps to verify that the air hose will not drag across the panel later as you move around). To reduce the spray pattern size, turn the fan size (top knob) in clockwise. Also reduce the pressure - either with the knob near the inlet, or on the regulator, or the pros simply kink the hose...! The aim is to cover all the edges while you can see them - nothing as annoying as a missed edge later (somehow, I still manage it from time to time). It doesn't matter if you overspray a little onto the main surface, as the proper heavy coats will 'melt' onto this overspray. But you don't want to be spraying edges later, because the light overspray may not melt into the proper coats.
The first proper coat on the main surface should be fairly thin - fan size back up but reduced needle opening (lower screw) so that less paint gets on the panel, or I pull the trigger less. I find that a thin first coat reduces the risk of 'fish eyes'. The latter are the little craters where impurities (the oil, silicones, etc.) interfere with the paint film - even after all the degreasing...
15 minutes later in cold weather (10 minutes if about 20-degrees C) it's time for a second coat. This can be fairly thick but you have to be mindful of runs and sags on surfaces that are not horizontal. It's REALLY important that the full 10-15 minutes elapses (the 'flash-off time' quoted on the data sheet), otherwise, expect massive runs/sags as the paint film won't support the extra coat.
Again the paint spray must be in even, overlapped bands. It's normal for orange peel to appear during spraying, but if the thickness is consistent, this will disappear. If not, resist the temptation to immediately spray more onto the orange-peel areas - this will give runs/sags.
1.5-2 coats is all that the paint data sheet calls for (for my paint), but I put on a third coat anyway, because I paint in a less-than-ideal environment with dust and the odd water spot (!), so I want to be able to buff-out (sand and polish) the paint later. This especially applies to dark colours. Light colours do not show contamination as easily, so you may elect to stop after the second coat.
DEALING WITH DISASTER...
Three things I've found very useful:
- tack cloth
This is an open-weave, slightly-sticky cloth that is a bit of a fumble to get out of its plastic wrapper in the heat of the moment (ummm, plastic wrapper, not foil wrapper) - what you do is very lightly scrub the folded cloth across the degreased surface, and any remaining dust particles disappear. You can even do this between coats, if the flash-off time has properly elapsed.
- fine-point, high-quality tweezers
Bits of dust settle in the paint, no matter how hard you try (I close the garage door during the flash-off time, which helps a bit). The larger chunks of debris, plus hairs and threads from woolly jumpers etc., can be removed with tweezers. I do this before I apply the next heavy coat (of paint, I mean). I don't bother after the last coat, because with my shaky hands the tweezers are likely to make more of a mess than they avoid...
- paper towels and heat gun
Imagine that you have a big paint run before the final coat. After swearing, what do you do? You know that sanding the run out later will be hell, firstly because the run takes a long time to harden, and secondly because the paint around the run ends up too thin after the sanding.
So here's what to do. Use the edge of a paper towel to suck-up the excess paint! Start at the end of the run and work towards the beginning. Note that even after two flashed-off coats, the paint may clean off all the way down to the primer (because the excess paint melted the previous coats) - but don't worry. Just get the area fairly smooth. Then, blast it with a heat gun... I find this helps to flatten the paint - the heat, rather than hardening the paint, seems to thin it out so it flows! Then, lightly spot-paint the affected area to cover any primer and build a little more smoothness, wait 5-10 minutes, and apply the final coat over the whole panel. Provided the final coat is even, there should be no further runs - and the original run miraculously disappears...
I wish I could supply some photos (I did this twice today) but I was just too angry to go and get the camera
- plus, you have to work pretty quickly to catch the run before it spreads too far. I was very relieved at the result though!
Another possible disaster - water spots. In my case, water dripped from my face mask while I was fixing the run above (one problem became two...) Again, a paper towel soaks up the water (which will stay as a blob on the surface) - then dry with a heat gun. There may be a slight ring visible - this will either polish out, or a subsequent coat of paint will hide it.
Water also tends to blow in with the wind - because it's raining here, every day for weeks - plus, water drips off the air hose (picks up water from the ground). It would be a lot easier to paint on a dry summer's day - provided there wasn't much dust around, and no flies... Perhaps the autumn is the best time to paint?
-Alex