General The $120 (£47.24) Uno 45 - updated for Aug 08-Jan 09...!

Currently reading:
General The $120 (£47.24) Uno 45 - updated for Aug 08-Jan 09...!

I'm clammin' on some update pictures! lol

:hug:
Though I don't know what " clammin' " means... Claiming? ;)

I've been working in my office this week (i.e. not the garage) - trapped here for DAYS - the work (a one-week task) is nowhere near done yet. I'm hoping for a miracle turnaround in the next three days working 18-hour shifts. That will leave Tuesday and, err, until about the 15th of next month - to work on the Uno. Every day. The weather may be a problem (bloody cold - forecast ten degrees, raining) but expect updates anyway next week (y)

-Alex
 
Last edited:
Thanks everyone - BUT...

... no miracle three-day turnaround, just yet more problems (Wscript Shell/Execute Stdout-not-with-Run-only-Exec anomaly if anyone wants to know) - my job is to make Excel VBA stuff easy to understand, so first I have to understand it myself.

It now looks like I'll be spending the rest of the week indoors, which is OK I suppose because the weather's too grotty to roll the Uno outside for sanding/painting, and I don't want to sand/paint in the garage. I'm now looking forward to the weekend and next week.

-Alex
 
really nice:D

hope you get it on the road

is it the fire engine? 999ccm?

if it is, i got one too, really much rust, spare parts(y)
 
Updated 05/07/08

Finally as of last night - my time is free for a couple of weeks :cool:
James is also on holiday (being a school teacher) - so here we go, the push to the finish begins!

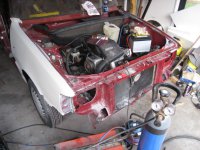
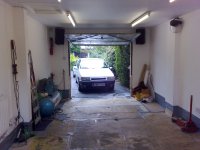
Starting about 11AM today, we moved the 164 out of my outside garage so we have somewhere to work on the removed panels (doors and bonnet) of the Uno - instead of cluttering the space around the Uno, they'll be primed and painted out in the other garage while the 164 weathers the elements.

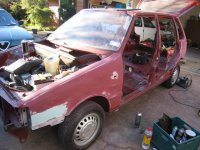
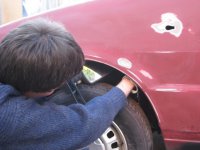
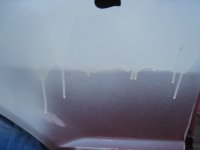
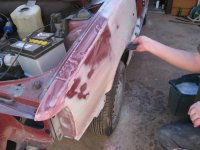
The Uno was a bit more approachable with the doors, bonnet, and bumpers out of the way (picture). But the WEATHER - horrible! Temperature reached 9 degrees today (apparently) with scattered outbreaks of sun, fine showers, and heavy rain the rest of the time, strong winds, and winds in the usual prevailing westerly direction that drives the rain into my inside (i.e. attached-to-the-house) garage :cry:

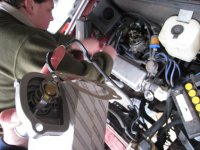
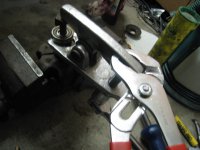
James and I tend to work like insects - we speed up when the sun's shining on us - so we both found it difficult to get motivated today knowing that painting, etc. was out of the question. We decided to start with fitting a couple of new parts bought recently. The cam cover gasket/rubber seal had a small leak near the distributor - this is after we'd cleaned/fitted it with Loctite Master Gasket. I don't know if you know Master Gasket, but it's a close relative of the red threadlocking compound - it sets when there is no air between close-fitting flanges.

Master Gasket worked so well on the flat parts that James had to use a slide hammer to remove the cam cover - of course, it had still leaked anyway because the rubber seal was not a good fit over the curved part. The slide hammer, having proved to be poor at removing dents, was excellent at removing the bonded-on cam cover! Cleaning off the hardened Master Gasket was not an easy job. We eventually used some grey silicone sealer to seal the corners and the back surface of the new gasket (rubber seal).

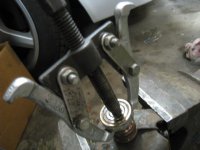
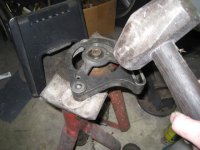
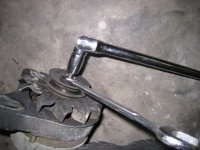
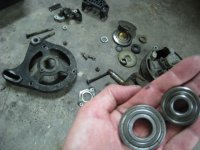
Meanwhile I set about the simple satisfaction of changing the thermostat. Even though we hadn't been able to really drive the car due to a cooling system leak, I had my suspicions that the thermostat wasn't working - the radiator top hose was getting hot pretty quickly and the heater output wasn't much. On the Trademe auction site last week, I spotted a new, genuine FIAT thermostat for a 1998 Punto 75SX. That's a rare model in NZ, but the thermostat looked familiar, so I took a punt on it for $40. With the gasket.

Sure enough, it was an identical shape to the one on the good old 999cc FIRE. The coolant that I'd put in a few weeks back drained out easily (hint: flexible screwdriver makes an ideal hoseclamp tool because the socket for hex screwdriver bits is exactly the right size for hose clamps), and the coolant was still clean and bright green, almost fluorescent.

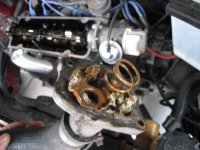
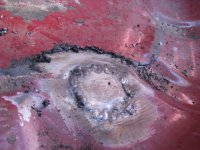
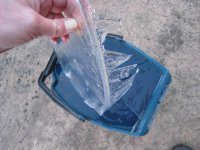
What made this little job even more satisfying was when the old thermostat came out in pieces! One of the posts had simply corroded away, so the centre was floating around, and also the plate had a ring of holes where there should have been a rubber seal. With the thermostat floating around, I'm sure that would have interfered with cooling flow to some extent and obviously didn't seal. (picture)

I re-used the coolant and refilled the system, trying to get the air out of the heater junction in the process (there's no bleed tap on this one, but even if there was, it's the highest point in the system so water won't reach it before the radiator overflows. A bit of a dumb design there - how can you get the air out? That's probably why Uno heaters usually gurgle when you turn them on - the air collects at the hoses. I think the best solution will be to add a bleed tap (I have one spare) and then make a 'head of water' by designing a tube to fit onto an old radiator cap and thus raise the water level above the bleed tap - that should work.

Come to think of it, if the radiator cap was fitted and the system run up to temperature, you could open the bleed tap (with the radiator cap on) and the pressure would force the water up to the bleed tap - so I guess I've answered my own question :eek:

Incidentally the Turbo does not have this air-in-the-heater-when-filling problem, because the expansion tank is the highest point.

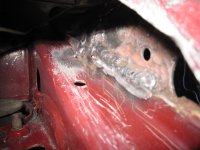
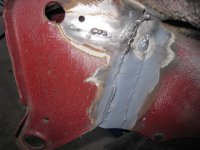
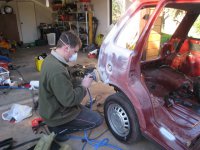
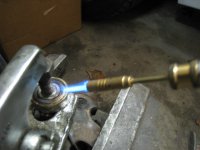
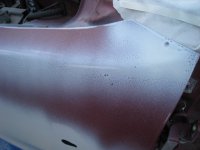
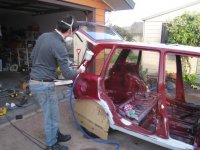
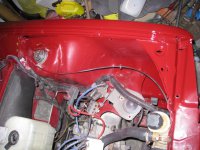
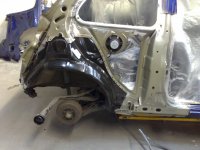
I stopped for a lunch break at this point, so James continued with the welder making some reinforcements where there had been rust in the engine bay front corner. I think James did a bloody brilliant job in a very inaccessible place (picture). No actual patch went in - it was more a case of welding the existing inner wing to the chassis rail and to the towing eye bracket, where it should have been welded in the factory but never was!

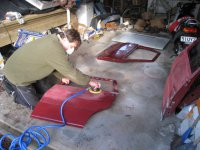
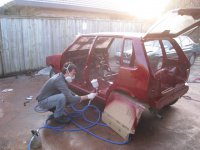
Next I sent James out to the outside garage with the D/A sander and several doors to get the clearcoat, flaking paint etc. sanded off. I then stumbled around trying to solve a problem with the compressor's regulator (I could hear the sander zinging at well over its max pressure, then it would be too low to start, and my compressor was running all the time). Solution was to turn down the compressor's regulator so that less air got used by the sander and therefore the pressure would be more consistent - problem is, it's quite tricky to adjust a regulator when the air tool is starting and stopping! James worked solidly though and got all three doors sanded ready for primer/filler. Except the recessed bits behind the handles! I guess I'll do those by hand :)

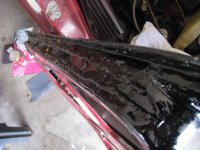
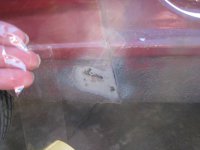
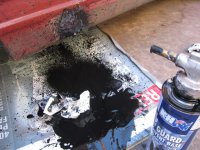
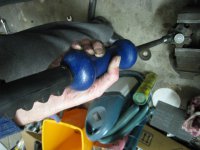
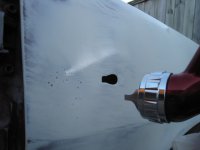
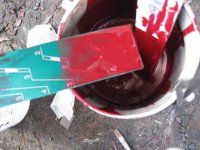
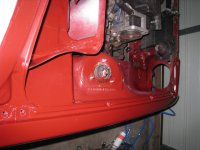
I also kicked around looking for my fibre-filler and my spreader, the tiny hardener tube, etc. in order to start filling the bottom of one door. All the welding had been painted with POR-15 (American anti-rust paint) which sets extremely hard and shiny. (picture) thepottleflump - Trevor - eat your heart out - just look at how lumpy that welding is compared with my worst before! I'm proud to say that I didn't do it - so it's all *his* fault :)

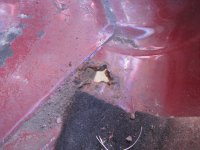
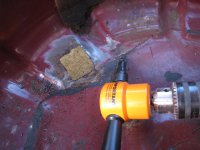
Ironically there are still big holes in the outer doorskin despite the metres of welding to the door bottom. The door had been soaking in rust converter for a few days, then I chased what remaining rust there was with a strip-disc on an angle grinder, so I'm confident the rust should be gone for a long time IF I can make the bottom of the door waterproof and repair the great big holes in the outer skin. Watch this space.

I think it's fair to say that I didn't get much done - but I may get some work done by myself tomorrow - the date will be 06/07/08, yay - but otherwise, on Monday we're hoping for a fine day so that we can roll the shell outside and sand/clean it in all the corners ready for painting soon. Ideally the doors/bonnet will get primed on Monday also.

Keep those projects ticking (y)

Cheers,
-Alex
 

Attachments

  • IMG_2301.JPG
    IMG_2301.JPG
    137.2 KB · Views: 70
  • IMG_2292.JPG
    IMG_2292.JPG
    114.3 KB · Views: 58
  • IMG_2294.JPG
    IMG_2294.JPG
    103.7 KB · Views: 67
  • IMG_2299.JPG
    IMG_2299.JPG
    100.4 KB · Views: 53
  • IMG_2298.JPG
    IMG_2298.JPG
    121.5 KB · Views: 47
  • IMG_2300.JPG
    IMG_2300.JPG
    127.5 KB · Views: 56
  • IMG_2303.JPG
    IMG_2303.JPG
    108.3 KB · Views: 54
Last edited:
I was quite pleased with this welding. Repairing the rear offside arch which was mostly missing. Anyone need any welding done?

[IMG]https://www.fiatforum.com/gallery/data/500/080518_Rear_Offside.jpg

Absolutely - could use your skills for repairing doors :)

In this photo we can see your reflection. All this time I've thought you were the big scary black guy in your avatar :D Now I see that's not the case! :p

-Alex
 
All this time I've thought you were the big scary black guy in your avatar :D Now I see that's not the case! :p

Pottleflump had Michael Jackson syndrome and was once a big, black scary guy like Mr. T. Then one day he turned white.

:p

Alex - amazing work on that little Uno! I wish I had more to report on mine but have been working on other vehicles instead. I WILL get some stuff done on my Fiats soon...
 
Last edited:
RIGHT - another day (well, five hours) of progress to report.

Today, James got most of the work done (and I think he would like it known that this is HIS Uno, and he usually seems to end up doing most of the work :)) while I stumbled around trying to fix things (e.g. air fittings, filler repairs).

Our priority is the shell itself (minus doors and bonnet) which we want to get painted first, so that we can put things back together when the weather intervenes and delays the spraying of the other panels.

James got on with sanding the rear quarters (picture) and the front wings, while I filled the holes in the bottom of the left front wing, yes I know, exciting stuff... I used tape on the (uncorroded) sill so that the fibre-filler didn't stick to it, yet there is a filler sandwich both sides of the steel.

We next decided to clear out inside the 'car' - one of my few contributions today was to unbolt the rear seatbelts and remove the trim, carpet wheelarch coverings, etc. I made some remark about how nice it was not to find any rust on the turrets, boot floor, etc. About then, James discovered the rust in the spare wheel housing. "Is it a hole?" I asked, then turned around just in time to see the screwdriver going through. "Yep", came the reply.

This was, though, a very easy place to repair properly - I used my sheet metal nibbler on a drill (which cost twice as much as the Uno), and then James rather neatly welded in a patch - very strong - probably more than really necessary but it cleaned up nicely and has a coat of etch primer/textured stone-chip coating...

...oh yes, the textured coating. This has a special gun that fastens to the canister and pressurises the paint. I hooked it up and pulled the trigger - nothing happened, nothing, nothing, then a short high-pressure blast of coating followed by a growing puddle as the stuff poured from the nozzle. Highly frustrating. After trying to re-use the stuff several times, I eventually gave in and cleaned the gun with Methyl Ethyl Ketone. At that point I discovered a blocked vent hole. All was OK after that. With what coating remained, I sprayed all sorts of things - the repaired wing bottom, the chassis rail welds in the engine bay that I'd tried to fill, and the inside of the wing near the side repeater - I used a mirror to see what I was doing. Just as well the Uno isn't lowered (enough space to get the gun + canister around the tyre). James took that picture. Note that usually it's ME that takes the pics while James works... :)

That seemed to be about it for today - the shell now eagerly awaits a coat of primer. But was that all I managed to do - the filling, the trim removal, and the textured coating?...
 

Attachments

  • IMG_2312.JPG
    IMG_2312.JPG
    136.2 KB · Views: 38
  • IMG_2320.JPG
    IMG_2320.JPG
    139.6 KB · Views: 56
  • IMG_2319.JPG
    IMG_2319.JPG
    134.8 KB · Views: 55
  • IMG_2306.JPG
    IMG_2306.JPG
    74.9 KB · Views: 45
  • IMG_2305.JPG
    IMG_2305.JPG
    137.7 KB · Views: 57
  • IMG_2314.JPG
    IMG_2314.JPG
    118.6 KB · Views: 47
  • IMG_2316.JPG
    IMG_2316.JPG
    141.2 KB · Views: 40
  • IMG_2322.JPG
    IMG_2322.JPG
    155.1 KB · Views: 41
  • IMG_2323.JPG
    IMG_2323.JPG
    99.4 KB · Views: 54
Last edited:
...well NO actually, that wasn't all :)

After James had left, I clambered under the front (couldn't be bothered taking a wheel off) and as testament to the accessibility, I had the alternator off in a few minutes. Only two short bolts hold the alternator onto a FIRE, but they have 16mm heads.

To get the pulley nut off, you have to hold the shaft with a 6mm Allen key (picture) - ideally an Allen-key-1/2"-socket as I have from a set given to me by James. Then you use a 19mm ring spanner to undo the nut (a few big hits from a mallet, of course). DON'T bother to try holding the fan with screwdrivers etc. I did that, distorted the blades, and the fan just spins (stiffly) on the shaft.

Why is the alternator coming apart, you may ask? The brushes turned out to be OK (it was sensible to inspect them before a flat battery resulted) but the bearings were (and are) absolutely knackered. The front bearing is devoid of grease and roars with gusto, and the back bearing grumbled quietly.

Both put up a huge fight for removal and this was easily more than an hour. I often think it would be nice to have a hydraulic press, but that is only half the story - you still need a way to accomodate the rotor and get something in behind the bearing both sides. The front casing was easily supported on axle stands so a mallet, applied to the nut on the shaft, did the job. (picture) A bolted plate holds the bearing into the front casing. Easy.

But the rear bearing... what do you do... there's minimal clearance behind it. I tried strips of steel resting on the axle stands, etc. but everything would fly apart when the mallet touched it. I still haven't found the bolt I was using as a drift.

Possible Solution One was to clamp the armature in a vice and use a slide hammer (with hooked end) on alternate sides. (picture) That had no effect, of course.

Possible Solution Two was some kind of puller - unfortunately it was in two-legged form (picture) with the centre bolt bent, and the extra leg+links were nowhere to be found (that sums up much of the day - spent looking for things in the tidy garage/cluttered shelves.) No effect.

Actual Solution was the balljoint extractor, with a bolt as a distance piece. As I had done for the other attempts, I used a butane torch to try and expand the inner race of the bearing (but in reality, I burned off what grease was left and then held a sparkler for a while as I wondered why the torch was turned off yet still burning strongly). I found that the slip rings tapped down the shaft just enough to fit the balljoint extractor into place. Width and depth was perfect for the job.

Bearings now removed (picture) - with exploded view of alternator and blood blister from the slip-joint pliers...

Tomorrow I shall buy some replacements - cheap - and install them hopefully before James sees the alternator in bits, as I don't think he wanted me to do this job... but I didn't like the growling/rumbling noise of the alternator before... :)

Isn't it interesting that the brushes have outlived the bearings... SKF bearings made in Italy are, in my opinion, some of the worst ball bearings available (closely followed by SKF made in France). I reckon the Japanese make the best ball bearings...

-Alex
 

Attachments

  • IMG_2334.JPG
    IMG_2334.JPG
    83.2 KB · Views: 42
  • IMG_2331.JPG
    IMG_2331.JPG
    84.6 KB · Views: 38
  • IMG_2330.JPG
    IMG_2330.JPG
    97.9 KB · Views: 42
  • IMG_2328.JPG
    IMG_2328.JPG
    111 KB · Views: 40
  • IMG_2327.JPG
    IMG_2327.JPG
    125.6 KB · Views: 45
  • IMG_2335.JPG
    IMG_2335.JPG
    91.5 KB · Views: 248
  • IMG_2336.JPG
    IMG_2336.JPG
    112.3 KB · Views: 43
Last edited:
Here's a glimpse of the weather here: http://www.metservice.co.nz/default/index.php?alias=hamilton

It might seem a bit odd to begin with something the English make a habit of talking about when they don't want to talk about something else... but come on, minus 4 degrees? :eek: Is it EVER that cold here? What is going on? Even my heat pump in the living room mysteriously shut down with a flashing red light - but I reckon it's simply because it's too bloody cold :rolleyes: I went out with a torch to look at the outside unit - ice in the fins, but the leaves/cobwebs probably aren't helping :eek: Never happened in ten years though, so 'global cooling' is starting to bite here. Or was it 'global warming'...

Today I spent about five hours sanding, filling, and sanding the front wings of the Uno. plus a few other problem-areas on the sills etc. I'll spare you the pictures this time, as there'll be better pics after tomorrow. The primer did not go well. Fish-eyes appeared straight away.

OK, in case you haven't seen fish-eyes before (I hadn't, they're not on the fingers or fillets) I shall go and find the camera.

The cause is that the wax-and-grease remover clearly doesn't. It smells like turps (and, probably IS mineral turpentine) and as of tomorrow, it won't be trusted for degreasing around here. As an emergency workaround I found that Brakleen (a CRC aerosol brake cleaner) works well, so I'm off to buy some 'Fuelite' tomorrow. This doesn't exist by that name in the UK or the USA (not that we have any Americans reading this), so exactly how you buy your n-hexane is a mystery to me. Here, it's sold as a clean-burning fuel for lamps. It smells just like brake cleaner.

I seem to have got away with fewer fish-eyes - silicone/oil contamination - in the past. I think the new cause is the D/A sander - that air-powered marvel that saves so much time - it needs oil and probably blows this onto the surface it's sanding. It hasn't been oiled for a few days now. I did try using an in-line tool oiler but that was a disaster - the oil disappeared within seconds - the airflow is too great. So instead I've dripped oil into the inlet before starting it up (but forgot this for the last few uses). It seems like a risk not to oil it, since the turbine spins at a million RPM thanks to the compressor's rather lax regulator.

Anyway, because I spent so long filling and sanding, I didn't get my bearings (see previous post), but I did get a Tipo to fix. The white DGT is in pretty good condition, no dents and a tolerable interior (smells like a sweaty shoe, but seats and carpet are still there). My job is to polish the paintwork, fix some strange electrical faults (fog lights/high beam come on together), install a working stereo, and clean the windows. I should have it done by the weekend.

Tomorrow morning is going to start EARLY. I shall warm up with a silicone-free polish of the roof edges (where the new paint has to blend - I have to get the orange/brown off first), then James shows up, and we shall wet-sand the whole shell (minus the doors, bonnet, and ignoring the roof) with warm soapy water. The 'warm' part will be essential. From about mid-day the sun will be shining on us, and with the aid of some compressed air, the shell should be dry and ready by 2-3PM for the top coats...

...which will have to go on the whole shell at once, and perfect.
I'm secretly worried about it :eek: So far, everything I've sprayed with my new gun has turned to RUNS. Maybe the Devilbiss GTi spray gun delivers a lot more paint than I am used to. But I think it's a variety of problems:

- Paint mixing. Hit and miss... As antsuno2 said, I really need a separate mixing cup. Trying to mix the primer and hardener in a 1:3 ratio is pure guesswork with a tapered paint cup. Adding in a slosh of thinners 'for luck' probably hasn't helped my cause. SOLUTION: tomorrow I shall buy a graduated paint mixing cup in a suitably easy-clean material.

- Paint volume. I think I've tended to turn the fan size up and down at will. I now get the impression that this isn't a good idea. SOLUTION: The paint volume needs to be reduced (lower screw turned 'in' to reduce trigger travel) when the fan is smaller. Or maybe I should just turn the fan size (top knob) up to 11 and run with it (quite literally - but no, there aren't any numbers).

- Air pressure. I discovered a few weeks ago that very little air pressure was needed with this wonderful new Trans-Tech system. But actually, it tends to spray too thickly when the pressure is low. I suspect that things will be smoother if I turn the pressure up a bit. Say, 25psi or maybe even 30, rather than the 20 I've been using. The problem with this is that the overspray will increase. Oh well.

I wonder if painting works properly when the temperature is only, say, 10 degrees. I doubt that the FIAT factory was that cold?

Of course by this time tomorrow, I'll be reporting on a total success and my confidence will be restored (in time for the four doors and a bonnet that are waiting to be sprayed...)

-Alex
 

Attachments

  • IMG_2348.JPG
    IMG_2348.JPG
    85.1 KB · Views: 41
  • IMG_2345.JPG
    IMG_2345.JPG
    60.4 KB · Views: 40
  • IMG_2346.JPG
    IMG_2346.JPG
    58.5 KB · Views: 37
Last edited:
... it's now "this time tomorrow" ;)

An icy start - first pic shows a bucket of water.

James did all the wet-sanding and we hosed-out the floor. We used IPA (Isopropyl alcohol) as a degreaser, which worked a little better than the 'wax and grease remover', but still not perfectly - there are some paint craters, only on the big panels, of course :rolleyes:

It didn't go too badly - I have some runs to sand out and polish (I hope!)

-Alex
 

Attachments

  • IMG_2364.JPG
    IMG_2364.JPG
    133.1 KB · Views: 55
  • IMG_2361.JPG
    IMG_2361.JPG
    123.4 KB · Views: 43
  • IMG_2358.JPG
    IMG_2358.JPG
    159.8 KB · Views: 49
  • IMG_2354.JPG
    IMG_2354.JPG
    114.4 KB · Views: 43
  • IMG_2352.JPG
    IMG_2352.JPG
    111.6 KB · Views: 42
  • IMG_2372.JPG
    IMG_2372.JPG
    135.3 KB · Views: 45
  • IMG_2371.JPG
    IMG_2371.JPG
    102.8 KB · Views: 51
  • IMG_2369.JPG
    IMG_2369.JPG
    128.7 KB · Views: 54
  • IMG_2366.JPG
    IMG_2366.JPG
    110 KB · Views: 58
  • IMG_2367.JPG
    IMG_2367.JPG
    111.3 KB · Views: 52
Last edited:
Hi alex!! looks like you paint is too thin, what 2k is it m/s or h/s, (medium or high solid), looks a lil cold as well, what hardner are you using, loads to choose from depending on the situation, in a non booth enviroment i use a rapid hardner, usualy an air dry 2k, and do you use a product called paint rocket, (says on the lable puts money in your pocket, it dries that quick) its an accelerator, only one capful required, stops snotters in its tracks, when mixing the paint in your cup (with mixing stick) leave a few mins to let it activate before spraying on, and leave 5-10 mins flash off inbetween coats, then the mixture scew is paramount, i wind it in all the way, then out 6 complete turns, + just under 2 bar ( it makes a special sound like mig welding when you get it just right) and final drop coat i add a lil more thinners and wind mixture srew in an extra 1.5 turns, every painter has a different style most paint from top to bottom but i'm the opposite, its the way i was taught, this is my second attempt at this post as last one flicked off, so hope i aint missed anything, texed in work today sick of getting all the crap work, currently doing a 7hr quarter panel on a volvo s80 thats made from boron steel, which cant be drilled off as blunts the drillbit after 3 welds removed, and a transit van roof, and numerous panels i'm making from filler, whooo!!! few pics from work! Ant!
 

Attachments

  • Anthony turners pics 063.jpg
    Anthony turners pics 063.jpg
    585.6 KB · Views: 48
  • Anthony turners pics 129.jpg
    Anthony turners pics 129.jpg
    717.2 KB · Views: 46
  • Anthony turners pics 156.jpg
    Anthony turners pics 156.jpg
    147.1 KB · Views: 63
  • Anthony turners pics 226.jpg
    Anthony turners pics 226.jpg
    783.1 KB · Views: 41
  • Anthony turners pics 237.jpg
    Anthony turners pics 237.jpg
    724.9 KB · Views: 49
Many thanks for the reply, Ants :)

As you may have noticed, I now have a mixing cup (I use the suction cup of my old spraygun ;)) and a mixing stick that shows correct ratio of paint/hardener/10% thinners.

I looked up the paint information at http://www.debeerlakfabrieken.com/ti/en/TI400GB.pdf and it says 47%-51% solids - I wonder if that is 'high' or 'medium'?

The hardener is a fast type - the shop hadn't heard of the accelerator that you mentioned - I imagine it affects the flow-out ability of the paint? Sounds like a good idea though if the thickness/smoothness is spot-on (mine isn't :eek:)

Due to the time it took to get around the whole shell, I lost track of whether the 10 minute flash-off time had elapsed - big mistake. The bonnet and doors are going to get painted individually so that the timing is right. I know it makes a big difference - thanks for the reminder.

My 'style' is usually a thin coat followed by a heavy second coat 15 minutes later, ideally after tacking-off contaminants, and then I spend the next 10 minutes picking bugs out of the paint with tweezers etc. which is why I like to close the garage door and walk away while the paint flows out. This technique should work well for the individual panels. Time of the day is crucial. I could see that the paint wasn't going on as thinly as the temperature dropped late-afternoon.

I really can't cope with more than two coats - three at the most - due to the contamination. (Luckily I see that the paint data sheet says 1.5-2 coats!)

Also I seem to get orange peel mostly on vertical panels - the horizontal parts look lovely - which means I've probably applied too much paint. I'm going to try and buff-out the orange peel in some parts. Buffing by hand never seemed to work with this paint in the past - stays dull.

I think most of the runs were caused by ad-hoc attempts to lay on a lot of paint after the fisheye problems and in one case where I accidentally dragged a bit of cardboard - used to mask the wheel - across the paint after the second coat. Straight through to the primer - ever noticed that?! You'd have thought the first coat would have had PLENTY of time to set, but no...

I've bought some better panel degreaser now - it's PPG branded and very expensive. Actually I discovered a new paint shop today that does PPG, Glasurit, and all sorts of famous brands. I bought a polisher - a giant thing with a variable-speed motor and 1100W of power, with a selection of wool and foam mops (and Velcro backing pad). Cost as much as the whole Uno is worth (and five times what we paid)... hope it will bring up a nice shine on the new 2K paint that hand buffing does not.

I plan to attempt a wet-sand with 1000, then 2000 grit tomorrow - if there's enough paint left, I'll try and polish it, but if not then I'll respray just the front wings. I'm surprised by how much paint is getting used, but I think it's all the edges I painted (+ inside the back). I've used about half a litre so far (of unmixed paint). Provided the bonnet and doors go well (two coats each), I think it will be OK.

Meanwhile, your workshop looks wonderful - well-lit and spacious. And - TWO TVRs... :slayer:

As for the panel work... for the first pic (Volvo?) I can think of easier ways to get to the rear speaker :D and for the second pic, were you trying to get into the secret smuggling compartment above the windscreen?

Seriously, what a job - you do things properly there, whole panel replacements... I expect you have to braze as well as weld, on modern vehicles like those, and as for making panels from filler - well, I'm making an Uno door bottom. What are you making? ;)

Cheers,
-Alex
 
Last edited:
Back
Top