
Introduction
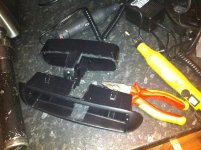
Well.... Its time to get around Todgers and collect the drive shafts i left there in storage...
These very shafts are from my original c20xe redtop seicento from back in 2009.... The car sold and was later crashed by the new owner... I bought it back (all in the back of a van) and intended to make a mk2 that never happened......
After some time and a few conversions in between I've never been able to throw the conversion shafts away... And have found myself researching ways around the problems i had with the mk1 2.0 16v incase i was to make an improved version haha!!
With the original project i had the help of one armed spastics.... this time im going it alone... or with the aid of a good mate on here...
I had gear selector issues... (think i was on mk6 by the time i had sold it).. However after a chat to the guys down at retro-power they have came up with a direct gear change solution which should rule out a lot of space and gear problems....
The cooling on the last one, to say the least was complex... It was like a scrap mans paradise, and the car looked as if it was sponsored by British gas heating engineers... Partly because it was all made by one, using their copper haha!! This time around i shouldn't need any of that, as a single rad in the front should be all it needs.
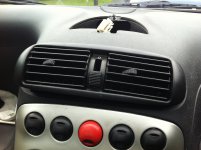
The missing heater on the mk1 was also a problem, mainly due to steaming windows and not having the correct type of heat inside the car... This will still be a prob with the new conversion, however im looking to cut and shut a heater to make enough room to be able to keep it.
The welding was untidy on the mk1... to be fair it held up in a nasty accident, however the welding has improved to say the least over the last few years...
Currently ive got a few bits of an xe together, however i have been modding them a fair bit to convert it to a turbo set up... If im building another, i might as well improve on the original design!!!
This im afraid WILL happen, but it wont be a 6 week bodge like the last one.. Mainly due to buying a house with the Mrs and getting the keys hopefully in a few days... Due to my self employed business im stuck rewiring, replumbing, fitting a kitchen, bathroom and heated flooring etc... all the boring house things to keep her happy...
The house to be gutted and rebuilt from scratch is planned to take me around 8-12 weeks part time, and around this il be gathering bits and bobs for the turbo vauxsei....
I know there are some huge power cinqs/seis around now, some usable on the road, and others not so... but this ones being built up for a daily driver and not a race or show toy...
These are a few of the cars that have kept me busy since the sei...
MK1 Fiesta Zetec 2.0 Blacktop on bike carbs (with the help of todger... who loved every min lol)
Mk2 Fiesta Zetec Turbo Conversion
The c20xe Turbo (which im basing the sei conversion on)
So far.... ive sorted the following...
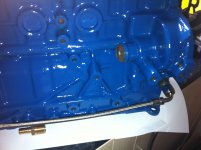
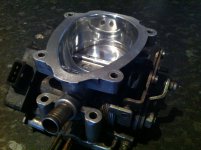
C20XE Engine Block...
This has been rebored & honed by Nuneaton Rebores to 87mm with chamfered tops for easy ring fitment. The block has had brand new coreplugs fitted, front turbo oil return fitted, and a genuine vauxhall let rear oil feed. Can be turned into a NA again with the front blocked off and the rear feed removed. The block is currently painted in blue hammerite, the bores have been coated in Graphogen and the block wrapped in cling film to keep the dust off (stored indoors - heated).
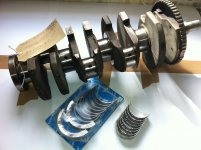
The crank...
This has been tested by nuneaton rebores and is within tolerances balance wise. The crank has been re-ground to a 0.25 oversize on the big ends and mains. I have also got the brand new oversize bearings for this crank. Its a strong XE one. This has also been covered in Graphogen on the bearing face of the crank & wrapped. Stored again indoors....
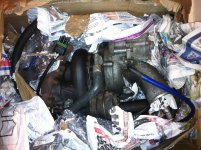
The Turbo...
This is a let turbo, with wastegate, manifold & actuator along with lamba sensor
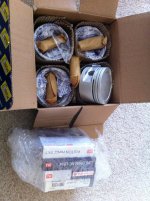
Pistons...
Brand new 87mm pistons (oem early piston quality) with brand new rings, Pins and circlips. These are NA pistons obviously and the rings have been fitted to the pistons as Nuneaton rebores wanted to gap the rings and make sure the bore work was perfect.
And a load of other fancy bits & bobs!!!
These very shafts are from my original c20xe redtop seicento from back in 2009.... The car sold and was later crashed by the new owner... I bought it back (all in the back of a van) and intended to make a mk2 that never happened......
After some time and a few conversions in between I've never been able to throw the conversion shafts away... And have found myself researching ways around the problems i had with the mk1 2.0 16v incase i was to make an improved version haha!!
With the original project i had the help of one armed spastics.... this time im going it alone... or with the aid of a good mate on here...
I had gear selector issues... (think i was on mk6 by the time i had sold it).. However after a chat to the guys down at retro-power they have came up with a direct gear change solution which should rule out a lot of space and gear problems....
The cooling on the last one, to say the least was complex... It was like a scrap mans paradise, and the car looked as if it was sponsored by British gas heating engineers... Partly because it was all made by one, using their copper haha!! This time around i shouldn't need any of that, as a single rad in the front should be all it needs.
The missing heater on the mk1 was also a problem, mainly due to steaming windows and not having the correct type of heat inside the car... This will still be a prob with the new conversion, however im looking to cut and shut a heater to make enough room to be able to keep it.
The welding was untidy on the mk1... to be fair it held up in a nasty accident, however the welding has improved to say the least over the last few years...
Currently ive got a few bits of an xe together, however i have been modding them a fair bit to convert it to a turbo set up... If im building another, i might as well improve on the original design!!!
This im afraid WILL happen, but it wont be a 6 week bodge like the last one.. Mainly due to buying a house with the Mrs and getting the keys hopefully in a few days... Due to my self employed business im stuck rewiring, replumbing, fitting a kitchen, bathroom and heated flooring etc... all the boring house things to keep her happy...
The house to be gutted and rebuilt from scratch is planned to take me around 8-12 weeks part time, and around this il be gathering bits and bobs for the turbo vauxsei....
I know there are some huge power cinqs/seis around now, some usable on the road, and others not so... but this ones being built up for a daily driver and not a race or show toy...
These are a few of the cars that have kept me busy since the sei...
MK1 Fiesta Zetec 2.0 Blacktop on bike carbs (with the help of todger... who loved every min lol)
Mk2 Fiesta Zetec Turbo Conversion
The c20xe Turbo (which im basing the sei conversion on)
So far.... ive sorted the following...
C20XE Engine Block...
This has been rebored & honed by Nuneaton Rebores to 87mm with chamfered tops for easy ring fitment. The block has had brand new coreplugs fitted, front turbo oil return fitted, and a genuine vauxhall let rear oil feed. Can be turned into a NA again with the front blocked off and the rear feed removed. The block is currently painted in blue hammerite, the bores have been coated in Graphogen and the block wrapped in cling film to keep the dust off (stored indoors - heated).
The crank...
This has been tested by nuneaton rebores and is within tolerances balance wise. The crank has been re-ground to a 0.25 oversize on the big ends and mains. I have also got the brand new oversize bearings for this crank. Its a strong XE one. This has also been covered in Graphogen on the bearing face of the crank & wrapped. Stored again indoors....
The Turbo...
This is a let turbo, with wastegate, manifold & actuator along with lamba sensor
Pistons...
Brand new 87mm pistons (oem early piston quality) with brand new rings, Pins and circlips. These are NA pistons obviously and the rings have been fitted to the pistons as Nuneaton rebores wanted to gap the rings and make sure the bore work was perfect.
And a load of other fancy bits & bobs!!!


![IMG_5698[1].JPG](https://cdn.fiatforum.com/data/attachments/122/122029-452e46544214661637b7c0f7634412aa.jpg)
![IMG_5699[1].JPG](https://cdn.fiatforum.com/data/attachments/122/122056-e71e0dfb134c3198253cb7f90799a589.jpg)