Technical Valve stem seals replacement

Currently reading:
Technical Valve stem seals replacement

Mike1alike

Established member
Joined
Aug 3, 2017
Messages
773
Points
236
Location
Timisoara
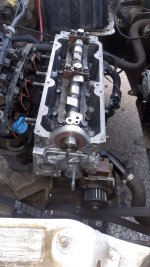
I've decided to replace the stem valve seals on my Punto 1.2 8V, as there are signs that I need to do this.
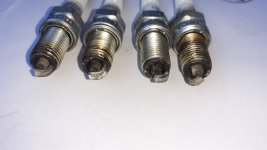
The engine runs well, but consumes a lot of oil, about 1.5 l in 1.000 kms and there are traces of oil in the combustion chambers, especially on the plugs as those are the parts I could see. There was oil on the plugs threads, so obviously oil gets inside the combustion chambers, kind of the same on all cylinders.
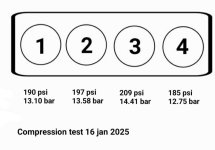
Compression test showed this:
1. 13.10 bar
2. 13.58 bar
3. 14.41 bar
4. 12.75 bar
Those are very good readings, meaning the piston rings are ok, I was dreaded the idea that them might need replacement. The car has over 250k km on the clock (~155k miles). The test was done with just one reading, without ingecting oil into chambers (wet testing) as those numbers told me the rings are good so the oil obviously comes through the stem valves. So I thought there's no need to add more oil. Also, the engine was not on working temperature while testing, but I've started it before not to be cold. It was warm-ish.
It's the first CH work I will do myself, so I welcome any good advice.
Last time I had the CH rebuild (took it to a specialist) was in 2018 and after that the oil was not on good levels, but I had to discover later on that the oil was leaking through the camshaft seal. By the time I'd replace that seal I think the stem seals started to leak, probably oil leaking contributed to early worn-out of stem seals. By the way, do you have any idea of what is the lifespan of stem seals?
That time the specialist did not put a new seal, used the old one and I think that he even put the seal in place with the bracket off and then put the bracket on and tighten the screws. I don't think that that is the correct way to put that seal on. I think the proper way is to place the brackets, tighten the bolts and then place the seal from the ouside in, like any other seal. This is the way I'm gonna do it.
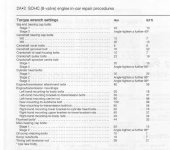
My first question is about the torque wrench settings, as Fiat has these silly recommendations with angle-tightening that I'm not gonna use. I'll just use the torque wrench and the cylinder head bolts I'm gonna tighten as I remember the mechanic did on my Punto in 2018, in these 4 steps:
1. 20Nm
2. 30 Nm
3. 70 Nm
4. 90 Nm
Do you agree with those numbers and do you have the numbers for the rest of bolts where Fiat recomands angle-tightening? I'm putting the recommendations from the Haynes manual and pics with how things are and what I'mdoing.
I will add pictures and details as I go along.
 
Model
Punto mk2 1.2 8V
Year
2005
Mileage
154999

Attachments

  • Torque wrench settings.jpg
    Torque wrench settings.jpg
    421.5 KB · Views: 49
  • 20250116_135818.jpg
    20250116_135818.jpg
    2.6 MB · Views: 23
  • Compression test 16 jan 2025.jpg
    Compression test 16 jan 2025.jpg
    46.2 KB · Views: 24
Everything wrong mate, slow down.
1. You have uneven compression (not too crazy, but there is a difference > 10%).
First thing you should do is a "piston soak" method, to free the piston rings (they are probably stuck on cylinder 4, maybe 1 and 2 also a bit).

2. Valve stem seals can be replaced without removing the engine head. You just drop the timing belt and remove the camshaft.
I did this in my Punto_1 (1,1 8V) and Grande_Punto (1,4 8V). No ropes in cylinders needed. Just put the piston up (so valve will not fall down).
Note that the engine may have other wear, like valve guides (so new seals will not live long, when valve stems rattle/wiggle around).

3. Your mechanic is a fool. "Torque + angle" is way more accurate than just torque (it is very sensitive to the thread condition, clean, dirty, dry, lubricated, if the turn is continuous or multiple steps). Turning a bolt with specific angle translates directly to the clamping force (torque alone is not that predictable).

Used M9 bolt will pop in the 80-90 Nm range if you properly lubricate it (thread and under the bolt head). It will survive with dry head, but you will fight the friction and not progressing in terms of clamping force (so it's pointless - goal is to install the head correctly, not to protect/save the old bolts).

as Fiat has these silly recommendations with angle-tightening that I'm not gonna use
Those angle gages/indicators are cheap (brand new head bolts too). Who's silly here?

Cheap_angle_indicator.png
 
Last edited:
I've already bought new bolts. Will look for an angle indicator. Thank you.
As for "piston soak", what solution shall I use?
 
I said "silly" because I find it more inconvenient to have to use the angle indicator than use the torque wrench. You have to "hook" that in a steady point for it to indicate the correct angle you're tightening, don't you? And also, I'm wondering, do you know, after 2x90⁰ tightening how much torque is there, more or less than 90 Nm?
 
3. Your mechanic is a fool.
No, he isn't. He did a good job. He tightened them in one movement and it was all good. And that time he used the old bolts. Can you explain me why is the angle method better than torque wrench? I don't like the angled one, I'm for the torque one. If you lubricate the bolts and tighten them all the same way, there will be no difference in clamping force. And I really don't like that there isn't at least an estimate of the resulted torque after angle-tightening. I'm thinking it shouldn't get over the recommended torque, should it? I don't think you can elongate the bolts by tightening them (nor do I want to try), they get elongated in time and that is because some tensions are not quite balanced. I don't think it's a good job when bolts get elongated, I think you can get good balance without overdoing things.
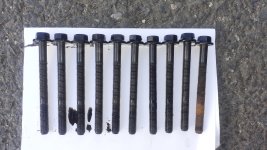
I took the CH down, will take a picture of the bolts to check their state. They might be the original ones, I don't know if there was any work done to the CH before I bought the car (I think not) and I did that one time.
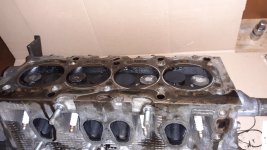
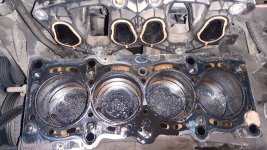
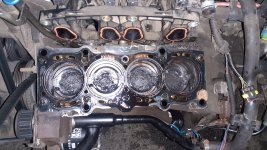
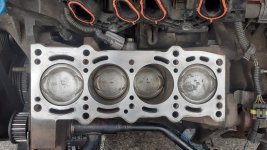
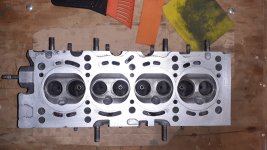
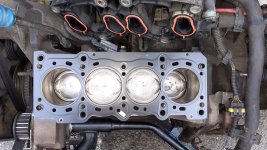
Here is how it looks. Lots of oil inside the combustion chambers.
About the oil that shows I saw people saying that that is the prove of gasket failure, but I say it isn't. I say that is the oil line that goes from the filter up to the cover and that oil dripped when I took the CH down.
The right-hand down side bolt had that yellowish thing that shows in the pictures, looked like that foam that appears on the aluminum parts on cold temperatures and high humidity. I don't know how it got there, is that bolt in touch with the cooling system or so?
 

Attachments

  • 20250125_200917.jpg
    20250125_200917.jpg
    2.6 MB · Views: 22
  • 20250125_181351.jpg
    20250125_181351.jpg
    4.2 MB · Views: 23
  • 20250125_181345.jpg
    20250125_181345.jpg
    3.7 MB · Views: 28
  • 20250125_181336.jpg
    20250125_181336.jpg
    3.5 MB · Views: 28
These are the old bolts.
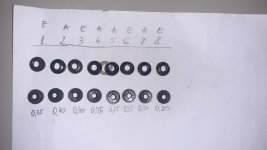
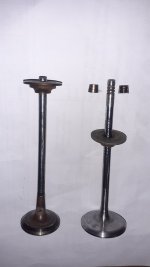
And the seals on the top, I've put the new ones under them, for comparison. Down I've written the shim clearances, they need a bit of adjustment which so far turns out to be a problem as I need 4 new shims, 2x2.25 mm and 2x2.30 mm. The suppliers say there aren't such products for Fiat, their shims are between 3.85 - 4.60 mm which is such a nonesens and is totally not the first time I get this answer from the suppliers, "This product doesn't exist". I managed to find the codes for them made by Metelli
METELLI 03-0-31225 (2.25 mm)
METELLI 03-0-31230 (2.30 mm)
The problem is they are out of stock and cannot take my order to get them. Anyways, should manage to find them.
I took the gasket off the engine block, too and it is looking good. Not so much dirt, I will clean it nice. I did spray some brake cleaner on top of the pistons and rotated the crankshaft, it moves with ease. If there was carbon on the rings, might have got it off. The spray helped remove a lot of that oily carbon on the pistons, they are not just yet clean, but I will get there.
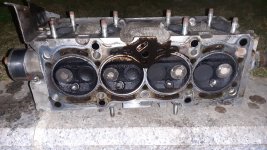
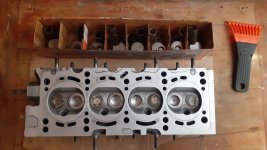
I had the CH soaked in diesel, the valves too. Them too are way cleaner, but not there yet. What do you reckon, would it help to try cleaning them with brake fluid? Or do you know any othe good stuff to proper clean them?
 

Attachments

  • 20250129_152328.jpg
    20250129_152328.jpg
    2.9 MB · Views: 29
  • 20250129_174627.jpg
    20250129_174627.jpg
    2.4 MB · Views: 20
  • Fiat Punto 1.2 8V Tehnical Data - From 06-2003.jpg
    Fiat Punto 1.2 8V Tehnical Data - From 06-2003.jpg
    144.7 KB · Views: 28
  • 20250127_145208.jpg
    20250127_145208.jpg
    2.4 MB · Views: 28
And I forgot to mention, the valve guides are in tip top condition, which is very good.
 
@GrandePunto PL, you convinced me, mate. I bought myself an angle indicator and I will use it to tighten the bolts as recommended.
I thought about it and I was trying to avoid using the angle gauge due to the practical aspect of things. Yes, theoretically the gauge is more precise than the torque wrench. But practically you need to apply pretty big force in tightening the CH bolts and my opinion is that the best way to do it is in one movement, a swift turn. So I was being worried that is no an easy job to do that and to stop bang on to the 90⁰ or how many degrees are required for other bolts. In that way the torque wrench is more practical because it just clicks when you hit the set torque. But of course, using torque is not so precise, friction force being involved and more variables.
So thank you for the advice, I wil do it just as Fiat recommends.
 
Polish forum again: https://fiatpunto.com.pl/post861504.html#p861504
Amateur testing (torturing) of the old M9 head bolts. Result: almost textbook stress-strain curves/graphs.
Basic (fundamental) science like that can be replicated/confirmed at home. Angle is more reliable than torque.

Torque values, charts, tables are OK if they specify the thread (and bolt head or nut + washer) condition (clean, dirty, rust, oil/grease).
If not, the author is clueless and/or there is a dangerous assumption, that "everyone knows" what the thread should be (new, clean etc.).
Some of this is common sense and experience: like wheel bolts - they should be dry (lubricated or "just" painted will get loose).
 
Last edited:
I was going to pitch in and say I would go with the torque angle rather than using a torque wrench. I am glad to see you have now opted to do this.

I would suggest that if all you were planning to do were replace the valve stem oil seals then I would not have lifted the head. Would have been far better to just leave the head in place and not disturb the head gasket if you didn't need to, but it seems that ship has sailed especially if not replacing the valve guides or doing anything else to the valves themselves.

when putting the head back on make sure there is no dirt or debris in the holes that the cylinder head bolts go into, make sure everything is meticulously clean, if you have one you could even chase the threads with a tap just to make sure nothing is going to snag or slow the bolts as you drive them in and make sure to follow the tightening pattern.
 
It's ok to put a new gasket on, too. The one I had is about 7 years old, not so many miles on and it would have carried on. And as you say, I could have replaced the valve stem seals without lifting the head. But I wanted to do this job and I'm enjoying doing it, it's the first time I do this. First I thought that I need to replace the piston rings too and it's very good that the compression test showed I don't need to. And I wanted to see what's going on inside the engine and I think I got to find out. I posted about it here, the oil channel on top was clogged. Again, I could have done that too, without lifting the head, but as you said, that ship has sailed and I'm enjoying the ride. That over heating and improper lubricated camshaft is bad and contributed to prematurely damage of the seals. That exces oil spilled on top instead of getting where it shoud, on the camshaft contact points with the head, got carried inside the inlet manifold and combustion chambers. The oil got prematurely burned, in contact with over heated camshaft and head. Hope it will run much better now.
It's good that valves and guides are in good shape and that I could see that. What I need to do is adjusting the shim clearances and this turns out to be a bitch of a problem so far. One shim was good in its place, I can swap around other 3, but I need 4 new ones. And I cannot find them at the right size. I need the 2.00, 2.05, 2.20, 2.50 mm and all I can find are 3.xx and 4.xx mm. They say the Fiat does not provide product codes for these sizes. I found them made by Freccia, but all the stores I tried so far told me they are out of stock and their suppliers are the same. Do you know the Fiat codes for these 2.xx shims? They surely must exist, I understand that these are used on the models made since 2004 on.

Yes, having the bolts holes properly cleaned is something I am concerned with and I know I have to do it right. I don't have a M9x1.25 tap to chase the threads, hope to find one. So far I sprayed WD40 and dirt came out of them all, some more than others. I will probably use gas too, push it in with a syringe and afterwards blow the holes with a compressor.

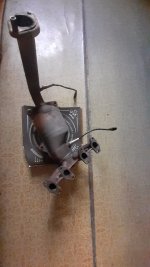
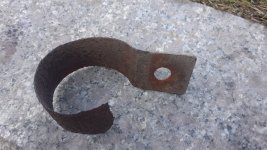
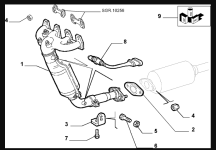
So far I also took the catalytic converter down and washed it inside with heated vinegar, so did a good cleaning. The clamp that holds it in the lower side was terribly rusted and managed to find and get a new one. Got the same answer at shops "Fiat does not give a code for this product" but in the end I managed to find it, it's
Exhaust clamp FA1 124-950 Ø: 51mm
Code OE 51816520.
 

Attachments

  • 20250128_105500.jpg
    20250128_105500.jpg
    479.4 KB · Views: 17
  • 20250127_144735.jpg
    20250127_144735.jpg
    3.3 MB · Views: 21
  • Cat Punto.png
    Cat Punto.png
    103.2 KB · Views: 19
I bought a tap to clean the threads on the engine block and also found the needed shims, ordered them, should have them soon.
Any advice on how to clean the head where is most needed to be clean? I'm not using sand paper so I wouldn't scratch it and so far I soaked it in diesel, also tried with some petrol, break cleaner and WD40. Also did a wash with worm water and detergent and it started to look better but there are still bits of the old gasket. How could I take those off, easy and safe?
 
The plastic scraper didn't really work. Bits of it (of the scraper) would come off, just not the old gasket. So I got to the next level and I used scuff pads and break cleaner. That did the job, I'm satisfied of how it looks. Also cleaned a bit more the stems by putting them in the drill and spinning them against scuff pads and cleaner. Happy about them too. And I also cleaned the engine block and the piston's heads, as well.
I put the new seals on and also got the needed shims and set the clearances right, they are in specs now.
I put the head back on, with the new gasket and new bolts, of course. It went really nice, I did it as recommended, first 30 Nm then 2 more 90⁰ each.
Next to set the timing, put everything back on and start the engine.
 

Attachments

  • 20250213_154501.jpg
    20250213_154501.jpg
    1.3 MB · Views: 19
  • 20250213_145941.jpg
    20250213_145941.jpg
    2.7 MB · Views: 21
  • 20250211_222053.jpg
    20250211_222053.jpg
    974 KB · Views: 16
  • 20250208_155326.jpg
    20250208_155326.jpg
    2.4 MB · Views: 20
  • 20250207_150629.jpg
    20250207_150629.jpg
    2.3 MB · Views: 17
  • 20250207_111019.jpg
    20250207_111019.jpg
    3.1 MB · Views: 19
  • 20250213_141418.jpg
    20250213_141418.jpg
    3.1 MB · Views: 21
Question about the timing:
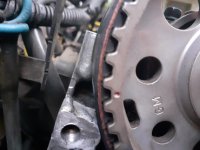
Is this mark on the camshaft pulley the correct setting corresponding to cylinder no.1 top dead center?
IMG-20230825-WA0006.jpg
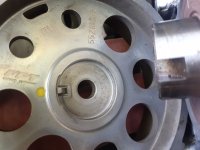
Also, which is the correct way to position the camshaft pulley on the camshaft? The pulley has this spur on the inside, but the space on the shaft is wider than the spur. So it can be positioned for 3 teeth, spur at one end corresponds one tooth, at the other end corresponds the second tooth after the first and spur right in the middle has the tooth between those two. So... which is the correct way to place it? I've placed it in the middle because it was placed like that before, on mine, but is this the correct position in order to get the timing right following the mark on the other side?
20230823_105901.jpg
 
Is this correct pulley for your Punto 2 Face_Lift? Looks like a newer style seen in Grande era cars (1,0 / 1,4 8V non VVT for South America for example).
Quick Google search, camshaft wheels for P2... Tooth is much wider (up to 2x, by "eye balling" it)! Compare ratios from the pictures (tooth size to the hole).
Correct_camshaft_pulley_for_Punto2-FL.jpg


Use EPER and search by VIN number (maybe it will clarify which wheel is correct one for you).
My bet is someone mixed the parts. They all (almost all) look "the same", right?
 
Last edited:
Back
Top