General Trolley jack

Currently reading:
General Trolley jack

about the same as mine

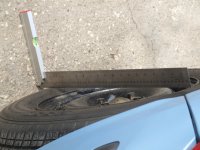
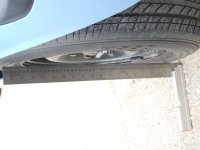
there probably other ways to measure the camber.

I could use an angle measurer if I was bothered but I am no bothered and I might be if it turned out to be a bother. Then I would have to buy and fit a subframe and that's £100+ gone!!
 

Attachments

  • DSCF5165.JPG
    DSCF5165.JPG
    2.2 MB · Views: 26
  • DSCF5167.JPG
    DSCF5167.JPG
    2 MB · Views: 25
Get a "2 x 6" timbers and some 4" (100mm) screws from Wickes. Cut the wood in half and screw the pieces together to make an L shape. You now have an idea "beam" to lift the back axle using a trolley jack under the car's centreline. To make it even easier to use, screw a wood block to each end that will butt against the axle beam inboard of the spring pans.
 
I did this for what it is worth.:eek:

A length of angle-iron (run cross-wise under the car) will give a more accurate camber check. But the real issue is Toe-in or Toe out. For that, you'll need two angle irons longer than the car which you can align parallel and take you four wheel toe measurements from.
 
A length of angle-iron (run cross-wise under the car) will give a more accurate camber check. But the real issue is Toe-in or Toe out. For that, you'll need two angle irons longer than the car which you can align parallel and take you four wheel toe measurements from.

I am not too concerned about the rear wheel geometry I guess.
 
Get a "2 x 6" timbers and some 4" (100mm) screws from Wickes. Cut the wood in half and screw the pieces together to make an L shape. You now have an idea "beam" to lift the back axle using a trolley jack under the car's centreline. To make it even easier to use, screw a wood block to each end that will butt against the axle beam inboard of the spring pans.

I have to confess I am struggling to picture this in my head.:confused:
 
The timber transfers jacking loads to the swing arms so the U channel twist beam is not taking the strain. I tried it with a fence post but there was not enough height for the wood and the jack. 2" thick timber bends too much, hence the two screwed together making a L section (if you can see what I mean).

I did this because jacking the rear end is a always struggle. Jack under the sills (with protective blocks) and you can't get the jack stand under the garage jack points. Jacking under the axle ends tilts the car, risking it falling off an axle stand.
 
I am not too concerned about the rear wheel geometry I guess.
My car was merrily chewing its way through left rear tyres when I got it, due to too much toe-in on that corner.
It would be a good idea to monitor tyre wear on your new set of boots. Pandas have a bit of a reputation for high/uneven tyre wear.
 
Last edited:
The timber transfers jacking loads to the swing arms so the U channel twist beam is not taking the strain. two screwed together making a L section (if you can see what I mean).

Yes I got the idea of simulating the arms of a poster lift but the L shape escaped me until I read this.

It's a nuisance this jacking problem but do you think a fence post would do it if there was clearance for the jack?

I have some low rise plastic car ramps that I bought when I had my Ignis for exactly the problem you state about getting a jack under but it was to get the jack actually under the car!:eek:
If I run the car onto them there could be enough room for a jack and a fence post especially if I use a low profile trolley jack.
Generally I hate driving on to ramps - If I want to use ramps I like to jack the car first and put ramps under second. So this is all a bit back to front!:bang:
 
<br />
My car was merrily chewing its way through left rear tyres when I got it, due to too much toe-in on that corner.<br />
It would be a good idea to monitor tyre wear on your new set of boots. Pandas have a bit of a reputation for high/uneven tyre wear.

Absolutely!
I do not intend this motor to do much in the way of miles per year.

How many miles does it take to do this to a tyre?

Nonetheless it is something I will watch out for in the future thanks.

I am about to fit 185 65 14 tyres and they will outlive the car's life.:eek:
 
How many miles does it take to do this to a tyre?
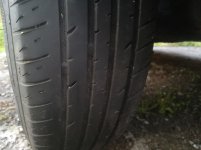
This is my left rear tyre in question showing feathering on the outside trailing edge of the tread after about 6-7,000 miles on the car:
tyre wear.jpg
The tyre itself was less than 2 years old at this point.

It was quite badly worn down on the outside tread by the time I noticed it, only during pre-MoT checks after I'd had the car nearly a year.

Looking back through the file there was a bill for one new tyre every MoT...
 
Last edited:
This is my left rear tyre in question showing feathering on the outside trailing edge of the tread after about 6-7,000 miles on the car:
View attachment 219614
The tyre itself was less than 2 years old at this point.

It was quite badly worn down on the outside tread by the time I noticed it, only during pre-MoT checks after I'd had the car nearly a year.

Looking back through the file there was a bill for one new tyre every MoT...

Strewth that is fairly rapid. Did it need a new rear subframe to correct it?
 
I've tried to correct it with some DIY bodgery by adding shim washers to the hub:)

I got the tracking done afterwards, and it seems to have helped. I'm still monitoring it, but tyre wear appears to be even now.

The steering on mine always pulled to the left. It still does a bit, but not as much, and apparently a lot of them do, so I'm not too bothered about that. I just wanted to avoid having to replace a tyre every year.
 
My 100HP had uneven tyre wear and pulled left. There was no change with power steering fuse removed. Tracking was set and two different 'shops and found to be correct. I fitted shims under both rear wheel hub spindle carriers (one toe out one toe in). That has all but corrected the "pull" but could be put back to factory in less time than it takes to jack up the car.

Changing the axle -
It's said the 100HP has a different axle. I'm not sure that it does. However, braided stainless hoses from caliper to chassis flare nut will solve any hydraulic issues. 600mm braided deletes the two rubber hoses and a length of steel pipe. Braking feels normal if you keep the rubber front hoses.
 
Last edited:
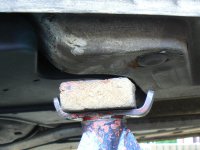
As with all front wheel drive cars, I've always jacked up the front using a block of wood under the lowest point of the bell housing.

I meant to take a pic today but this has been jacked up in that sort of area and some flanges have been mercilessly bent.:bang::bang:
 
As with all front wheel drive cars, I've always jacked up the front using a block of wood under the lowest point of the bell housing.
Sorry Yolanda, I've no doubt you've been successfully doing this for years? but I'd be very VERY nervous about doing this because you are in effect hanging the entire weight of the front of the body on the engine mounts - they were never designed to do this.

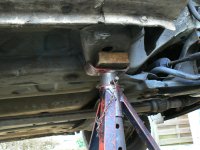
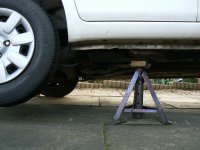
Personally I go for box sections or strong parts of suspension or subframes. On the Panda there is a very convenient box section both front and rear:
P1090044.JPG

P1090049.JPG

P1090050.JPG

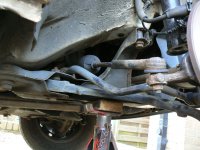
Whilst you can jack up on these safely it then leaves you with the problem of where to put axle stands if you are doing more than just changing a wheel because these points also make excellent places to put the axle stands. You can jack it on the rear axle just behind the chassis mounts where it's very strong and similarly at the front on the subframe where it bolts to the body, like where this axle stand is positioned:
P1090045.JPG

but it can be a bit of a phaf and the jack can slip if you're not careful. It does let you use the box sections for the axle stands though.

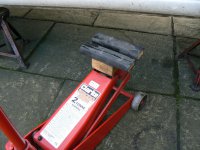
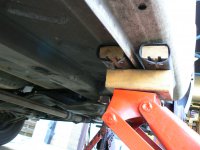
What I like to do is make up a dedicated fitment for my jack which bridges the sill seam and is big enough to spread the load so, unless severely corroded, no damage will be done to the sill:
P1090051.JPG

P1090052.JPG

I've done this for every car I've owned for many years now and never had a problem with jacking them up this way. You can jack the whole side in one go by putting the jack about one third of the way down the side of the car from the front - front being much heavier with the engine etc - and in no time at all you've got the stands in and ready to go to work.

Personally, I'd never even think about jacking up in the centre of a rear axle beam. You might get away with it but if you don't? well, you'd better have deep pockets!

PS It was always a great temptation to jack up the old British Leyland stuff - Mini, 1100, Maxi, etc etc on the bottom of the lovely flat sump but if you did it almost guaranteed the engine mounts would delaminate/separate and oh boy was that guaranteed to upset the foreman!
 
Last edited:
I've done this for every car I've owned for many years now and never had a problem with jacking them up this way. You can jack the whole side in one go by putting the jack about one third of the way down the side of the car from the front - front being much heavier with the engine etc - and in no time at all you've got the stands in and ready to go to work.
I notice you are using a small jack. My trolley jacks have big saddles and with thick rubber pads. Also, I have the split hockey puck as they call them but would never use them unless desperate as I do not like any jacking on any sill. In fact I have a telescopic bottle jack with rubber pads to use under where I place the trolley jack for a simple roadside tyre change.
 
Panda sills flanges are too deep for "universal" rubber pucks. I made a wooden jack pad using the thick plywood/OSB as the base with softwood battens above. Axle stands go under the garage jacking points or subframe mounts.

I always use the tyre change jacking points as jacking else-where under the sill risks damage. The 100HP with its plastic trim has a narrow gap at the jacking points so my support blocks are about 3 inches wide to fit the gap provided. "Ordinary" Panda's could use a longer support pad but it's probably not necessary as the tyre-change jack has a near point load.
 
Last edited:
Back
Top